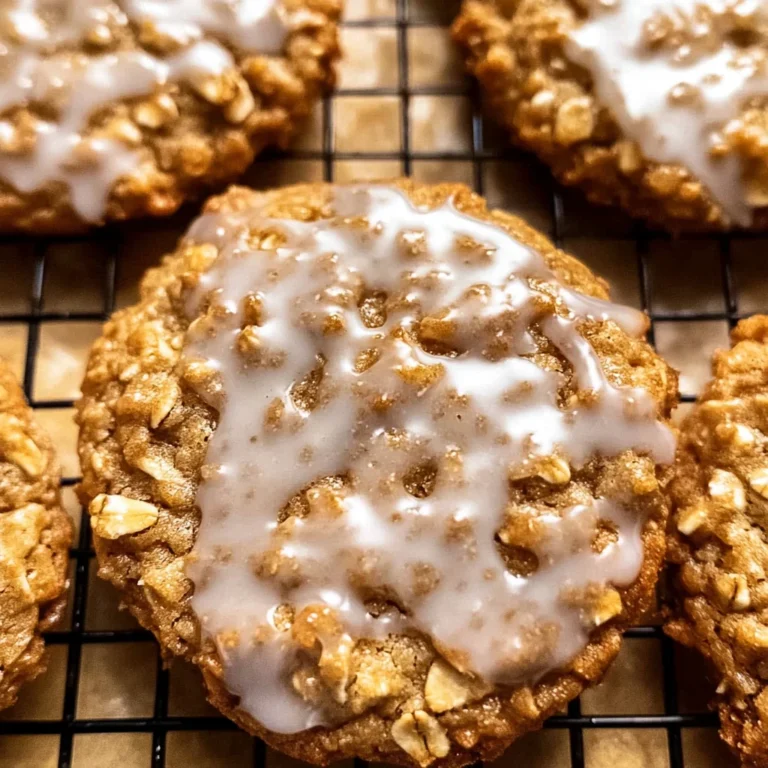
Maple Cookies With Maple Icing
There’s something truly magical about the aroma of freshly baked cookies wafting through the kitchen, isn’t there? It’s like a warm hug on a chilly day, an invitation to gather around with loved ones and indulge in something sweet. Today, I’m thrilled to share my cherished recipe for Maple Cookies with Maple Icing. These cookies are not just any dessert; they’re a symphony of flavors that encapsulate the essence of comfort food. The rich notes of maple syrup dance harmoniously with the warmth of cinnamon, creating a treat that feels like nostalgia wrapped in every bite.
What makes these Maple Cookies so special is their soft, chewy texture that begs you to take another bite. As you dip them in the luscious maple glaze, you’ll find yourself entranced by the glossy sheen and the promise of sweetness it holds. Whether you’re hosting a fall gathering or simply indulging in a cozy night at home, these cookies will elevate any occasion. Trust me when I say that every time I bake these delightful morsels, I’m transported back to my childhood kitchen where laughter and love were as plentiful as the cookie dough!
Maple Cookies With Maple Icing: Sweet Comfort in Every Bite
Let’s embark on this delicious journey together! Making these Maple Cookies with Maple Icing isn’t just about following a recipe; it’s about creating memories and savoring every step along the way. The rich, velvety maple syrup brings a unique depth to these cookies that is utterly intoxicating. You’ll be amazed at how simple ingredients can come together to create such profound satisfaction.
Ingredients:
As we prepare to dive into our baking adventure, it’s essential to understand why each ingredient plays its part in making our Maple Cookies shine. Every element contributes not just flavor but also texture and stability, ensuring your cookies emerge from the oven perfectly soft and chewy.
- ½ cup (1 stick) unsalted butter, softened. This is absolutely paramount for achieving that light and airy texture we crave in our cookies. When butter is softened properly—just soft enough to leave an indentation when pressed—it creams beautifully with sugar to create air pockets that help your cookies rise. If your butter is too cold, it won’t cream effectively; if it’s melted, your cookies may spread too much during baking. Opt for high-quality butter, as it will impart a richer flavor into your treats.
- 1 cup brown sugar. Brown sugar is more than just sweetness; it adds moisture and contributes to that delightful chewiness we love in cookies. The molasses present in brown sugar gives our Maple Cookies a deeper flavor profile while helping them stay soft longer than their granulated counterpart would allow.
- ¼ cup pure maple syrup. This liquid gold is what elevates our cookies from ordinary to extraordinary! The natural sweetness and distinct flavor of maple syrup infuse each bite with warmth and richness that’s truly captivating. Be sure to select pure maple syrup (not imitation), as its complex flavors significantly enhance your baked goods.
- 1 large egg. Eggs are crucial for binding our ingredients together while providing structure and moisture. They act as a leavening agent, helping our cookies rise slightly without becoming dry or crumbly.
- 1 teaspoon vanilla extract. Vanilla extract adds an aromatic sweetness that rounds out all other flavors beautifully—think of it as the secret handshake between ingredients! Always choose pure vanilla extract for its unparalleled flavor over synthetic varieties.
- 2 ½ cups all-purpose flour. Flour provides structure but remember: how you measure matters! For best results, spoon flour into your measuring cup and level it off rather than scooping directly from the bag, which can compact the flour and lead to dense cookies.
- 1 teaspoon baking soda. This leavening agent works wonders by creating tiny gas bubbles when combined with acidic ingredients like brown sugar or maple syrup, resulting in lightness in texture.
- ¼ teaspoon ground cinnamon. Cinnamon adds warmth and spice that beautifully complements the sweetness of maple syrup—this subtle hint will transport you right back to cozy autumn days with every bite!
For our glorious maple glaze:
- 1 ½ cups powdered sugar. This sweet powder dissolves easily into liquids for smooth glazing perfection! It’s important for achieving that silky finish on top of our cookies while providing delightful sweetness without being overly cloying.
- 3 tablespoons pure maple syrup. Just like before, this ingredient pulls double duty: not only does it add flavor but also helps achieve a lovely consistency for our glaze.
- 1-2 tablespoons milk (as needed). Milk can adjust the consistency of your glaze—add slowly until you reach that perfect pourable thickness that allows it to coat without running off completely.
- Roasted chopped pecans or crumbled cooked bacon (for garnish) – These are optional but do consider adding them! The crunch of pecans offers a nutty contrast while crumbled bacon can provide an unexpected savory note that marries wonderfully with sweet flavors!
Equipment You’ll Need:
Having the right tools at your disposal makes this culinary adventure smoother and more enjoyable! While they might not be ingredients, these essential partners will help bring your vision of Maple Cookies With Maple Icing to life!
- Mixing bowls – A good set of mixing bowls allows you to separate wet from dry ingredients easily while giving ample space for stirring without spilling over—a messy kitchen isn’t what we’re aiming for here!
- Electric mixer (stand or hand) – Using an electric mixer speeds up creaming butter and sugar together significantly compared to mixing by hand; plus, it saves those precious arm muscles! This tool ensures uniformity in texture so you can focus on enjoying every moment rather than tiring out halfway through mixing.
- Measuring cups & spoons – Accurate measurements are non-negotiable if we want consistent results! Invest in sturdy measuring tools so you can confidently scale recipes up or down without worrying about mishaps.
- Baking sheets lined with parchment paper – Parchment paper not only prevents sticking but also ensures even cooking across all cookies—no one wants unevenly baked treats! Plus, cleanup becomes an absolute breeze afterward.
Now that we’ve gathered everything we need—the ingredients brimming with promise and tools ready at hand—let’s dive into preparing those delectable Maple Cookies With Maple Icing!
Step 1: Preheat Your Oven & Prepare Your Baking Sheets
First things first! Preheat your oven to 350°F (175°C) because starting off with hot temperatures ensures even baking throughout each batch of wondrous cookies—you don’t want any half-baked surprises later on! Line two baking sheets with parchment paper; this step is crucial as it prevents sticking while allowing easy transfer once they’re cool enough for serving (if they last that long!). Taking care here sets us up perfectly for success right from the beginning—trust me on this one!
Step 2: Cream Together Your Butter & Brown Sugar
In a large bowl, grab your softened butter and brown sugar then mix them together using either an electric mixer or whisk until they become light and fluffy—a sign you’re doing things right! This process, known as creaming, incorporates air into your mixture which will help produce tender yet chewy results in our final cookie shape; don’t rush this step as taking time here pays dividends later on when biting into those delicious morsels filled with flavor!
Step 3: Add Your Liquid Ingredients
It’s time now for some magic as we introduce our liquid ingredients: add in that glorious pure maple syrup along with one large egg and one teaspoon vanilla extract into your creamed mixture from before then blend well until everything combines seamlessly—it should look smooth yet creamy without lumps remaining behind! Each addition brings its own unique flavor character which harmonizes beautifully within our batter; these complexities make every bite worth savoring endlessly!
Step 4: Combine Dry Ingredients
In another bowl (don’t worry—it’ll be worth it!), whisk together all-purpose flour along with baking soda until fully combined before adding ground cinnamon—this aromatic spice complements those sweet notes splendidly while enhancing overall taste profiles immensely once baked through evenly later down this journey ahead! Gradually fold these dry components into wet mixtures using gentle strokes so nothing gets overmixed (which could lead us astray). Watching both textures meld perfectly creates anticipation building toward cookie greatness—we’re almost there!
Stay tuned because there’s still more deliciousness awaiting us ahead as we shape these delightful treats into their final forms before sending them off into warm ovens where dreams transform into reality…
Step 5: Shaping Your Maple Cookie Masterpieces
Now that your dough is perfectly combined and ready, it’s time to transform this delightful mixture into little rounds of joy. Grab a cookie scoop or a tablespoon, and measure out about 1 ½ to 2 tablespoons of dough for each cookie. The size is crucial here – too small, and you’ll have bite-sized morsels; too large, and they might not bake evenly. Roll the dough between your palms until you achieve a smooth ball; this step helps to create even cookies that bake uniformly. Place each ball on the lined baking sheets, giving them about 2 inches of space apart. This spacing is paramount because as the cookies bake, they will expand slightly, and we want them to have room to breathe without merging into one another.
Once you’ve placed all your cookie balls on the baking sheets, it’s time to flatten them gently with the palm of your hand or the bottom of a glass. Aim for about ½ inch in thickness. Flattening is more than just aesthetics; it ensures that these cookies will bake through evenly, preventing any gooey centers while still retaining their soft and chewy texture. Trust me on this – those beautiful golden edges are what we’re after! If you find that the dough sticks to your hands or glass, lightly flouring the surface can make everything much smoother. Remember, patience is key here. Take your time to ensure each cookie is uniform – it makes a world of difference in presentation and cooking consistency!
Step 6: Baking Your Cookies to Golden Perfection
Now comes perhaps my favorite step: the baking! Preheat your oven to a cozy 350°F (175°C) if you haven’t already done so; this is where magic happens! Once preheated, slide those trays into the oven carefully. You’ll want to set a timer for 10-12 minutes but keep an eye on them as they approach that magic number. The cookies should look set around the edges while still soft in the center – almost like they’re giving you a little wink! This moment of baking is critical because if you leave them in too long, they could go from perfectly chewy to dry and crumbly faster than you can say “maple syrup.”
As they bake, your kitchen will fill with an utterly intoxicating warmth that envelops you like a cozy blanket on a chilly day – it’s part of what makes baking at home so profoundly satisfying! When they come out of the oven, resist the urge to dive right in; let them cool on the baking sheets for a few minutes first. This cooling period allows them to firm up just enough so they don’t fall apart when you transfer them to wire racks later. It also gives them that perfect soft center we’re all after! So, be patient and enjoy that sweet aroma wafting through your home.
Step 7: Crafting Your Maple Glaze
While those delicious cookies cool down, let’s whip up our maple glaze – this is where things get exciting! In a mixing bowl, combine 1 ½ cups of powdered sugar with 3 tablespoons of maple syrup. I love using pure maple syrup here because its rich flavor truly elevates this glaze from ordinary to extraordinary! Whisk these two together until they’re fully blended; it should be thick but still pourable. If it feels too thick for your liking (we want it drippy and luscious), add milk one tablespoon at a time until you achieve your desired consistency. This step is crucial because having the right glaze texture ensures a beautiful finish when we dip our cookies.
Once you’ve got that gorgeous liquid gold ready, take a moment to admire how simple ingredients can create such magic! Now envision dipping those cooled cookies into this glossy concoction – it’s going to be divine! The key here lies in being gentle as you whisk; vigorous mixing can cause air bubbles which might affect how smoothly the glaze sets on your cookies later. Remember: slow and steady wins the race!
Step 8: Glazing Your Cookies with Love
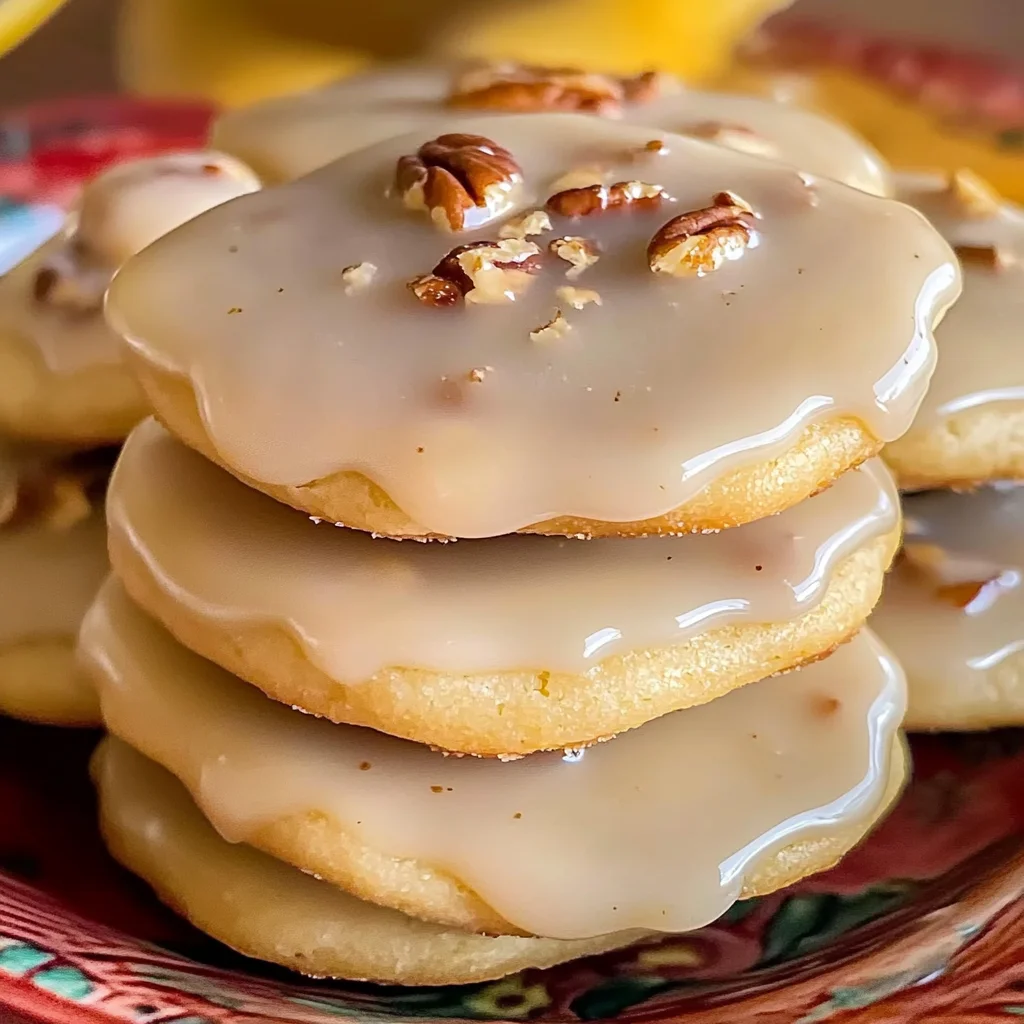
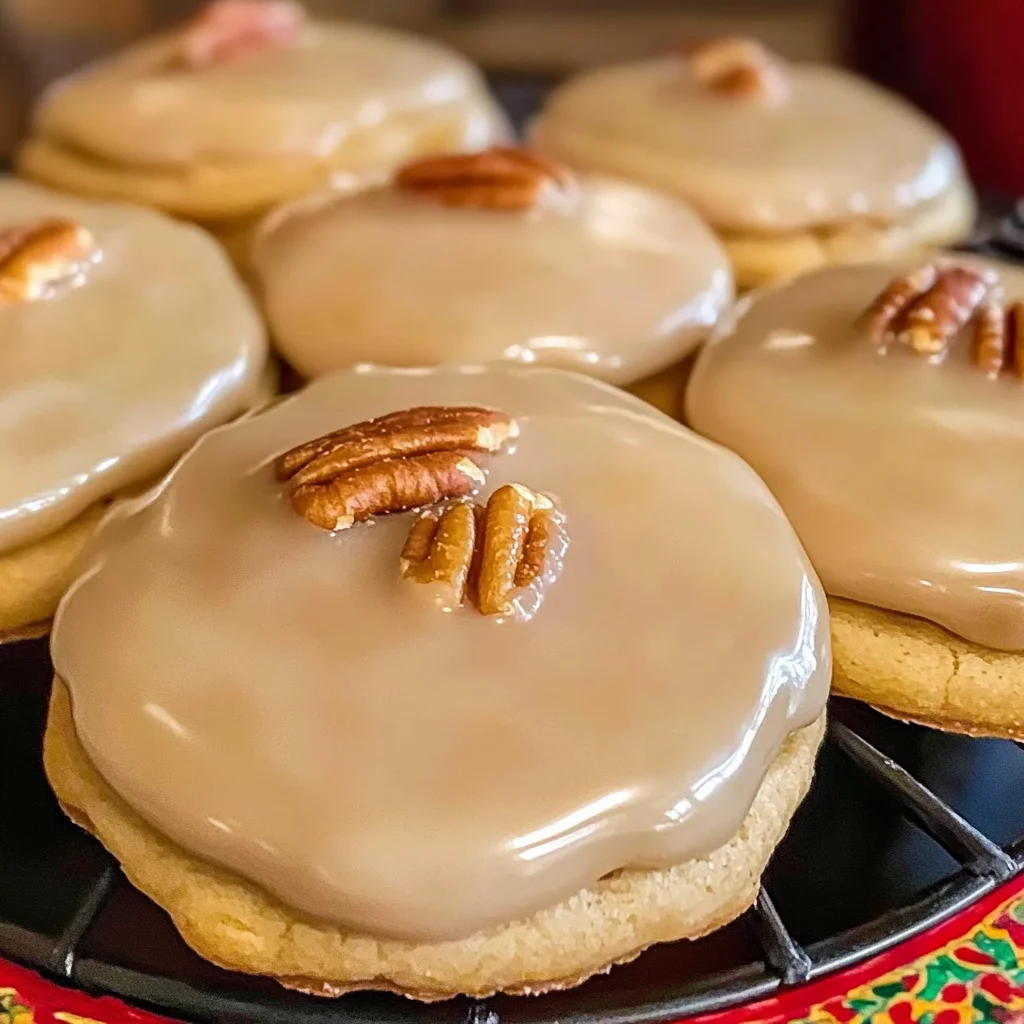
Now comes one of my absolute favorite parts — glazing those warm cookies! With each cookie cooled and waiting patiently on your wire rack or parchment paper-lined tray, grab one by its edges and dip just the top into that velvety maple glaze. Let excess glaze drip off back into the bowl; we don’t want gloppy cookies here – just a beautiful sheen that enhances their appeal without overpowering their maple flavor.
As you’re doing this part, take note of how satisfying it feels; there’s something deeply rewarding about seeing those golden brown tops transformed into glossy treats right before your eyes! Once dipped, sprinkle with roasted chopped pecans or crumbled bacon immediately while the glaze is still wet if you’re feeling adventurous—those toppings add an extra crunch that perfectly complements each bite’s softness. But even if you’ve chosen not to garnish them (which is totally fine!), these Maple Cookies with Maple Icing will shine all on their own.
Next Major Phase – Final Touches
Step 9: Allowing Your Cookies to Set
Once glazed (and garnished if desired), it’s time for another important step: allowing those beauties to set properly before diving in headfirst! Place them aside on wire racks or even back onto parchment paper for about 15-20 minutes; this resting period lets the glaze firm up beautifully while keeping those soft centers intact – trust me when I say it’s absolutely worth waiting for that perfect bite!
The transformation from warm cookie dough balls into stunning maple-glazed delights takes patience but creates an experience that’s truly unforgettable—the mingling aromas alone are enough to make anyone swoon! As they cool down completely during this time (resist temptation!), think about how wonderful it will be when friends or family get their hands on these treats—you’ll be showered with compliments!
So there you have it: deliciously soft Maple Cookies with Maple Icing ready to impress at any gathering or simply make any day feel special. Each bite carries warmth reminiscent of cozy autumn afternoons spent with loved ones—what could be better? Enjoy every crumb of these treasures you’ve created—your kitchen deserves nothing less than delicious chaos filled with laughter and love!
Storage and Enjoyment Tips for Your Maple Cookies With Maple Icing
Now that you’ve baked up a storm with these delightful Maple Cookies with Maple Icing, it’s time to savor every bite! The aroma wafting through your kitchen is simply intoxicating, and I can already imagine you taking that first blissful bite. But what if you find yourself with leftovers (if that’s even possible)? Don’t worry; I’ve got you covered with some fantastic storage tips to keep those cookies as scrumptious as the moment they came out of the oven.
Storing Leftover Maple Cookies With Maple Icing
To preserve the heavenly goodness of your Maple Cookies with Maple Icing, it’s essential to store them properly. I recommend using an airtight container to prevent moisture from ruining that delightful chewy texture you worked so hard to achieve. Place a piece of parchment paper between layers if you have multiple cookies stacked; this simple trick ensures they don’t stick together! Kept at room temperature, they’ll stay fresh for about five days—though I promise they’ll likely be devoured long before then! For those who like their cookies warm and gooey, simply pop them in the microwave for a few seconds or warm them in the oven at a low temperature. Trust me, the comforting aroma will fill your home once again, making it feel like a cozy autumn afternoon.
Freezing Cookies for Later
If you want to save some for a future treat (or just want to ensure you always have something sweet on hand), freezing is an excellent option! To freeze your cookies, first make sure they are completely cooled down—this step is crucial. Once cooled, arrange them in a single layer on a baking sheet and place them in the freezer until solid. After about an hour, transfer them into a freezer-safe bag or container, separating layers with parchment paper again. They can stay frozen for up to three months without losing their delightful flavor and texture. When you’re ready to enjoy them again, simply let them thaw at room temperature or warm them up as mentioned above. The convenience of having these sweet treats at your fingertips is absolutely paramount!
Maple Cookies With Maple Icing
Get ready to indulge in the delightful warmth of Maple Cookies with Maple Icing! These soft, chewy cookies are a comforting treat perfect for cozy gatherings or quiet afternoons at home. The rich flavor of pure maple syrup paired with a hint of cinnamon creates a nostalgic taste experience that will transport you back to cherished moments spent in the kitchen. Topped with a luscious maple glaze and optional roasted pecans for crunch, these cookies are sure to become a favorite in your baking repertoire. Whether enjoyed with a cup of tea or shared with loved ones, each bite is an invitation to savor life’s sweetest moments.
- Prep Time: 20 minutes
- Cook Time: 12 minutes
- Total Time: 32 minutes
- Yield: Approximately 24 cookies 1x
- Category: Dessert
- Method: Baking
- Cuisine: American
Ingredients
- ½ cup unsalted butter, softened
- 1 cup brown sugar
- ¼ cup pure maple syrup
- 1 large egg
- 1 teaspoon vanilla extract
- 2 ½ cups all-purpose flour
- 1 teaspoon baking soda
- ¼ teaspoon ground cinnamon
- 1 ½ cups powdered sugar
- 3 tablespoons pure maple syrup
- 1–2 tablespoons milk (as needed)
- Roasted chopped pecans (for garnish)
Instructions
- Preheat your oven to 350°F (175°C) and line two baking sheets with parchment paper.
- In a large bowl, cream together softened butter and brown sugar until light and fluffy.
- Add pure maple syrup, egg, and vanilla extract; mix until smooth.
- In another bowl, whisk together flour, baking soda, and cinnamon. Gradually fold into the wet mixture until just combined.
- Using a cookie scoop or tablespoon, portion out dough onto prepared baking sheets, spacing them about 2 inches apart. Flatten slightly.
- Bake for 10-12 minutes or until edges are set but centers remain soft. Let cool on baking sheets for a few minutes before transferring to wire racks.
- For the glaze, whisk together powdered sugar and maple syrup; adjust consistency with milk as needed. Dip cooled cookies into the glaze and sprinkle with chopped pecans if desired.
Nutrition
- Serving Size: 1 cookie (30g)
- Calories: 120
- Sugar: 10g
- Sodium: 50mg
- Fat: 5g
- Saturated Fat: 3g
- Unsaturated Fat: 2g
- Trans Fat: 0g
- Carbohydrates: 17g
- Fiber: <1g
- Protein: 1g
- Cholesterol: 15mg