Key Lime Pie Lush
There’s something utterly magical about a dessert that embodies the essence of summer, and my Key Lime Pie Lush does just that. This isn’t just a recipe; it’s a celebration of vibrant flavors that whisk you away to sun-soaked beaches. Imagine the zesty tang of key limes dancing on your palate, kissed by the creaminess of whipped layers, all resting on a golden, buttery crust. When I take that first bite, I’m transported to warm afternoons where laughter fills the air, and friends gather around to share stories over delightful treats. It’s more than food; it’s a moment of connection, an experience steeped in nostalgia and joy. Trust me when I say this Key Lime Pie Lush is not only refreshingly delicious but also incredibly easy to make!
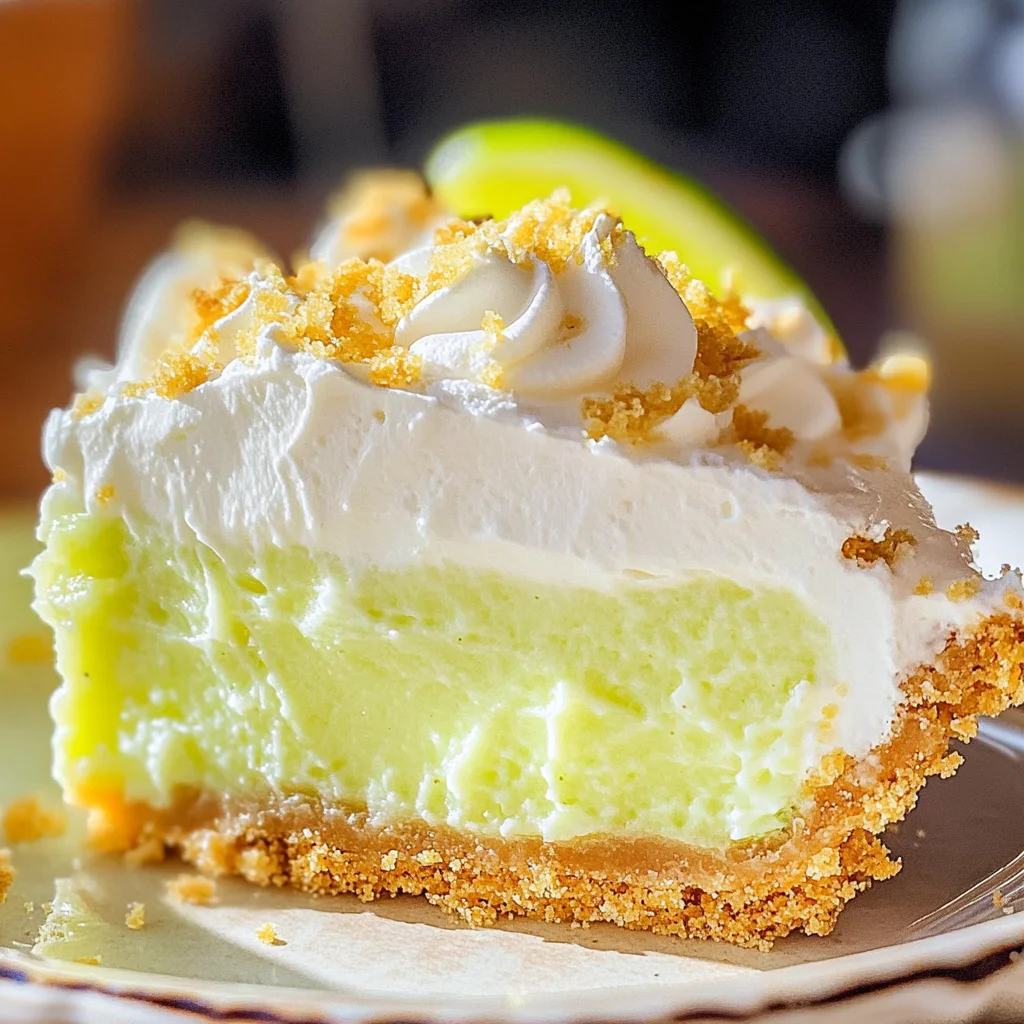
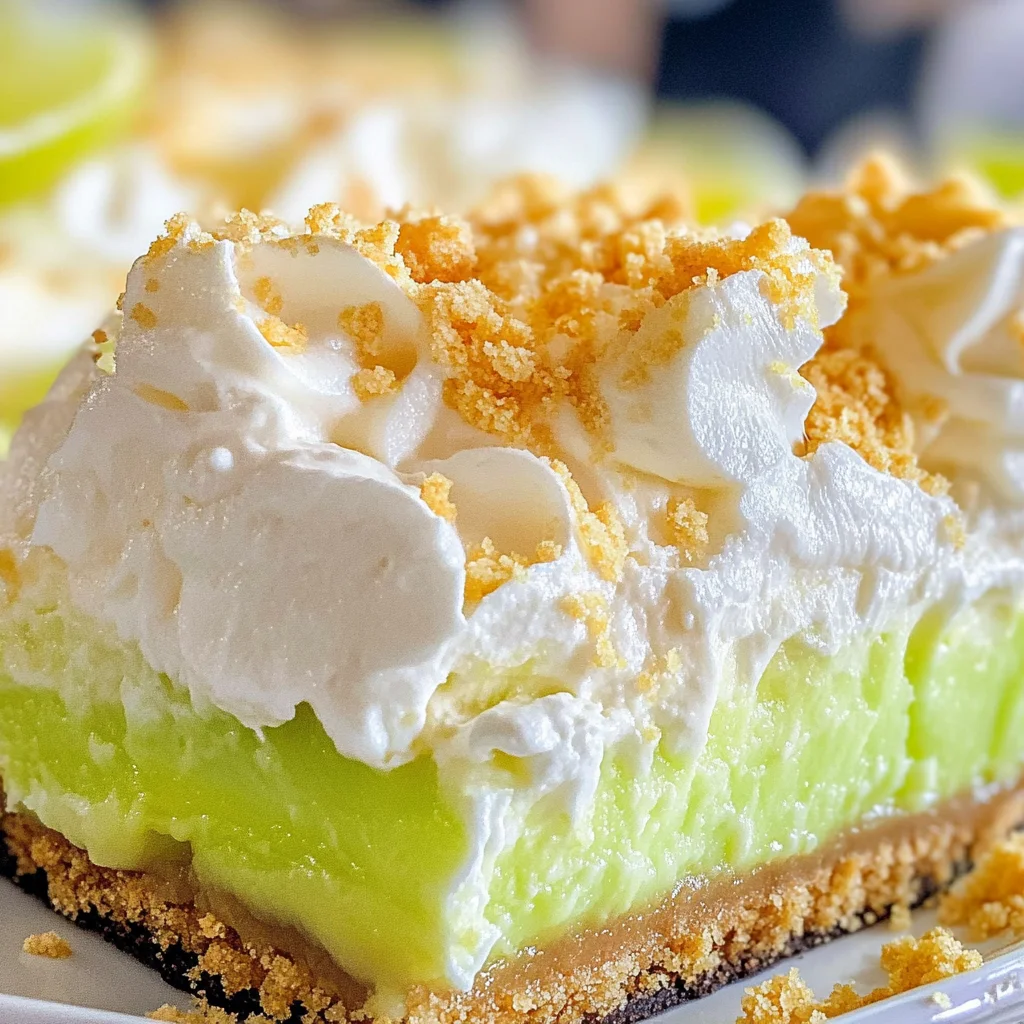
What makes this dessert so special is its five luscious layers, each contributing to an extraordinary symphony of flavors and textures. The crispness of the Golden Oreos contrasts beautifully with the silky cream cheese filling and the lightness of whipped cream, while the key lime juice provides that signature tartness we all adore. I’ve always been captivated by desserts that offer both simplicity in preparation and complexity in taste—this one checks all the boxes! Whether served chilled or frozen, it’s perfect for summer gatherings or any occasion where you want to impress without spending hours in the kitchen.
Key Lime Pie Lush: A Slice of Sunshine in Every Bite
Let’s dive into this delightful recipe together! The Key Lime Pie Lush is as easy to prepare as it is stunning to serve. With just a handful of ingredients, you’ll create a dessert that looks like you slaved away for hours—when in reality, it comes together in less than 30 minutes! So grab your mixing bowls and let’s embark on this sweet culinary adventure.
Ingredients:
As we embark on this culinary journey together, each ingredient plays a vital role in crafting our Key Lime Pie Lush. Let’s explore what makes these components so special!
- 20 ounces double stuffed Golden Oreos (family-sized package). These cookies form the base layer of our dessert—a buttery crumbly crust that’s both sweet and rich. The double-stuffed version adds an extra layer of creaminess that complements our lush filling beautifully. Don’t be afraid to crush them finely; this will help create a solid foundation for our layers. If you can’t find double-stuffed Oreos, regular ones will work just as well—just consider adding a bit more butter to maintain that delightful texture.
- ⅓ cup unsalted butter (melted). Butter is absolutely paramount for binding our cookie crust together while adding richness to every bite. Melting it allows for even distribution throughout the crushed Oreos, ensuring they hold their shape once set. Always opt for unsalted butter here because it gives you control over the seasoning—plus, we want those sweet flavors front and center without any distractions.
- 16 ounces cream cheese (softened). Cream cheese brings a sumptuous creaminess to our lush layers—it’s what makes each bite feel indulgent yet refreshing at the same time. Softening it beforehand is crucial; otherwise, you’ll end up with lumps instead of that smooth consistency we’re aiming for! Make sure it’s at room temperature so it blends seamlessly with the other ingredients.
- 6.8 ounces instant vanilla pudding mix (2 packages). This ingredient not only adds sweetness but also contributes to that velvety texture we crave in creamy desserts like this one. The instant kind is key here because it thickens quickly without needing any cooking—the magic happens as soon as you mix it into your cream! Feel free to experiment with different flavors if you’re feeling adventurous; however, vanilla pairs beautifully with our bright key lime flavor.
- 5 1/2 cups heavy whipping cream (divided). Heavy whipping cream is like liquid gold in desserts—it transforms into fluffy clouds when whipped! Dividing it ensures we achieve perfect textures throughout each layer: some will stay fluffy for folding into other ingredients while some become stable enough for spreading over layers later on. Use cold heavy cream straight from the refrigerator for optimal whipping results—trust me on this!
- 1 cup key lime juice (fresh or bottled). This is where the magic truly happens—the star flavor that takes our dessert from ordinary to extraordinary! Freshly squeezed key lime juice has an unmatched brightness and depth of flavor compared to bottled varieties; however, either works if fresh isn’t available! If using fresh limes, roll them on your countertop before juicing—they yield more juice when they’re slightly warmed up.
- ½ cup powdered sugar. Powdered sugar lends just the right amount of sweetness without making things too cloying—it’s perfect for balancing out our tangy key lime juice! Sifting it before use eliminates any clumps and helps it dissolve better into creams or batters when mixing—this little step makes all the difference!
- Zest of 1 lime. Zesting may seem like an optional step but trust me—it infuses your Key Lime Pie Lush with an aromatic burst of citrus fragrance that elevates every layer! Use a microplane grater or zester to get those fine shavings without hitting any bitter pith underneath—the zest adds complexity and depth without overwhelming tartness.
Equipment You’ll Need:
Having the right tools at your disposal can truly transform your cooking experience from chaotic to enjoyable—and preparing this Key Lime Pie Lush is no exception! While these items may not be ingredients themselves, they are essential partners in creating something wonderful.
- Mixing bowls – A good set of mixing bowls allows you to whisk together different elements smoothly without worrying about spills or messes! Opt for various sizes; having smaller bowls for whipping cream and larger ones for combining wet ingredients gives you versatility during prep time.
- Electric mixer – This tool is non-negotiable when whipping heavy cream or blending soft cream cheese! An electric mixer saves time while allowing you to achieve those peaks effortlessly; look for one with multiple speed options—this way, you can start slow and build up gradually without splattering everywhere!
- Rubber spatula – Don’t underestimate this trusty tool; it’s perfect for folding whipped cream into mixtures gently while keeping air intact—a critical technique here since we want everything light yet cohesive!
- Measuring cups and spoons – Precision matters when baking! Ensure you have dry measuring cups for your Oreos and wet measures for liquids like butter or lime juice so nothing gets lost in translation.
Now that we’re equipped with everything needed let’s move forward into preparing our luscious layers!
Preparing the Key Lime Pie Lush
Step 1: Creating Your Cookie Crust
To begin this journey toward deliciousness, start by crushing those Golden Oreos until they resemble fine crumbs—think sand on a beach! You can do this by placing them in a zip-top bag and using a rolling pin or pulsing them briefly in your food processor until smooth—both methods work wonders! Once they’re ready, transfer these crumbs into a mixing bowl and drizzle in your melted unsalted butter before stirring until every crumb feels coated—a bit like wet sand at the shoreline! This process binds everything together while adding richness—without adequate moisture here, your crust could crumble apart once set!
Step 2: Pressing Down That Delicious Crust
Next comes my favorite part: pressing down our crumb mixture firmly into an even layer at the bottom of a 9×13-inch dish—or whatever pan suits your fancy! Grab another flat-bottomed object like measuring cup or glass jar if necessary; press down hard enough so it’s compact but not overly tough—think firm yet yielding under pressure—that’s how you know you’ve got great structure going on here! This step ensures stability throughout layering later—inadequate pressure might lead to sad cookie crumbles instead as layers stack atop one another!
Step 3: Whipping Up That Cream Cheese Mixture
With our crust secured nicely at its base now turn attention toward blending together softened cream cheese along with instant vanilla pudding mix until combined smoothly—aiming ideally for no lumps remaining should be top priority here since texture matters greatly within layered desserts such as ours! Add half-cup powdered sugar gradually during mixing process—it helps balance flavors while making everything extra creamy too—notably enhancing overall mouthfeel immensely whenever bites occur later down road ahead.
Step 4: Folding In That Heavenly Whipped Cream
Now comes one important part: whipping heavy whipping cream until stiff peaks form—a visual cue indicating readiness occurs when lifted beaters reveal peaks holding shape firmly rather than drooping back down again after removal from bowl itself—I promise taking time here pays off later once incorporated fully within other elements afterward since it creates lighter-than-air textures everyone craves within luscious desserts such as this one!
Stay tuned as we continue layering these divine creations step-by-step toward completion—the best part lies just ahead…
Step 5: Crafting the Creamy Filling
Now that you have your dreamy crust ready, it’s time to create the luscious filling that will elevate this dessert into a realm of pure delight. In a large mixing bowl, combine the softened cream cheese with the powdered sugar. You want the cream cheese to be at room temperature; this ensures it blends smoothly without any lumps, creating that silky texture we all crave. Use an electric mixer on medium speed for about 2-3 minutes until the mixture is creamy and fluffy. This step is crucial because it ensures that there are no pockets of unblended cream cheese, which can lead to an uneven texture in your Key Lime Pie Lush.
Next, slowly add in the key lime juice—this is where the magic happens! The acidity from the lime juice not only adds that signature tartness but also helps to lighten the filling as it reacts with the cream cheese, creating a wonderfully airy consistency. Mix until well combined, and don’t rush this step! Trust me on this; you want to take your time ensuring everything is blended beautifully together. Once smooth, set this mixture aside for a moment while you whip up that heavy cream.
Step 6: Whipping Up Bliss
In another bowl (yes, more dishes—but totally worth it!), pour in about 3 cups of heavy whipping cream. Using your electric mixer again, beat on high speed until stiff peaks form—this typically takes around 4-6 minutes. If you’re new to whipping cream, stiff peaks mean that when you lift your whisk out of the bowl, peaks will form and hold their shape without drooping over. This step is absolutely paramount; whipped cream adds volume and lightness to our filling, transforming it from a simple mixture into an airy dream that will melt in your mouth.
Once you’ve achieved those glorious peaks, gently fold one-third of this whipped cream into your key lime filling using a spatula. This process is known as folding—gently incorporating one mixture into another without deflating it too much. The goal here is to lighten up that dense mixture so that every layer of your Key Lime Pie Lush has a cloud-like quality when you dig in. After folding in part of the whipped cream, add the remaining whipped cream and continue folding until just combined. You want those beautiful swirls of white throughout without over-mixing; otherwise, you’ll lose all that wonderful airiness you’ve worked so hard to create!
Step 7: Layering Like a Pro
Here comes one of my favorite parts—the layering! Grab your prepared crust and dollop half of the creamy filling right onto that golden base. With an offset spatula or even the back of a spoon, spread it out evenly across the crust; be gentle but firm enough to ensure it reaches all corners. It’s essential to create an even layer so every bite of your Key Lime Pie Lush has that perfect balance of sweet and tart flavors combined with crunchy crust—trust me when I say nobody wants just crust or just filling!
After you’ve smoothed out half of your filling, it’s time for another layer: repeat this process with another layer of crushed Golden Oreos followed by the remaining filling on top. As you do this, I encourage you to take a moment and admire how beautiful these layers are becoming! The contrast between the rich Oreo crust and the bright greenish-yellow lime filling is simply stunning—a feast for both the eyes and taste buds! Once you’ve finished layering everything together like a pro chef (or at least like someone who watches cooking shows), cover your dish with plastic wrap or aluminum foil—not too tightly though—to keep out unwanted ice crystals if you’re opting for freezing.
Step 8: Chilling for Perfection
Now comes perhaps one of the most important steps in making any layered dessert: chilling! Cover your masterpiece with plastic wrap or foil and slide it into the refrigerator for at least 4 hours—or better yet, overnight if you can resist! This time allows all those incredible flavors to meld together beautifully while giving each layer time to set properly. It’s during this chilling phase that each bite transforms from good into utterly intoxicating; think about how all those textures and flavors intermingle underneath that cool surface!
If you’re short on time (I totally get it!), aim for at least four hours—this will allow some flavor melding while still giving you something deliciously presentable. Just be aware that if you skip over this crucial resting period, you might encounter some difficulties when slicing through layers later on—it could become mushy rather than firm! So take my advice here: practice patience! Your Key Lime Pie Lush deserves every moment it spends chilling away in its cozy spot in the fridge.
Conclusion:
As we wrap up our delightful journey through making this sensational Key Lime Pie Lush, I can’t help but feel giddy about all the flavors we’ve combined to create something truly extraordinary. From that zesty key lime juice dancing with the rich cream cheese to the sweet crunch of Golden Oreos forming each layer, this recipe is a testament to how simple ingredients can lead to profound satisfaction. Every bite resonates with summer vibes; it’s as if you’re indulging on a sun-kissed beach with waves gently lapping at your feet!
This recipe is undoubtedly a must-try not just for its taste but also for the sheer joy it brings while making it—the laughter shared as you whip up fluffy whipped cream, the anticipation as each layer comes together, and finally witnessing your friends’ faces light up when they take their first bite! It shines at gatherings—whether it’s a festive barbecue or an intimate dinner party—and trust me when I say everyone will be clamoring for your secret recipe afterward. Picture yourself pulling this vibrant dessert from the fridge; the moment is nothing short of magical—the coolness radiates happiness!
For serving suggestions, imagine savoring one decadent slice alongside a chilled glass of iced tea or perhaps coffee—what bliss! For an afternoon pick-me-up during those long summer days, pair it with fresh strawberries bursting with sweetness or even some vibrant blueberries that add that pop of color. And if you’re feeling adventurous? A sprinkle of toasted coconut flakes on top takes it over-the-top deliciously tropical!
Feeling adventurous? This recipe is wonderfully adaptable; try swapping out key lime juice for fresh lemon juice if you want something more citrusy yet equally refreshing! Or consider adding layers of fresh fruit like kiwi or mango between those creamy sections—oh my goodness! Each variation opens up new avenues of flavor exploration while still keeping that beloved essence intact. So go ahead—experiment with different fruits or even add some crushed graham crackers into the mix for extra texture! I invite you not only to try this recipe but also to share your unique twist on it with loved ones. Connect with me; I’d love to hear about your culinary adventures!
Key Lime Pie Lush
Indulge in the refreshing delight of our Key Lime Pie Lush, a dessert that captures the essence of summer in every layered bite. This no-bake treat combines zesty key lime juice with creamy layers of whipped cream and rich cream cheese, all nestled atop a buttery Golden Oreo crust. Perfect for gatherings or a sweet escape on warm days, this dessert is incredibly easy to prepare, taking less than 30 minutes of hands-on time.
- Prep Time: 20 minutes
- Cook Time: None
- Total Time: 0 hours
- Yield: Approximately 12 servings 1x
- Category: Dessert
- Method: No-bake
- Cuisine: American
Ingredients
- 20 ounces double-stuffed Golden Oreos
- ⅓ cup unsalted butter (melted)
- 16 ounces cream cheese (softened)
- 6.8 ounces instant vanilla pudding mix (2 packages)
- 5 ½ cups heavy whipping cream (divided)
- 1 cup key lime juice (fresh or bottled)
- ½ cup powdered sugar
- Zest of 1 lime
Instructions
- Crush Golden Oreos finely and mix with melted butter; press into the bottom of a 9×13-inch dish.
- Blend softened cream cheese with powdered sugar until smooth; add key lime juice and mix well.
- Whip 3 cups of heavy cream until stiff peaks form; fold into the cream cheese mixture gently.
- Layer half of the filling over the crust, followed by another layer of crushed Oreos and then the remaining filling.
- Chill in the refrigerator for at least 4 hours or overnight before serving.
- Top with additional whipped cream and lime zest before slicing.
Nutrition
- Serving Size: 1 slice (approximately 100g)
- Calories: 370
- Sugar: 24g
- Sodium: 180mg
- Fat: 26g
- Saturated Fat: 15g
- Unsaturated Fat: 10g
- Trans Fat: 0g
- Carbohydrates: 28g
- Fiber: 1g
- Protein: 3g
- Cholesterol: 70mg