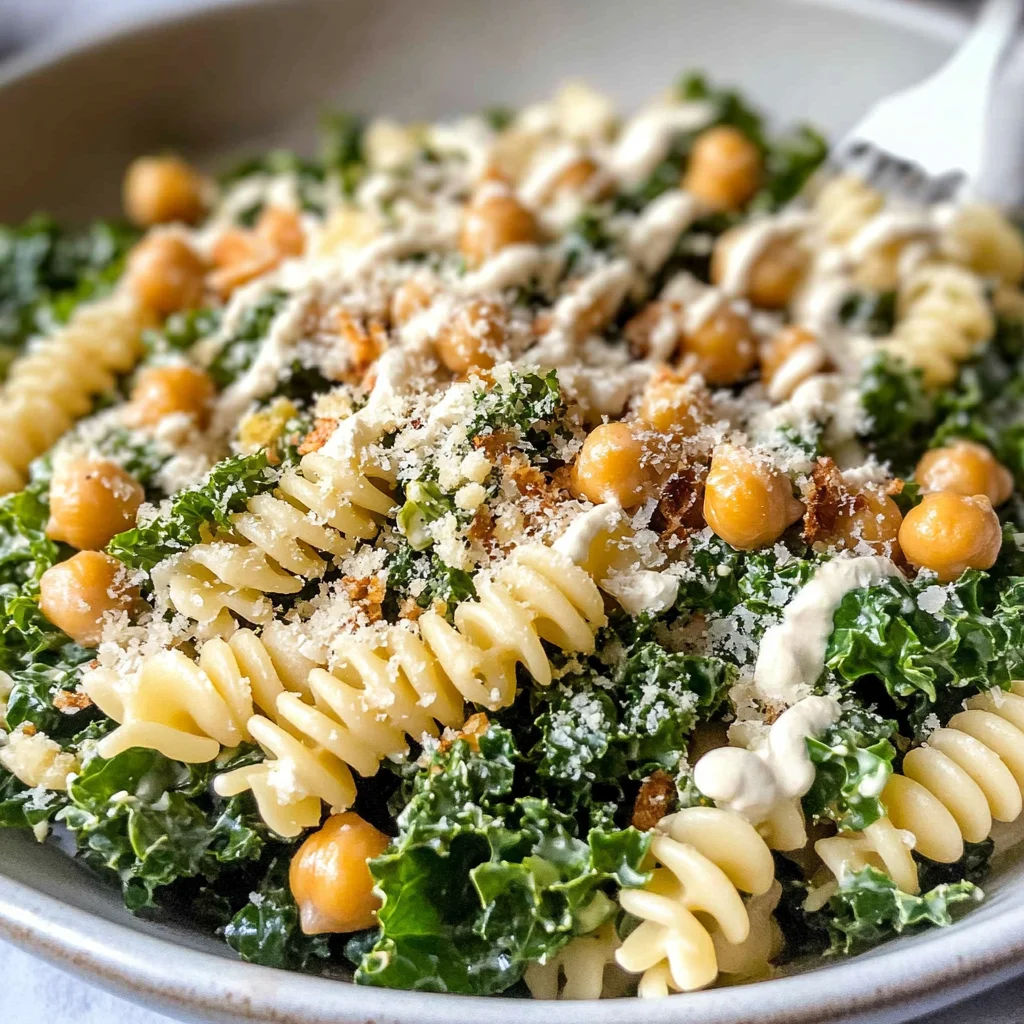
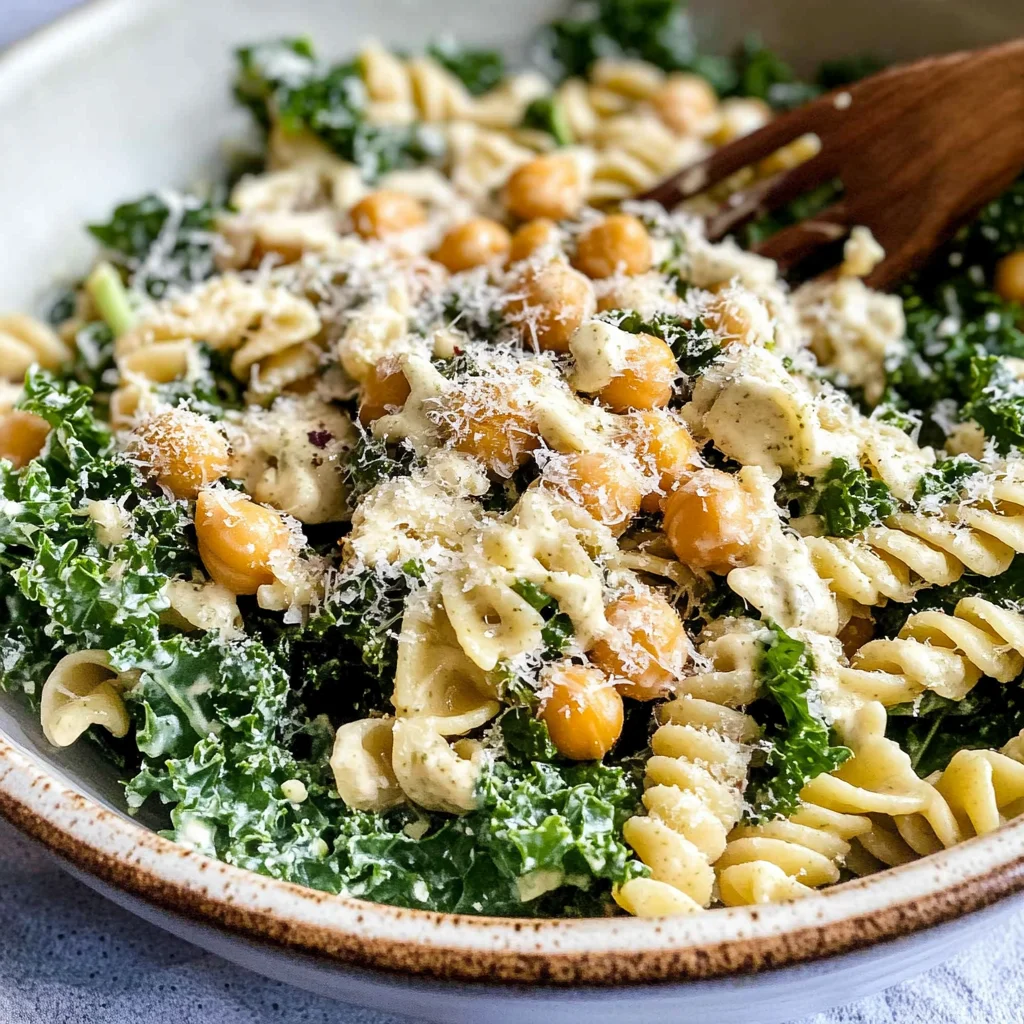
Kale Caesar Pasta Salad
When I think of summer gatherings and the vibrant, sun-soaked days that stretch into balmy nights, I can’t help but feel a rush of excitement for all the delicious possibilities that await us. One dish that has woven itself into my seasonal repertoire is this Kale Caesar Pasta Salad. It’s not just a salad; it’s an experience that dances on your taste buds and brings a sense of joy to every bite. Imagine the crunch of crispy chickpeas against the tender, massaged kale, the twirl of your favorite pasta, all enveloped in a creamy Caesar dressing that’s packed with protein and flavor. The contrast between the fresh greens and satisfying carbs creates this beautiful symphony of flavors that feels both indulgent yet remarkably wholesome. Trust me when I say, this Kale Caesar Pasta Salad deserves a spot at your next summer barbecue!
The beauty of this recipe lies not only in its delightful taste but also in its ability to bring people together. As we gather around tables filled with laughter and stories, dishes like this remind us of the connections we share over food. The rich history behind Caesar salad itself adds an element of intrigue; originally crafted to impress diners in Tijuana, Mexico, it has transformed into a beloved classic worldwide. With my take on it—infusing kale for added nutrients and swapping traditional elements for modern touches—I believe we can honor its legacy while making it our own. So, whether you’re hosting friends or simply treating yourself after a long day, let this dish be your go-to recipe that bridges tradition with innovation.
Kale Caesar Pasta Salad: A Wholesome Delight for Every Gathering
Ah, dear friend! Let’s dive right into this delectable creation together. This Kale Caesar Pasta Salad is more than just food; it’s a celebration of freshness and flavor that will elevate any meal. Not only is it easy to whip up, but it also provides a nourishing balance that keeps you feeling satisfied without weighing you down.
Ingredients:
As we embark on this culinary journey together, let’s take a moment to appreciate each ingredient that plays a pivotal role in crafting our delightful Kale Caesar Pasta Salad. Each component contributes something unique, ensuring our finished dish is nothing short of extraordinary.
- 8 ounces gluten-free pasta. The foundation of our salad begins with pasta, which adds heartiness and substance to the dish. I love using gluten-free varieties because they bring different textures and flavors without compromising on taste. Look for brands made from brown rice or quinoa for an extra nutritional boost! Cooking the pasta until it’s al dente is key—it should have just the slightest bite to it so it holds up beautifully against the creamy dressing.
- 5 cups de-stemmed and chopped kale. Kale is truly the star here! Its robust texture holds up well against dressings and adds an earthy flavor profile that’s absolutely delicious when massaged gently with olive oil or lemon juice. When selecting kale, opt for deep green leaves without yellowing or wilting—freshness is paramount! Massaging the kale helps break down its fibrous structure, making each bite tender and enjoyable while enhancing its natural flavor.
- 1/4 cup grated parmesan. Ah, parmesan—the glorious cheese that adds depth and richness! In this recipe, we’re incorporating it not just as a topping but as an integral flavor enhancer within our dressing too. Look for high-quality parmesan; freshly grated will provide a more intense flavor than pre-packaged options. If you’re looking for dairy-free alternatives, there are some fantastic plant-based options available today!
- 1 (15-ounce) can chickpeas. These little gems introduce protein and texture to our salad while adding an irresistible crunch when roasted! Rinsing them thoroughly eliminates excess sodium from canned versions—trust me on this step! Once roasted with spices until crispy, they become addictive little morsels you won’t want to skip.
- 1 tablespoon olive oil. Olive oil serves as liquid gold in our kitchen; it not only helps roast our chickpeas perfectly but also enriches our dressing with healthy fats! Opt for extra virgin olive oil for its superior flavor profile—it should taste slightly fruity or peppery depending on its origin.
- 1/2 teaspoon paprika. This spice brings warmth and color to our dish; it’s like sprinkling sunshine onto your salad! Whether you choose sweet or smoked paprika depends on your preference—both add lovely undertones without overwhelming other flavors.
- 1/2 teaspoon garlic powder & 1/2 teaspoon onion powder. These are essential players in achieving that classic Caesar dressing flavor we know and love! They infuse depth without overpowering the fresh ingredients—think of them as supporting characters enhancing our star performers.
- 1/4 teaspoon salt & 1/4 cup mayonnaise + 1/4 cup plain Greek yogurt. Together these create the creamy base for our dressing—a perfect blend offering tanginess from yogurt paired with smoothness from mayonnaise! Using Greek yogurt not only lightens up the calorie count but also boosts protein content significantly—what’s not to love? Adjust these ingredients based on your desired creaminess!
- 1 tablespoon lemon juice & 1 clove garlic (minced). Fresh lemon juice brightens everything up while balancing richer flavors beautifully—it’s absolutely paramount in tying all components together harmoniously! Minced garlic adds an aromatic touch full of zest; using fresh rather than powdered gives a vibrant kick.
- 1 1/2 teaspoons Dijon mustard & 1/2 teaspoon salt & 1/4 teaspoon black pepper. Dijon mustard introduces subtle sharpness along with depth—it’s crucial for making those flavor layers pop! Don’t shy away from seasoning generously here; salt enhances all flavors while black pepper lends warmth—a perfect finish!
Now that we’ve gathered all our wonderful ingredients together, let’s prepare ourselves to create something magical!
Equipment You’ll Need:
Having the right tools at hand makes creating your Kale Caesar Pasta Salad not only easier but much more enjoyable too! While ingredients are essential stars in their own right, tools are like trusted companions guiding us through each step effortlessly.
- Large pot: A sturdy pot is crucial for boiling pasta evenly without overcrowding—a must-have tool in any kitchen adventure! Choose one large enough to hold plenty of water so that pasta cooks evenly without sticking together.
- Colander: After cooking pasta to perfection comes draining—and here’s where your colander shines bright! It allows excess water to escape while retaining all those precious noodles ready for tossing into our salad!
- Baking sheet: For roasting those chickpeas until they’re gloriously crispy! A rimmed baking sheet ensures they stay put while allowing air circulation around them during roasting—this will give you golden perfection every time!
- Parchment paper: Line your baking sheet with parchment paper for easy cleanup after roasting chickpeas—it’s like giving yourself permission to enjoy deliciousness without worry about scrubbing pans later!
- Salad bowl: A large mixing bowl helps combine all components easily—the bigger the better so everything can mingle beautifully!
Now that we’ve assembled both our ingredients and equipment, let’s move forward into preparing this delightful Kale Caesar Pasta Salad!
Step 1: Boil Your Pasta
Bring forth a large pot filled halfway with salted water—this will mimic ocean water’s salinity which enhances every morsel’s flavor during cooking! Once boiling vigorously like waves crashing against rocks, add in your gluten-free pasta gently—not rushing matters here ensures even cooking throughout each piece. Cook according to package instructions until al dente—the ideal texture should offer slight resistance when bitten into yet remain tender overall! After draining thoroughly using your trusty colander (as mentioned earlier), let it cool while you tackle other components—we want everything perfectly balanced before assembly time arrives!
Step 2: Prepare Crispy Chickpeas
Preheat your oven now at 400°F (200°C)—we need it hot enough so those chickpeas can transform into crunchy delights that’ll steal hearts at first bite! Drain canned chickpeas thoroughly before rinsing under cold water—all extra sodium needs washing away completely before proceeding further here… trust me on this step—it makes such a difference later! Place drained peas onto dish towels or paper towels then rub gently between them—this technique works wonders removing skins while ensuring moisture evaporates efficiently too before roasting begins! Toss dried peas lovingly into a bowl combined effortlessly alongside olive oil plus spices (paprika plus salt)—it’s time they shine bright under their new warm coat before heading onto lined baking sheets ready for their golden transformation lasting approximately thirty minutes total… keep watch so they don’t over-brown either!
Step 3: Massage Your Kale
While waiting patiently on those crispy treasures within oven realms above… turn attention instead towards massaging kale lovingly down below in another bowl nearby now… remove stems first then chop leaves finely—you want pieces small enough so they’ll fit perfectly alongside pasta later during assembly stages ahead too… running under cold water allows washing away dirt plus grit effectively beforehand… once cleaned off entirely embrace them gently between fingers performing massage techniques creates tenderness throughout leaving behind utterly intoxicating flavors left wanting more afterward already forming within palate memories long past dinner table moments shared amongst loved ones gathered round once again soon after preparation ends…
Step 4: Whisk Together Your Dressing
With crispy chickpeas out cooling nearby alongside kale awaiting transformation ahead soon further still blended altogether now… let’s focus next upon crafting creamy dressing masterpiece worthy enough complimenting all components joining forces shortly thereafter please indulge me during whisking phase where magic happens blending mayonnaise along Greek yogurt incorporated alongside grated Parmesan working harmoniously thus enriching textures added alongside zesty lemon juice minced garlic Dijon mustard pinpointed precisely measuring out salt plus pepper rounding off final touches needed completing entire concoction homage celebrating original recipes’ heritage honoring traditions rooted deep within culinary histories whilst embracing modern takes evolving naturally today onward toward future generations yet come carrying tales cherished fondly passed down through families everywhere…
I hope you’re as excited as I am about creating this delightful Kale Caesar Pasta Salad together—it promises mouthwatering satisfaction every time served no matter occasion celebrated bringing joy hearts souls nourished fully satisfied attending gatherings forever cherished moments shared amongst family friends alike throughout summertime bliss surrounding us endlessly…
The Joyful Journey to Perfecting Your Kale Caesar Pasta Salad
As we dive deeper into the process of creating this delightful Kale Caesar Pasta Salad, let’s savor every step together. Cooking is not just about following a recipe; it’s about experiencing the tantalizing aromas, vibrant colors, and delightful textures that come together in perfect harmony. So, let’s get started!
Step 5: Roasting Chickpeas to Crispy Perfection
Now that you’ve prepped your chickpeas, it’s time for them to shine! After draining and rinsing the chickpeas, dry them thoroughly using a dish towel or paper towels. You want them as dry as possible because moisture will prevent that beautiful crispiness we’re aiming for when they bake. This technique of drying is absolutely paramount; it allows the oil and spices to coat each chickpea evenly, ensuring that every bite is bursting with flavor. Once dried, toss the chickpeas in a bowl with olive oil and seasonings—paprika, garlic powder, onion powder, and salt. This blend of spices not only adds complexity but also gives our chickpeas that irresistible golden hue.
Spread them out on a baking sheet lined with parchment paper—this ensures they don’t stick and makes cleanup a breeze! Pop them in an oven preheated to 400°F (around 200°C) for about 30 minutes. You’ll want to give them a gentle shake halfway through; this promotes even cooking and avoids those sad little soggy spots. As they bake, keep an eye on them: you’re looking for that lovely golden brown color and an aroma that fills your kitchen with warmth—a scent so inviting it practically beckons your friends to join you. Trust me on this: the crunch of these roasted chickpeas will elevate your salad from good to extraordinary!
Step 6: Massaging Your Kale – It’s More Than Just a Trend!
While those chickpeas are transforming into little nuggets of joy in the oven, let’s turn our attention to the kale. This leafy green deserves a bit of love! Start by removing the tough stems from the kale; they can be quite fibrous and chewy, which isn’t pleasant in our salad. Chop your kale into bite-sized pieces—this helps with both texture and ease of eating. Now here comes the fun part: massaging! Place your chopped kale into a large bowl, sprinkle it with a pinch of salt (trust me on this—it softens the leaves), and then use your hands to gently knead and squeeze the greens for about 2-3 minutes.
You might wonder why we go through this extra step? Massaging kale breaks down its tough cell structure, making it tender while also enhancing its flavor—the result is wonderfully vibrant greens that no longer feel like you’re chewing through leather! The transformation is magical; watch as your kale changes from a stiff, rough leaf into silky smooth ribbons ready to embrace all those delightful flavors we’ve prepared. Once you’ve given it some love, rinse it under cold water in a strainer—this removes any residual grit or excess salt—and then pat dry before adding it to your salad bowl.
Step 7: Whisking Together That Dreamy Dressing
Now let’s create our creamy Caesar dressing—arguably one of the most exciting parts of this process! In a separate mixing bowl, combine mayonnaise and plain Greek yogurt; this duo provides creaminess without being overwhelmingly heavy while boosting protein content—a fantastic bonus! Add in grated parmesan cheese for depth and richness (because what’s a Caesar without that umami hit?), freshly minced garlic which brings pungency and warmth to our dressing, Dijon mustard for tanginess that cuts through richness perfectly, lemon juice for brightness that dances on your palate, along with salt and black pepper for seasoning.
I promise you; whisking these ingredients together feels like magic. As you mix them vigorously—with enthusiasm!—you’ll see how they meld into a luscious dressing that’s both creamy and invigoratingly zesty. It’s essential to taste as you go; everyone’s palate is different! If you prefer more zing, add another squeeze of lemon or more garlic if you’re feeling bold. Remember: this dressing is what ties everything together—the glue holding our beautiful Kale Caesar Pasta Salad in blissful unity!
Step 8: The Grand Assembly
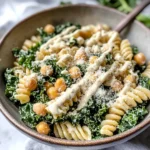
At last! We are nearing the finish line where all these glorious components come together in one magnificent bowl. Once you’ve pulled out those perfectly roasted chickpeas from the oven (and perhaps snacked on one or two—they’re irresistible!), allow them to cool slightly before adding them into your salad bowl filled with massaged kale. Next up is the cooled gluten-free pasta—you’ll notice how beautifully it holds its shape after boiling according to package instructions. Gently fold everything together using tongs or two forks; be careful not to crush those crispy chickpeas!
Now comes my favorite part: drizzling that dreamy dressing over the assembled salad! Don’t rush this step; take your time tossing everything gently until each component is beautifully coated in that wonderfully creamy dressing—we want every bite infused with flavor! The visual appeal here is stunning—the bright green kale against golden chickpeas and pasta speckled with flecks of parmesan creates a symphony of colors that’ll make anyone’s mouth water at first glance.
Final Touches: A Dash More Parmesan
Before serving up your gorgeous Kale Caesar Pasta Salad—a dish truly worthy of any summer gathering—let’s sprinkle just a touch more grated parmesan over the top as a final flourish. This last-minute addition not only enhances presentation but also provides an extra burst of flavor right when it’s needed most. Serve immediately or let it chill for about 15-20 minutes before digging in if you prefer those flavors mingling together longer—though honestly? I can never wait once I see it looking so scrumptious!
And there you have it—a Kale Caesar Pasta Salad that’s not just food but an experience filled with love, care, and delightful flavors that will leave everyone asking for seconds (and maybe even thirds). I promise you’ll feel proud serving this at any dinner table or summer barbecue; it’s fresh yet hearty enough to satisfy everyone around you while being gluten-free too!
Enjoy every bite knowing you’ve crafted something truly special—inspired by love for food and shared moments around the table. Happy cooking!
Storage and Enjoyment Tips for Your Kale Caesar Pasta Salad
Now that your Kale Caesar Pasta Salad is beautifully assembled, bursting with vibrant colors and tantalizing aromas, it’s time to dive into the delightful experience of enjoying each bite! This salad is not only perfect for serving fresh but also lends itself beautifully to storage, ensuring you can relish its flavors even days later. I promise you, the combination of massaged kale, crunchy chickpeas, and creamy dressing just gets better as the ingredients meld together. So let’s talk about how to keep this masterpiece fresh for those moments when you want to savor it again.
Storing Leftover Kale Caesar Pasta Salad
To ensure your leftover Kale Caesar Pasta Salad stays fresh and delicious, I recommend transferring it into an airtight container. This is crucial because it keeps moisture out and flavors intact. Ideally, store it in the refrigerator where it will remain tasty for about 3 to 5 days. However, to maintain that delightful crunch of the chickpeas and the vibrant texture of the kale, consider adding a slice of bread inside the container. This tip works wonders by absorbing excess moisture that could make your salad soggy over time. After a day or two in storage, you might notice that the flavors have deepened; the tangy dressing seeps into every component, creating a symphony of tastes with each bite. When you’re ready to enjoy it again, just give everything a good toss – no need to reheat since salads are best enjoyed chilled!
Freezing Components for Later
If you find yourself captivated by this recipe and want to prepare ahead of time, freezing individual components is a fantastic option! While I wouldn’t recommend freezing the assembled salad itself—since the textures can get mushy—frozen chickpeas are an excellent choice for future use. Simply spread them out on a baking sheet after seasoning them and freeze until solid before transferring them to a freezer bag. They can be kept frozen for up to three months! This way, when you’re craving that crispy goodness or planning a meal on a busy weeknight, you can pull them straight from the freezer and bake them while your pasta cooks. Trust me on this one: having these prepped chickpeas at your fingertips is pure convenience and will elevate your meals effortlessly!
Kale Caesar Pasta Salad
Elevate your summer gatherings with this Kale Caesar Pasta Salad, a vibrant and nutritious dish that combines the crunch of roasted chickpeas with the fresh flavors of massaged kale and a creamy dressing. This salad is not only visually appealing but also offers a delightful balance of textures, making it perfect for casual meals or special occasions. With gluten-free pasta as the foundation, every bite is a burst of wholesome goodness that everyone will love. Easy to prepare and even easier to enjoy, this salad is sure to become a staple at your table.
- Prep Time: 15 minutes
- Cook Time: 30 minutes
- Total Time: 45 minutes
- Yield: Serves 6
- Category: Salad
- Method: Roasting, Boiling, Mixing
- Cuisine: American
Ingredients
- 8 ounces gluten-free pasta
- 5 cups de-stemmed and chopped kale
- 1/4 cup grated parmesan cheese (or dairy-free alternative)
- 1 (15-ounce) can chickpeas
- 1 tablespoon olive oil
- 1/2 teaspoon paprika
- 1/4 cup mayonnaise
- 1/4 cup plain Greek yogurt
- Juice of 1 tablespoon lemon
- 1 clove garlic, minced
Instructions
- Boil the gluten-free pasta according to package instructions until al dente. Drain and set aside.
- Preheat the oven to 400°F (200°C). Rinse and dry chickpeas, then toss with olive oil, paprika, and salt before spreading on a baking sheet. Roast for about 30 minutes until crispy.
- In a bowl, massage the chopped kale with a pinch of salt for about 2-3 minutes until tender.
- In another bowl, whisk together mayonnaise, Greek yogurt, parmesan cheese, lemon juice, minced garlic, Dijon mustard, salt, and pepper.
- In a large mixing bowl, combine cooked pasta, massaged kale, roasted chickpeas, and dressing; toss gently to coat.
Nutrition
- Serving Size: 1 cup (250g)
- Calories: 320
- Sugar: 2g
- Sodium: 480mg
- Fat: 14g
- Saturated Fat: 3g
- Unsaturated Fat: 10g
- Trans Fat: 0g
- Carbohydrates: 41g
- Fiber: 8g
- Protein: 11g
- Cholesterol: 10mg