Jalapeno Cheddar Bread
There’s something truly magical about the aroma of freshly baked bread wafting through your home. It’s more than just a scent; it’s an invitation to gather, share stories, and create memories. When I think of comfort food, my mind immediately drifts to a warm loaf of Jalapeno Cheddar Bread. Imagine biting into a slice and feeling the soft, pillowy texture mixed with the delightful heat of jalapenos and the rich, creamy flavor of cheddar cheese. Each mouthful is a symphony of flavors that dances on your palate, making your heart feel light and satisfied. This recipe is not just about filling our bellies; it’s an experience that brings people together, bridging the gap between simplicity and indulgence.
Jalapeno Cheddar Bread holds a special place in my heart for its versatility. This isn’t just a side dish; it’s a star! Whether you serve it alongside your favorite soup, slather it with butter for an afternoon snack, or simply enjoy it plain as you sip your coffee, each occasion feels special. The warmth from the freshly baked bread wraps around you like a hug on a chilly day. The best part? It’s easy to customize! Want it spicier? Toss in an extra jalapeno or two! Prefer it milder? You can easily adjust the amount until it’s just right for you and your loved ones. I promise you; once you take your first bite, you’ll be hooked!
Jalapeno Cheddar Bread: A Spicy Twist on Comfort
Let’s dive into this delightful recipe together! Making Jalapeno Cheddar Bread isn’t just about the ingredients; it’s about creating something that nourishes not only our bodies but also our souls. As we embark on this culinary journey, let me guide you every step of the way so that you can enjoy making this bread as much as indulging in its incredible flavor.
Ingredients:
Gathering the right ingredients is crucial before we start baking. Each component plays an important role in determining not only the flavor but also the texture of our Jalapeno Cheddar Bread.
- 3 cups all-purpose flour: This is our foundational ingredient that gives structure to the bread. Look for high-quality all-purpose flour with good protein content – it will provide strength without being too heavy. Flour is like a blank canvas; depending on how you treat it, it can yield everything from light pastries to hearty breads. You could also experiment with whole wheat flour if you’re looking for added nutrition and flavor—though this will change the texture slightly!
- 1 cup warm water (110°F): Water is essential for activating our yeast and hydrating our flour. The temperature matters here; if it’s too hot, you risk killing off those little yeast cells that we want to thrive! Warm water creates an inviting environment for yeast to flourish, producing carbon dioxide that helps our dough rise beautifully. Use a thermometer if you have one—it’s worth ensuring success!
- 2 teaspoons active dry yeast: Yeast is what makes our bread rise! Choosing active dry yeast means we need to wake it up before using, which adds one more layer of excitement to this process. When mixed with warm water and sugar, you’ll see bubbles forming—that’s your yeast coming to life! If you’re ever in doubt about freshness—check expiry dates or do a quick test by adding some yeast to warm water with sugar; if it doesn’t froth up within 10 minutes, it’s time to buy some more.
- 2 tablespoons olive oil: Olive oil adds richness and moisture to our Jalapeno Cheddar Bread while also contributing to its beautiful crust when baked. I always recommend using extra-virgin olive oil for its superior quality and flavor profile—it’s like liquid gold in cooking! It not only enhances taste but also helps keep your bread tender over time.
- 1 tablespoon granulated sugar: Sugar serves two purposes here—it feeds our yeast during the fermentation process and balances out the flavors in our bread. Don’t be surprised if sugar shows up in savory recipes; it brings harmony to contrasts! You could replace granulated sugar with honey or maple syrup if you’re feeling adventurous—they’ll impart their unique flavors while doing their job.
- 1 teaspoon salt: Salt is absolutely paramount when baking; not only does it enhance flavors, but it also controls yeast activity—too much salt can inhibit rising, while too little can allow for over-proofing. This balance is crucial for achieving that perfect loaf texture and flavor profile we’re after.
- 2-3 fresh jalapenos, finely chopped: Ah, now we get to the fun part—the jalapenos! They add zestiness and excitement with their spicy kick—but don’t worry—you control how much heat goes into this recipe! When selecting jalapenos at the store, look for firm peppers with shiny skin—they should feel heavy for their size! If you’re spice-sensitive but still want some heat, consider removing the seeds before chopping them up.
- 1 cup shredded cheddar cheese: Finally, let’s talk cheese! The richness of cheddar elevates this bread from ordinary to extraordinary—it melts beautifully during baking and creates those gooey pockets of deliciousness throughout each slice. Opt for sharp cheddar for more intense flavor or mild cheddar if you’d prefer a subtler touch—either way, grated cheese blends seamlessly into our dough.
Equipment You’ll Need:
Before we get started on crafting this delectable Jalapeno Cheddar Bread, let’s gather some essential tools that will make our kitchen adventure smoother and more enjoyable!
- Mixing bowls: A sturdy mixing bowl is vital for combining ingredients efficiently without worrying about spills or messes. A larger bowl allows space for kneading without feeling cramped—opt for glass or stainless steel since they are durable and easy to clean.
- Measuring cups & spoons: Precision in measuring ingredients ensures consistent results every time you bake! Invest in dry measuring cups (for flour) and liquid measuring cups (for water) so you can achieve accuracy without guesswork.
- Floured surface (like a countertop or cutting board): Kneading requires space where you can work that dough into submission without sticking everywhere! A clean floured surface keeps things tidy while providing enough room to stretch out those doughy muscles as they come alive under your hands.
- Baking sheet or loaf pan: Depending on whether you’re shaping this bread freeform or in a loaf pan will determine which one you’ll need here—both will yield delicious results but might affect baking times slightly due to shape differences!
- Kitchen towel or plastic wrap: Covering your dough during rising periods keeps moisture locked inside so it doesn’t dry out—a simple yet effective trick that guarantees fluffy results!
Now that we’ve gathered all these essential ingredients and equipment together let’s roll up our sleeves—we’re ready to make magic happen in the kitchen!
Preparing the Jalapeno Cheddar Bread
Step 1: Awakening Our Yeast
To begin crafting this incredible Jalapeno Cheddar Bread, we need to awaken our dormant yeast! Start by combining 1 cup of warm water (remember that ideal temperature around 110°F), along with 1 tablespoon of granulated sugar in a mixing bowl—this little bit of sweetness acts as nourishment for our yeast as they come back to life after their long slumber! Sprinkle 2 teaspoons of active dry yeast over this mixture and gently stir just enough so everything incorporates nicely together—don’t overdo it here; we want those precious bubbles forming naturally on top instead of swirling away too soon! Let this sit undisturbed for about 5–10 minutes until frothy—a sign those tiny organisms are working hard on rising up!
Step 2: Mixing It All Together
While waiting patiently (and perhaps inhaling those lovely scents wafting through), grab another large mixing bowl where we’ll combine both dry ingredients—the flour along with salt—and take note here because getting these ratios right sets us up perfectly later down the line! Make sure they blend well before creating a well-like indentation at center where we’ll introduce activated yeasty goodness mingled with olive oil plus finely chopped jalapeños into mix—oh goodness gracious…can you smell how wonderful that’s going be?
Now comes time when things get fun—we’ll use either hands (my preferred method!) or spatula/spoon depending upon preference—to combine everything thoroughly until moist clumps begin forming throughout mixture before turning onto lightly floured surface where we’ll knead away next step…
Step 3: Kneading Our Dough
Kneading may sound intimidating at first glance but trust me—it’s therapy wrapped inside scrumptiousness galore once learned properly! Take dough lump between palms pressing downwards while folding edges inward then repeating process continually turning towards yourself until smooth texture achieved after approximately 8–10 minutes elapsed time passes by… This tactile engagement creates elasticity within gluten strands allowing loaf rise perfectly shaped upon baking completion later on down line so don’t rush through anything here—it deserves all attention devoted wholly unto itself!
Step 4: First Rise
Once kneaded lovingly till smoothness attained place dough ball inside oiled bowl covering securely using kitchen towel/plastic wrap allowing rest period now required until doubled volume occurs—this could take anywhere from an hour depending upon warmth present surrounding area around us… In meantime why not tidying up counter space? Perhaps even preparing favorite soup/salad pairing ahead planning ahead? Watching bubbling beauty grow before eyes truly rewarding sight indeed…
And there we have begun crafting this irresistible Jalapeno Cheddar Bread together—a few steps down already bringing flavors alive within house creating beautiful atmosphere filled anticipation awaiting final product outcome ahead… Stay tuned as next stages unfold bringing us closer towards heavenly bites soon enough!
Step 5: The Art of Shaping and Second Rise
Now that your dough has risen beautifully, it’s time for the next essential phase: shaping and allowing it to rise a second time. Gently punch down the dough; this technique, known as “degassing,” is crucial because it releases excess air pockets that can lead to an uneven texture in your finished bread. You’ll want to handle the dough gently to preserve some of those lovely bubbles created during the first rise, which contribute to the lightness of your bread.
Once you’ve punched it down, transfer the dough onto a clean, floured surface. With your hands, carefully shape it into a loaf by folding in the edges toward the center and then rolling it tightly from one end to the other. This step not only creates surface tension but also helps develop a beautiful structure that will hold its shape while baking. Place your shaped loaf seam-side down in a greased loaf pan. Cover it with a clean kitchen towel or plastic wrap, and let it rise again in a warm place for about 30-60 minutes, or until it’s nearly doubled in size. Trust me on this—the second rise is absolutely paramount! It ensures that your Jalapeno Cheddar Bread will be airy and tender rather than dense and heavy. Keep an eye on it; you’ll know it’s ready when it’s puffed up nicely and feels soft to the touch.
Step 6: Prepping for Baking Bliss
While your dough is rising, let’s prepare our oven for what I promise will be an extraordinary baking experience! Preheating your oven is not just about getting it hot; it’s about creating an environment where your bread can bake evenly and develop that irresistible golden crust we’re all after. Set your oven temperature to 375°F (190°C) and give it at least 15-20 minutes to reach that perfect heat level before you pop in your bread. This is crucial because if you put the loaf in too early, you risk having an undercooked center or a crust that doesn’t properly form—neither of which are acceptable outcomes for this delightful recipe!
As you wait for the oven to warm up, consider placing a shallow pan filled with water on the bottom rack of the oven while preheating. This simple addition creates steam that helps achieve that magical crust we all adore! The steam prevents the outer layer of dough from forming too quickly before the inside has had a chance to rise fully, resulting in a moist crumb and an utterly intoxicating texture. So go ahead—get excited! In just a few moments, you’ll be filling your kitchen with glorious aromas.
Step 7: Baking Your Jalapeno Cheddar Bread
Ah, here comes the moment we’ve all been waiting for—the baking phase! Once your dough has completed its second rise beautifully, it’s time to slide that gorgeous loaf into your preheated oven. Carefully place it on the middle rack—this ensures even heat circulation around your bread for uniform baking. Now set your timer for about 35-40 minutes but don’t walk away just yet! You want to keep an eye on this beauty as it transforms into something spectacular.
As you watch through the oven door (and trust me—don’t keep opening it!), you’ll notice how the crust starts to turn golden brown and how wonderful scents begin wafting through your home like an embrace from an old friend. That’s when you know magic is happening! To test if your bread is done, gently tap on the bottom of the loaf—if it sounds hollow, you’re ready; if not, give it another few minutes. Also, if you’ve got a food thermometer handy, check for doneness by inserting it into the center; you’re aiming for about 190°F (88°C). Remember, patience pays off here; every moment spent waiting will yield profound satisfaction when you finally slice into that warm loaf.
Step 8: The Grand Reveal
When that timer goes off, oh my goodness—it’s time for the grand reveal! Carefully remove your Jalapeno Cheddar Bread from the oven using oven mitts—it’s hot and glorious! Let me tell you something important: resist cutting into your beautiful creation right away. I know it’s tempting; trust me—I’ve been there countless times myself—but letting it cool on a wire rack for at least 10-15 minutes allows those flavors to settle and meld even further while ensuring that crumb remains intact when sliced.
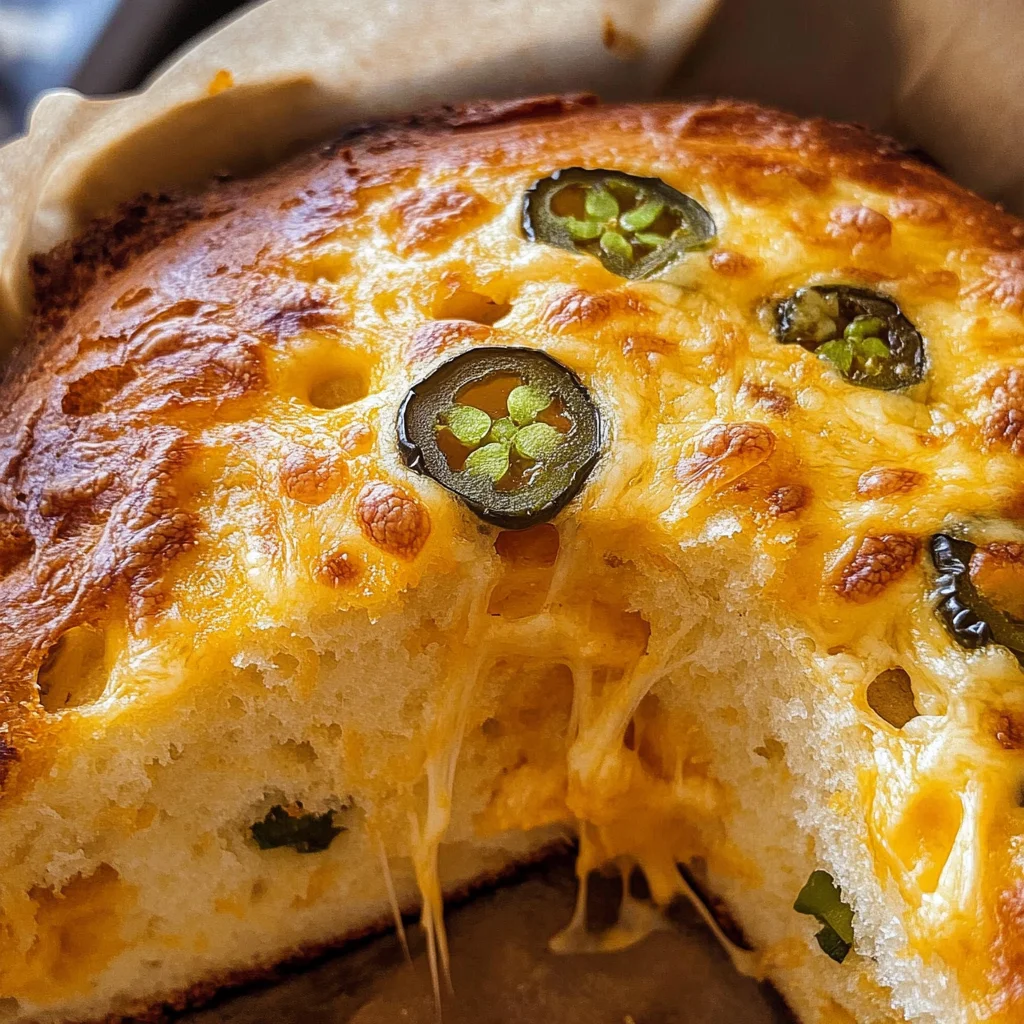
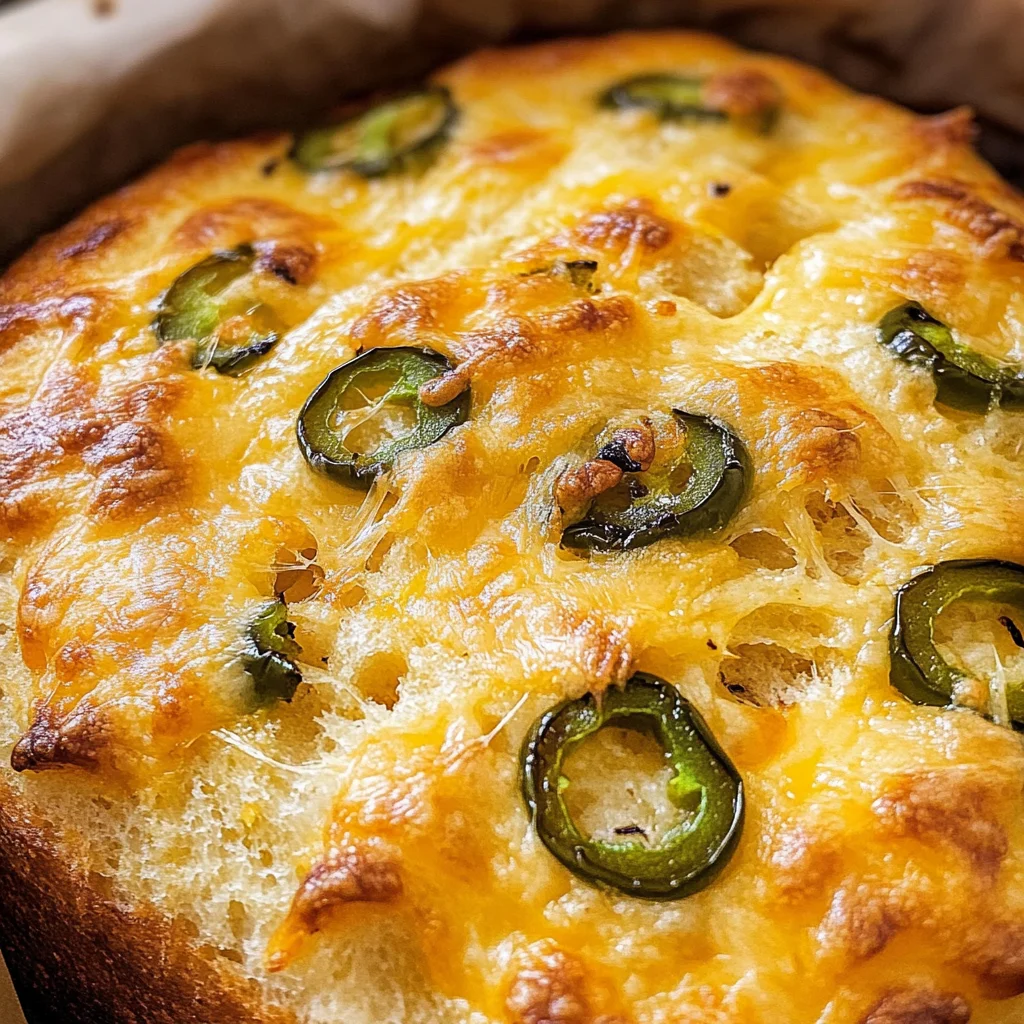
During this cooling period, take a moment to appreciate what you’ve accomplished here—the aroma swirling around is captivating and should have everyone gathering around with eager anticipation. When you’re finally ready to slice into this masterpiece, use a serrated knife for clean cuts—you want those beautiful jalapeno bits peeking through each slice like little green gems nestled within creamy cheddar clouds. Whether slathered with butter or paired lovingly with soups or salads, I promise each bite is going to be nothing short of extraordinary!
Final Touches: Elevate Your Experience
Now comes one last flourish before serving—consider brushing some melted vegan butter over warm slices or sprinkling additional shredded cheddar on top just before serving for an added cheesy finish! This small touch takes things over-the-top delectable while ensuring every bite bursts with flavor.
And there you have it—your very own homemade Jalapeno Cheddar Bread! I can’t wait for you or anyone lucky enough to share this loaf with friends or family to dive into its warmth and taste its remarkable symphony of flavors. Enjoy every single crumb—you’ve earned this delicious moment together!
Storage and Enjoyment Tips for Your Jalapeno Cheddar Bread
Now that your kitchen is filled with that intoxicating aroma of freshly baked Jalapeno Cheddar Bread, it’s time to dive into the delightful ways you can enjoy this scrumptious loaf even beyond the first warm slice. Trust me, there’s something truly special about savoring this bread over the days to come. But before we get into how to preserve this beauty, let’s appreciate how versatile it is—whether slathered in butter, served alongside your favorite soup, or simply enjoyed on its own. Each bite is not just a taste but a memory waiting to be made!
Storing Leftover Jalapeno Cheddar Bread
To keep this delicious bread at its peak freshness, store any leftovers in an airtight container at room temperature. This method will allow your Jalapeno Cheddar Bread to maintain its soft texture and flavorful kick for about 3-4 days—if it lasts that long! To ensure you’re enjoying every morsel at its best, I recommend placing a piece of bread or a slice of apple in the container; this little trick helps maintain moisture and keeps the bread from drying out. When you finally take a slice after a day or two, you’ll be pleasantly surprised by how well the flavors meld, with the jalapenos becoming even more pronounced. If you’re looking to reheat it later, just pop it in the oven at 350°F (175°C) for about 5-10 minutes or until warmed through; trust me, there’s nothing quite like that freshly baked aroma wafting through your home again!
Freezing Jalapeno Cheddar Bread for Later
If you find yourself with more bread than you can eat (though I doubt that!), freezing is an excellent option to ensure none goes to waste. To freeze your Jalapeno Cheddar Bread properly, wrap it tightly in plastic wrap or aluminum foil—this prevents freezer burn and keeps those flavors locked in—and then place it inside a resealable freezer bag. This way, it can stay fresh for up to three months! When you’re ready to enjoy some of that cheesy goodness again, simply remove the desired amount from the freezer and let it thaw overnight in the refrigerator or at room temperature for a few hours. You can even toast slices straight from frozen; just add a couple of extra minutes to your toaster oven time. The convenience of having this savory treat ready whenever hunger strikes is absolutely fantastic!
Jalapeno Cheddar Bread

Jalapeno Cheddar Bread is a delightful fusion of spicy jalapenos and rich cheddar cheese, creating a warm, comforting loaf that’s perfect for any occasion. The moment you pull it from the oven, your kitchen will be filled with an irresistible aroma that beckons everyone to gather around. Each slice offers a soft, pillowy texture combined with just the right amount of heat, making it a fantastic accompaniment to soups or enjoyed on its own. This recipe is incredibly versatile—adjust the spice level to suit your taste and experiment with different cheeses for a unique twist! Whether you’re hosting friends or treating yourself to a cozy night in, this homemade bread promises satisfaction in every bite.
- Prep Time: 20 minutes
- Cook Time: 40 minutes
- Total Time: 1 hour
- Yield: Approximately 12 servings 1x
- Category: Bread
- Method: Baking
- Cuisine: American
Ingredients
- 3 cups all-purpose flour
- 1 cup warm water (110°F)
- 2 teaspoons active dry yeast
- 2 tablespoons olive oil
- 1 tablespoon granulated sugar
- 1 teaspoon salt
- 2–3 fresh jalapenos, finely chopped
- 1 cup shredded cheddar cheese
Instructions
- In a bowl, mix warm water and sugar; sprinkle yeast on top and let sit for 5–10 minutes until frothy.
- In a separate bowl, combine flour and salt. Create a well in the center and add activated yeast mixture along with olive oil and jalapenos. Mix until dough forms.
- Knead on a floured surface for about 8–10 minutes until smooth.
- Place dough in an oiled bowl, cover with a towel, and let rise for about 1 hour or until doubled in size.
- Punch down the dough gently, shape into a loaf, and place it in a greased pan. Let it rise again for about 30–60 minutes.
- Preheat oven to 375°F (190°C). Bake for 35–40 minutes until golden brown.
- Cool on a wire rack before slicing.
Nutrition
- Serving Size: 1 slice
- Calories: 160
- Sugar: 1g
- Sodium: 200mg
- Fat: 6g
- Saturated Fat: 1g
- Unsaturated Fat: 4g
- Trans Fat: 0g
- Carbohydrates: 22g
- Fiber: 1g
- Protein: 5g
- Cholesterol: 0mg