Healthy Homemade Butterfingers
If you’re looking for a sweet treat that’s both delicious and easy to make, I have just the recipe for you: Healthy Homemade Butterfingers! These delightful snacks are a nostalgic twist on the classic candy bar, but made with wholesome ingredients that you can feel good about. Whether you’re whipping them up for a busy weeknight dessert or bringing a batch to a family gathering, these butterfingers are sure to bring smiles all around.
What makes this recipe special is how simple it is. With just a few ingredients, you can create something that tastes indulgent while still being a healthier option. Plus, they’re fun to make—perfect for getting kids involved in the kitchen!
Why You’ll Love This Recipe
- Quick and Easy: This recipe comes together in just over an hour, making it perfect for those busy days when you crave something sweet.
- Family-Friendly: Everyone from kids to adults loves the flavor of peanut butter and chocolate; it’s a crowd-pleaser!
- Make-Ahead: These treats store well in the fridge or freezer, so you can prepare them ahead of time and enjoy whenever the craving hits.
- Wholesome Ingredients: Made with simple, healthy ingredients, you can indulge without the guilt.
- Customizable: Feel free to experiment with add-ins or coatings to make each batch uniquely yours!
Ingredients You’ll Need
Gathering your ingredients for these Healthy Homemade Butterfingers is part of the fun! You’ll be pleased to see that they are all simple and wholesome. Here’s what you’ll need:
For the Base
- 1 cup peanut butter
- 1/3 cup honey
- 1/2 tsp vanilla extract
- 1/2 tsp sea salt
- 1 + 3/4 cup cornflake cereal
For the Coating
- 1 cup chocolate chips (dairy free, if needed)
- 1 tsp coconut oil
Variations
One of the best parts about this recipe is its flexibility! You can easily adapt it to suit your taste or dietary needs.
- Add Some Crunch: Mix in chopped nuts like almonds or walnuts for extra texture.
- Switch Up the Sweetness: Try agave syrup or maple syrup instead of honey for a different flavor profile.
- Go Nut-Free: Use sunbutter or soy nut butter if you’re avoiding peanuts completely.
- Flavor Boost: Experiment with spices like cinnamon or a pinch of cayenne pepper for an exciting twist!
How to Make Healthy Homemade Butterfingers
Step 1: Prepare the Peanut Butter Mixture
In a saucepan over medium-low heat, combine your peanut butter, honey, vanilla extract, and sea salt. Stir this mixture gently for about 2-4 minutes until everything is heated through and smooth. This step ensures that your flavors meld beautifully together, creating a rich base.
Step 2: Combine with Cereal
Once your peanut butter mixture is nice and smooth, pour it into a large mixing bowl with your cornflake cereal. Stir everything together until well-combined. Don’t be afraid to crush some of the cereal as you mix; this will help every piece get coated in that luscious peanut buttery goodness.
Step 3: Shape Your Logs
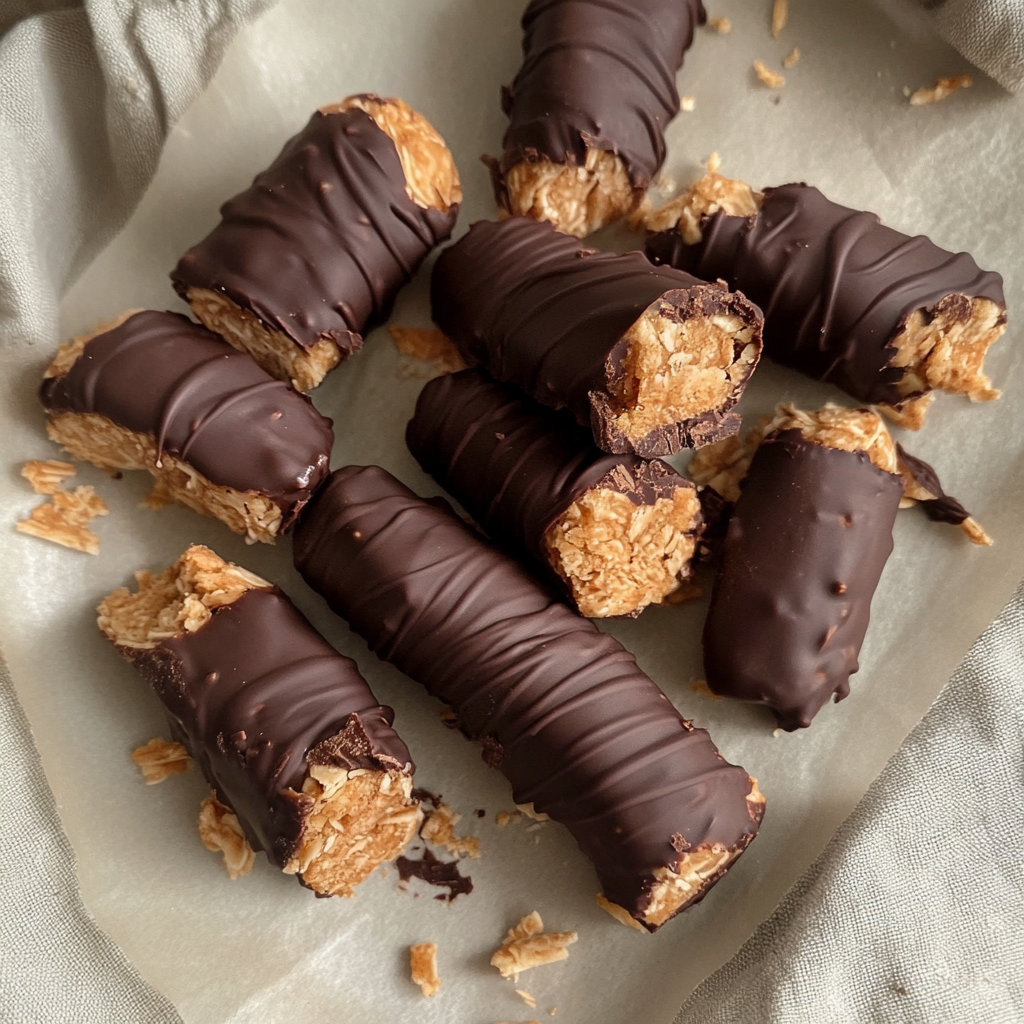
Now comes the fun part—forming your mixture into logs! You should end up with about 12-14 logs. Lay them out on a parchment-lined plate or baking sheet and pop them in the freezer for an hour. Freezing helps them set nicely before dipping in chocolate.
Step 4: Melt the Chocolate Coating
While your logs freeze, melt your chocolate chips and coconut oil. You can do this either in the microwave or on the stove—just be careful not to scorch that beautiful chocolate!
Step 5: Dip and Set
Once your logs are solid from freezing, dip each one into your melted chocolate coating. Let any excess chocolate drip off before returning them to the lined plate. Place them back in the freezer until the chocolate sets—this should take about 10 minutes. Finally, store these tasty treats in either the refrigerator or freezer until you’re ready to enjoy!
And there you have it! A delightful way to satisfy your sweet tooth while keeping things healthy with these Healthy Homemade Butterfingers. Enjoy every bite!
Pro Tips for Making Healthy Homemade Butterfingers
Creating your own Healthy Homemade Butterfingers is a delightful process, and with these tips, you’ll make them even better!
- Use natural peanut butter: Opting for natural peanut butter without added sugars or oils enhances the flavor and keeps your treats healthier.
- Experiment with sweeteners: If you prefer a different sweetness level, feel free to substitute honey with maple syrup or agave nectar—both work wonderfully!
- Crush cornflakes finely: Crushing the cornflakes into smaller pieces helps them mix well with the peanut butter, ensuring every bite is crunchy and satisfying.
- Chill before dipping: Letting the formed logs chill in the freezer before dipping them in chocolate prevents melting and helps maintain their shape.
- Try different chocolate types: Use dark chocolate or even white chocolate chips (dairy-free) to create unique flavors that suit your taste preferences.
How to Serve Healthy Homemade Butterfingers
Presenting your Healthy Homemade Butterfingers can turn a simple treat into an impressive dessert. Here are some fun ideas to elevate your serving!
Garnishes
- Chopped nuts: Sprinkling crushed peanuts or almonds on top adds an extra crunch and visual appeal.
- Cocoa powder dust: Lightly dusting cocoa powder over the chocolate-covered logs gives them a sophisticated touch while enhancing the chocolate flavor.
Side Dishes
- Fresh fruit salad: A vibrant mix of seasonal fruits can provide a refreshing contrast to the rich flavors of the butterfingers.
- Greek yogurt dip: A creamy yogurt dip (dairy-free if needed) pairs beautifully with the sweetness of the butterfingers while adding a tangy element.
- Nutty granola: A handful of nutty granola not only complements the texture but also adds more nutritional value to your snack time.
- Herbal tea: Enjoying these treats alongside a warm cup of herbal tea can create a cozy experience perfect for winding down after a long day.
With these tips and serving suggestions, you’re ready to enjoy your homemade treats in style! Happy snacking!
Make Ahead and Storage
These Healthy Homemade Butterfingers are perfect for meal prep! You can easily whip up a batch in advance and have a delicious treat ready whenever you need a sweet snack.
Storing Leftovers
- Store any leftover butterfingers in an airtight container.
- Keep them in the refrigerator for up to one week for the best taste and texture.
- If you notice any condensation when you take them out, simply allow them to sit at room temperature for a few minutes before enjoying.
Freezing
- To freeze, place the butterfingers in a single layer on a baking sheet and freeze until solid.
- Once frozen, transfer them to a freezer-safe bag or container.
- They can be stored in the freezer for up to three months.
Reheating
- For the best experience, enjoy your butterfingers cold or at room temperature straight from the fridge or freezer.
- If you prefer them slightly warmed, microwave briefly (about 10-15 seconds) until they soften slightly—be careful not to melt the chocolate!

FAQs
Here are some common questions about making these tasty treats!
Can I use different nut butters for Healthy Homemade Butterfingers?
Absolutely! Feel free to swap peanut butter with almond butter or cashew butter. Just keep in mind that different nut butters may alter the flavor slightly.
How do I make Healthy Homemade Butterfingers vegan?
This recipe is already vegan-friendly as it uses honey, but you can easily substitute maple syrup or agave nectar for a completely plant-based option!
Can I adjust the sweetness of my Healthy Homemade Butterfingers?
Yes! If you prefer less sweetness, reduce the amount of honey or use a sugar alternative like agave syrup or stevia. Adjusting will change the texture slightly, so experiment to find your perfect balance!
Final Thoughts
I hope you enjoy making these Healthy Homemade Butterfingers as much as I do! They’re not just tasty; they’re also easy to prepare and great for satisfying those sweet cravings without any guilt. Share them with family and friends, or keep them all to yourself—your secret is safe with me! Enjoy this delightful treat, and happy cooking!
Healthy Homemade Butterfingers
Indulge in a healthier version of a classic treat with these Healthy Homemade Butterfingers! They’re easy to whip up and perfect for satisfying your sweet cravings without the guilt. Made from wholesome ingredients like creamy peanut butter, honey, and crunchy cornflakes, these delightful snacks are coated in rich chocolate for that irresistible flavor combo. Whether you’re preparing them for a busy weeknight dessert or sharing them at family gatherings, these butterfingers will surely please everyone. Plus, they’re fun to make—get the kids involved in the kitchen and watch the smiles grow!
- Prep Time: 20 minutes
- Cook Time: 5 minutes
- Total Time: 25 minutes
- Yield: Approximately 12 servings 1x
- Category: Dessert
- Method: No-bake
- Cuisine: American
Ingredients
- 1 cup peanut butter
- 1/3 cup honey
- 1/2 tsp vanilla extract
- 1/2 tsp sea salt
- 1 + 3/4 cup cornflake cereal
- 1 cup chocolate chips (dairy-free if needed)
- 1 tsp coconut oil
Instructions
- In a saucepan over medium-low heat, combine peanut butter, honey, vanilla extract, and sea salt. Stir for 2-4 minutes until smooth.
- Pour the mixture into a large bowl with cornflake cereal and mix until well combined.
- Shape the mixture into logs (12-14 logs) and place on a parchment-lined sheet; freeze for an hour.
- Melt chocolate chips and coconut oil together until smooth.
- Dip each log in the melted chocolate, allowing excess to drip off, then return to the parchment-lined sheet. Freeze until set (about 10 minutes).
Nutrition
- Serving Size: 1 serving
- Calories: 180
- Sugar: 9g
- Sodium: 105mg
- Fat: 10g
- Saturated Fat: 3g
- Unsaturated Fat: 7g
- Trans Fat: 0g
- Carbohydrates: 18g
- Fiber: 2g
- Protein: 5g
- Cholesterol: 0mg