Hawaiian Huli Huli Chicken Stack
The Hawaiian Huli Huli Chicken Stack is more than just a meal; it’s an experience that transports you straight to the sun-kissed shores of Hawaii with every bite. Imagine this: tender, marinated chicken thighs infused with the sweet tang of pineapple juice and the umami-rich depth of soy sauce, kissed by the grill to deliver that smoky perfection. Each layer of this stack brings together a symphony of flavors, textures, and colors that not only delights the palate but also warms the soul. Picture yourself gathering around a table with friends or family, sharing stories and laughter as you dig into this vibrant dish, which is not just food but a celebration of life and love for cooking.
I’ve always been captivated by how food can evoke memories and feelings. This Hawaiian Huli Huli Chicken Stack has become one of my go-to recipes for summer gatherings and cozy weeknight dinners alike. It marries tradition with innovation, showcasing a classic Hawaiian flavor profile while allowing room for personal touches. Whether you’re in search of dinner ideas for a special occasion or simply wanting to impress your loved ones on a regular Tuesday night, this dish embodies joy and togetherness. Trust me when I say that once you experience this tropical feast, it will become a cherished part of your culinary repertoire.
Ingredients:
As we embark on this culinary journey to create the Hawaiian Huli Huli Chicken Stack, let’s take a moment to appreciate each ingredient involved in crafting this delightful dish. Each component plays a vital role in creating layers of flavor that will dance on your taste buds.
- 4 boneless, skinless chicken thighs: The chicken thighs are the stars of our show! I adore using thighs over breasts because they offer more moisture and tenderness due to their higher fat content. This means you’ll be rewarded with juicy bites rather than dry chicken—absolutely paramount for any great grilled dish. When selecting your chicken, look for pieces that are plump and fresh; they should feel firm yet yielding when pressed gently.
- 1/2 cup soy sauce: This liquid gold lends our dish its salty umami depth. It’s essential for marinating our chicken as it infuses flavor while helping to tenderize the meat through its natural enzymes. If you’re looking for gluten-free options, tamari works beautifully here too! When purchasing soy sauce, opt for high-quality brands; their rich taste enhances your dish in ways you’ll truly appreciate.
- 1/4 cup brown sugar: Brown sugar introduces a delightful sweetness that balances out the savory elements beautifully. Its molasses content adds complexity, contributing to that lovely caramelization when grilled. When measuring brown sugar, make sure it’s packed into the cup—this small detail ensures you’re getting all its sugary goodness.
- 1/4 cup pineapple juice: Ahh, pineapple juice! This ingredient brings a bright acidity and tropical sweetness to our marinade that’s simply irresistible. Plus, its natural sugars help achieve those gorgeous grill marks on the chicken when cooked! Always choose 100% pure juice without any added sugars or preservatives to keep things fresh and wholesome.
- 2 tablespoons ketchup: Ketchup might seem like an unconventional addition here, but trust me—it helps create depth in flavor while adding that essential tangy sweetness we crave. Opt for organic varieties if possible; they often omit unnecessary additives and enhance the overall quality of your dish.
- 1 tablespoon rice vinegar: A splash of rice vinegar brightens up our marinade with its mild acidity; it cuts through richness beautifully while adding subtle complexity to flavors without overpowering them. When shopping for rice vinegar, look for unseasoned versions for best results in this recipe.
- 2 cloves garlic, minced: Garlic is an absolute must-have! It infuses our marinade with aromatic warmth and depth that elevates each bite into something truly extraordinary. Freshly minced garlic delivers more pungency than pre-minced options found at stores—don’t skimp on this!
- 1 teaspoon fresh ginger, grated: Ginger adds an invigorating zing that complements the sweetness from pineapple beautifully! Its aromatic qualities enhance everything else in our dish while offering anti-inflammatory benefits—a win-win if you ask me! Look for firm bulbs with smooth skin; avoid any shriveled or moldy ones.
- 1 tablespoon vegetable oil: While grilling your chicken thighs, brushing them with vegetable oil helps prevent sticking while promoting even browning across the surface—this step is crucial! You can use any neutral oil such as canola or grapeseed; just avoid olive oil since its lower smoke point won’t give us those beautiful grill marks we’re after.
- 2 cups cooked jasmine rice: The fluffy jasmine rice serves as comforting pillows beneath our vibrant toppings—a perfect base to soak up all those flavorful juices from above! Make sure it’s cooked al dente so it holds its shape well during assembly. The aroma alone will fill your kitchen with warmth reminiscent of tropical getaways!
- 1 cup fresh pineapple, diced: Adding diced fresh pineapple brings bursts of juicy sweetness right into our stack—each bite becomes an explosion full of sunshine! Choose ripe pineapples that give slightly when pressed but aren’t overly soft; they should be fragrant too!
- 1 red bell pepper, diced: Red bell peppers not only add crunch but also vibrant color to our stack! Their natural sweetness contrasts wonderfully against all those savory elements we’ve created thus far—plus they’re packed full of vitamins A and C! When selecting peppers at the store, go for ones free from blemishes or wrinkles.
- 1/2 cup green onions, sliced: Green onions provide freshness along with a mild onion flavor that brightens everything else in this dish! They add beautiful visual appeal too—their vibrant green tops offer contrast against other ingredients—a lovely touch!
- 1 avocado, sliced: Let’s talk about creamy avocados—they bring richness unlike anything else directly into our stack while balancing out all those flavors perfectly! Always choose avocados that yield slightly under gentle pressure; you want them ripe yet still firm enough not to fall apart during assembly.
- Fresh cilantro, for garnish: Cilantro is optional but highly recommended—it introduces herbal brightness contrasting nicely against heavier elements within our dish—and oh how gorgeous does it look atop everything? Just remember some people have strong opinions about cilantro’s taste (it can taste soapy!), so feel free to omit if necessary.
- Lime wedges, for serving: Finally—we can’t forget the lime wedges! A squeeze right before digging into your stack brings everything together like magic—the zesty pop elevates every layer making each mouthful sing!
Equipment You’ll Need:
Having the right tools makes all the difference when bringing this culinary creation to life—trust me on this one! These essential partners will help ensure everything runs smoothly as we whip up our Hawaiian Huli Huli Chicken Stack together in no time!
- Grill or grill pan – Whether you’re firing up an outdoor grill under sunny skies or using an indoor grill pan when weather doesn’t cooperate—having something specially designed for grilling helps achieve those coveted char marks while locking in moisture effectively during cooking!
- Resealable plastic bag – Perfectly ideal for marinating chicken without worrying about spills or messes—these bags seal tightly ensuring every bit gets coated evenly while saving space in your fridge too!
- Medium bowl & whisk – A sturdy medium-sized bowl will serve well during mixing marinades together—whisking ensures uniformity throughout avoiding clumps caused by undissolved sugar!
- Sharp chef’s knife & cutting board – For slicing both veggies and grilled chicken strips cleanly—it’s important not only functionally but also visually pleasing when assembling stacks later down line!
Now that we’ve gathered all these wonderful ingredients and equipment let’s dive into preparing our Hawaiian Huli Huli Chicken Stack…
Step 1: Whisking Up Magic
In a medium bowl set aside specifically for marinating purposes (it’ll get messy!), combine your soy sauce, brown sugar, pineapple juice alongside ketchup plus rice vinegar before adding freshly minced garlic alongside grated ginger as well—all these components meld together beautifully creating what could only be described as liquid gold once whisked thoroughly until sugar dissolves completely within mixture! This step sets up flavor layers bound to elevate dishes beyond expectations later down line—as essential flavors meld harmoniously creating tantalizing balance essential throughout entire experience ahead!
Step 2: Marinate Your Chicken
Next comes placing those lovely boneless skinless chicken thighs inside resealable plastic bag (don’t skimp here!). Pour marinade directly over top ensuring every piece gets sufficiently coated before sealing tightly closing off air pockets completely—you don’t want any leaks ruining fun later down line! Pop this bag into refrigerator allowing flavors develop further over at least two hours (or overnight if possible); patience pays off big time here enhancing each bite exponentially upon cooking later down line—not rushing creates opportunities letting proteins absorb goodness fully leading ultimate satisfaction come dinnertime!
Step 3: Preheat Grill & Oil Chicken
Once marination period wraps up patiently waiting upon magical transformation beginning unfold ahead—it’s time fire things up preheating grill medium-high heat (typically around 375°F works wonders). As grill begins warming up nicely remove marinated chicken from bag discarding leftovers safely since cross-contamination isn’t worth risking here folks! Brush both sides lightly utilizing vegetable oil ensuring surfaces stay non-stick plus promote optimal browning throughout cooking process ahead—a step crucial achieving those characteristic char marks everyone loves seeing adorning perfectly grilled meats alongside imparting flavor enhancing elements created through previous steps combined!
Step 4: Grill Until Perfection
Time has finally come placing oiled pieces directly onto preheated surface allowing sizzle sound greet ears signaling deliciousness approaching shortly thereafter (about six-seven minutes per side depending thickness). Keep close eye checking internal temperature aiming reach safe number around 165°F (75°C)—this signals doneness achieved leading juicy succulent bites await once rested afterward slicing strips presentation-wise perfection ensuing moments later assembling towering stacks filled bursting flavors waiting eagerly upon plates served hot ready devoured moments shared amongst loved ones gathered round tables filled laughter accompanied tasty treasures arising kitchen adventures undertaken together creating lasting memories made forever cherished through shared meals enjoyed lovingly prepared by hands skilled offering love served generously plated experiences unfolded…
Step 5: Preparing the Pillowy Jasmine Rice
While your chicken is soaking up all that incredible flavor from the marinade, it’s the perfect time to turn your attention to the jasmine rice. I absolutely adore jasmine rice for its delicate fragrance and slightly nutty flavor, which pairs beautifully with the tropical notes of our Hawaiian Huli Huli Chicken Stack. If you haven’t cooked jasmine rice before, don’t worry! It’s quite simple. Start by rinsing 1 cup of rice under cold water until the water runs clear—this step is crucial because it removes excess starch that can make your rice gummy. Then, in a medium saucepan, combine your rinsed rice with 1½ cups of water and a pinch of salt. Bring it to a gentle boil over high heat.
Once it’s boiling, reduce the heat to low and cover with a tight-fitting lid. Now here’s where patience comes into play—allow it to simmer for about 15 minutes without lifting the lid! Trust me, lifting the lid allows steam to escape and can result in unevenly cooked rice. After those 15 minutes are up, remove the pan from heat but leave it covered for an additional 10 minutes; this steaming step is non-negotiable as it allows each grain of rice to reach its full fluffy potential. Once that timer goes off, uncover and fluff the rice gently with a fork; you’ll see how light and airy it becomes, ready to cradle all those wonderful toppings we’re about to add.
Step 6: Grilling Chicken to Smoky Perfection
Now comes one of my favorite parts—the grilling! Preheat your grill or grill pan over medium-high heat; you want it hot enough to create those beautiful sear marks and lock in all that juicy goodness but not so hot that you scorch your chicken. While that’s heating up, brush your marinated chicken thighs with a tablespoon of vegetable oil—this is important not just for flavor but also to prevent sticking. Carefully place the chicken on the grill; you should hear that glorious sizzle as it makes contact—a sound that promises smoky flavors and deliciousness ahead!
Cook each thigh for about 6-7 minutes on one side without flipping them too soon; this allows for caramelization—a crucial technique for building flavor. You’ll know it’s time to flip when you see those gorgeous grill marks forming and the edges starting to look opaque. Flip them over gently using tongs (never pierce them with a fork or knife; you don’t want to lose any precious juices). Let them go for another 6-7 minutes on this side as well until their internal temperature reaches 165°F (75°C). This step ensures the chicken is perfectly cooked through yet still juicy inside—nobody wants dry chicken in their stack! Once done, please remember to let them rest for at least five minutes before slicing; this resting period is vital as it allows juices to redistribute throughout the meat, ensuring every bite is moist and flavorful.
Step 7: Slicing Chicken into Bite-Sized Perfection
After allowing your grilled chicken thighs to rest (and oh, what an enticing aroma they give off!), it’s time for slicing! Using a sharp knife, cut each thigh into bite-sized strips—this helps not only with presentation but also makes it easier for everyone to enjoy their stack without any fuss. As you slice through that tender meat, notice how juicy and succulent it looks inside; this is what all our careful preparation has led up to! The slight char from grilling adds such a beautiful flavor contrast against the tender chicken—it’s truly extraordinary.
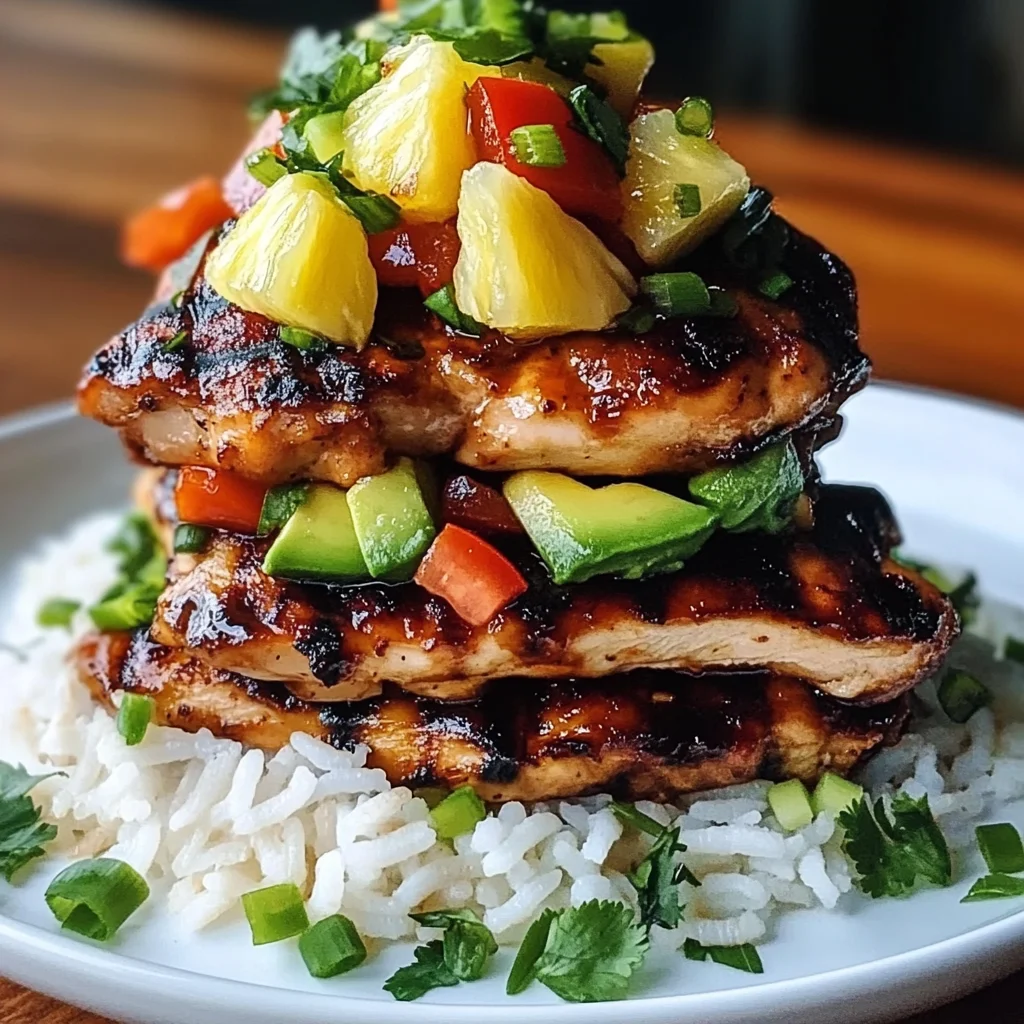
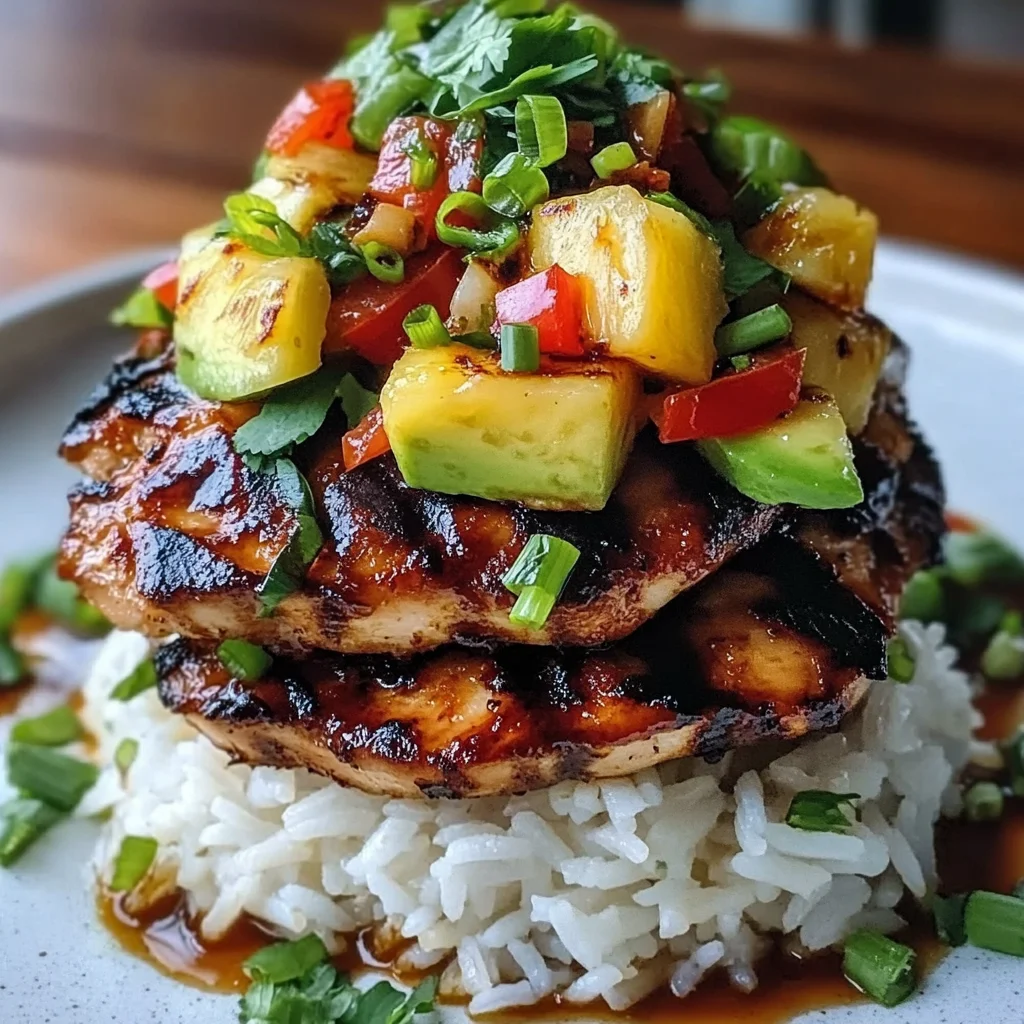
Arrange these beautiful slices neatly atop a mound of fluffy jasmine rice in your serving dish like a warm embrace waiting for its delightful toppings. Each piece should lie comfortably on its base of rice, creating a cozy foundation that will soak up all those vibrant flavors we’re about to layer on top. And trust me on this: every single component plays an integral role in making our Hawaiian Huli Huli Chicken Stack not just dinner but an experience—a symphony of textures and tastes that transport you straight to an island paradise.
Step 8: Building Your Tropical Flavor Stack
Now comes one of my favorite moments—building our gorgeous Hawaiian Huli Huli Chicken Stack! Start by generously spooning diced fresh pineapple over the sliced chicken; this sweet addition brings a refreshing burst of flavor that complements the smoky richness so beautifully. The pineapple’s natural sugars caramelize during grilling, creating an utterly intoxicating sweetness that will have everyone coming back for more.
Next up is adding diced red bell pepper; its crisp texture provides a satisfying crunch while its vibrant color adds visual appeal that’s just irresistible! Think about how each layer contributes not only flavor but also nutrition—a perfect balance between healthful ingredients and deliciousness! After layering these two spectacular components, it’s time for creamy avocado slices—their velvety texture offers such a luxurious mouthfeel amidst all those bright flavors. Don’t skimp on this step; avocados are nature’s butter and elevate our dish beyond measure! To finish off our creation, sprinkle sliced green onions and fresh cilantro liberally over everything—the green onions add a mild zing while cilantro introduces an herbaceous freshness that’s simply refreshing.
Final Touches — The Zest That Ties It All Together!
As we approach the final steps of assembling our Hawaiian Huli Huli Chicken Stack, let’s not forget about one last essential element—the lime wedges! These little gems may seem minor at first glance but squeezing fresh lime juice over your stack brings everything together in such an extraordinary way—it enhances flavors like nothing else can! The acidity cuts through richness while brightening every single bite; I promise you won’t want to skip this crucial finishing touch.
Serving immediately after assembly ensures everything remains fresh and vibrant—no need for holding back here as we want those colors popping on your dining table! With every layer thoughtfully placed upon one another, take pride in what you’ve created: not just dinner but rather a celebration of flavors reminiscent of sunny beaches and palm trees swaying in warm island breezes. Enjoy every moment while savoring your Hawaiian Huli Huli Chicken Stack with friends or family—it’s moments like these that create lasting memories around the table. Happy cooking!
Storage and Enjoyment Tips for Your Hawaiian Huli Huli Chicken Stack
Now that you’ve crafted this gorgeous Hawaiian Huli Huli Chicken Stack, it’s time to dig in and relish every mouthful of its tropical splendor! But what if you have leftovers? Fear not, my friend—this dish is not only a feast for the tastebuds but also quite easy to store and enjoy later. The vibrant flavors will hold up beautifully when preserved correctly, allowing you to experience that island magic even on a busy weeknight.
Storing Leftover Hawaiian Huli Huli Chicken Stack
To keep your Hawaiian Huli Huli Chicken Stack fresh and delicious, I recommend using airtight containers. These are the custodians of flavor that protect your dish from air exposure, ensuring every layer remains as delightful as when you first prepared it. You can store your leftovers in the refrigerator for up to three days—a perfect timeframe to savor this tropical treasure again. If you’re looking to maintain the quality of the rice, consider placing a slice of bread in the container with it; this little trick helps absorb excess moisture and keeps your rice fluffy instead of sticky. When you reheat your chicken stack, whether in the microwave or on a skillet over low heat, make sure to add a splash of water or a drizzle of olive oil to bring everything back to life. Trust me; it’ll taste just about as good as freshly made!
Freezing Components for Later
If you want to indulge in your Hawaiian Huli Huli Chicken Stack at a later date without compromising on taste, freezing components is an excellent option! To do this properly, let the grilled chicken cool completely before wrapping it tightly in plastic wrap and then placing it inside an airtight freezer-safe bag or container. This method ensures that each piece freezes evenly without getting freezer burn. You can store it like this for up to three months—imagine being able to pull out moist, flavorful chicken whenever a craving strikes! When you’re ready to enjoy it again, simply thaw overnight in the fridge and reheat as mentioned before. This convenience makes meal prep exciting and rewarding; you’ll always have a slice of paradise waiting for you!
Hawaiian Huli Huli Chicken Stack

Experience a taste of the tropics with our Hawaiian Huli Huli Chicken Stack! This vibrant dish combines juicy, marinated chicken thighs infused with sweet pineapple juice and savory soy sauce, all grilled to smoky perfection. Layered atop fluffy jasmine rice and topped with fresh ingredients like diced avocado, crunchy red bell peppers, and fragrant cilantro, each bite is a delightful explosion of flavors. Perfect for summer gatherings or cozy weeknight dinners, this easy-to-make recipe will transport you straight to the sun-drenched shores of Hawaii.
- Prep Time: 15 minutes
- Cook Time: 20 minutes
- Total Time: 35 minutes
- Yield: Serves 4
- Category: Main
- Method: Grilling
- Cuisine: Hawaiian
Ingredients
- 4 boneless, skinless chicken thighs
- 1/2 cup soy sauce
- 1/4 cup brown sugar
- 1/4 cup pineapple juice
- 2 tablespoons ketchup
- 1 tablespoon rice vinegar
- 2 cloves garlic, minced
- 1 teaspoon fresh ginger, grated
- 2 cups cooked jasmine rice
- 1 cup fresh pineapple, diced
- 1 red bell pepper, diced
- 1/2 cup green onions, sliced
- 1 avocado, sliced
- Fresh cilantro, for garnish
- Lime wedges, for serving
Instructions
- In a medium bowl, combine soy sauce, brown sugar, pineapple juice, ketchup, rice vinegar, garlic, and ginger. Whisk until well blended.
- Place chicken thighs in a resealable plastic bag and pour marinade over them. Seal tightly and refrigerate for at least 2 hours or overnight.
- Preheat grill to medium-high heat. Remove chicken from marinade (discard leftover marinade) and brush both sides with vegetable oil.
- Grill chicken for about 6-7 minutes per side until cooked through (internal temperature should reach 165°F). Let rest for 5 minutes before slicing.
- Serve sliced chicken over jasmine rice and top with diced pineapple, red bell pepper, green onions, and avocado.
Nutrition
- Serving Size: 1 stack (approximately 350g)
- Calories: 490
- Sugar: 19g
- Sodium: 850mg
- Fat: 15g
- Saturated Fat: 3g
- Unsaturated Fat: 10g
- Trans Fat: 0g
- Carbohydrates: 54g
- Fiber: 3g
- Protein: 34g
- Cholesterol: 110mg