Easy Dinner Roll Recipe With Just 5 Ingredients
There’s something profoundly satisfying about the aroma of freshly baked bread wafting through your home. It’s more than just a recipe; it’s a heartfelt creation that bridges generations, evoking memories of family gatherings, laughter shared over dinner, and the warmth of togetherness. This Easy Dinner Roll Recipe With Just 5 Ingredients is a delightful way to bring that feeling into your kitchen. As you knead the soft dough and watch it rise, you’ll find yourself enveloped in a symphony of scents—the sweet scent of yeast mingling with the rich warmth of butter and milk. Each roll becomes a vessel for love and comfort, ready to be slathered with butter or served alongside your favorite meal, making every bite an experience worth savoring.
What I adore about this recipe is its simplicity and accessibility. You won’t need an extensive pantry or exotic ingredients; just five everyday items come together to create something truly extraordinary. The beauty lies in the transformative process: from flour and water to fluffy, golden rolls that beckon you to break them apart with your hands. It’s like magic—watching those humble ingredients rise and develop into something deliciously inviting. Trust me when I say that once you master these rolls, they will become a staple in your home, perfect for weeknight dinners or special occasions alike.
Easy Dinner Roll Recipe With Just 5 Ingredients: The Perfect Accompaniment for Any Meal
Let’s embark on this culinary journey together! With just five simple ingredients, you’ll be amazed at how easy it is to create delightful dinner rolls that will impress everyone at the table. So grab your apron, roll up your sleeves, and let’s dive into this inviting recipe where each step is filled with joy and anticipation.
Ingredients:
As we gather our ingredients for this Easy Dinner Roll Recipe With Just 5 Ingredients, remember that each component plays a pivotal role in crafting those light and fluffy rolls that will dance on your taste buds.
- 3½ cups all-purpose flour. Flour is the backbone of our dinner rolls; it provides structure and stability to our dough. When selecting flour, look for a good quality all-purpose variety which has an ideal protein content for yeast breads—this ensures the right amount of gluten forms during kneading. The gluten is what gives our rolls their chewy texture while allowing them to rise beautifully as they bake. If you’re feeling adventurous or want a nuttier flavor, consider using half whole wheat flour mixed with all-purpose for added depth!
- 1½ tsp instant yeast. Yeast is absolutely paramount in this recipe as it creates those air pockets within the dough that make our rolls light and fluffy! Instant yeast is my go-to because it dissolves quickly and doesn’t require proofing—making our baking adventure even easier! When purchasing yeast, always check the expiration date; fresh yeast will work its magic more effectively than old. And here’s a tip: if you ever find yourself without instant yeast on hand, feel free to substitute active dry yeast—just remember that you’ll need to activate it first by mixing it with warm water and sugar.
- 2 tbsp sugar. Sugar does more than just sweeten; it acts as food for our yeast! This process encourages fermentation which contributes to both flavor and texture while also giving our rolls a beautiful golden-brown color once baked. Don’t worry; two tablespoons won’t make them overly sweet but will instead enhance their natural flavors beautifully. If you’re aiming for a healthier alternative, raw honey can work wonders here too!
- 1 tsp salt. Salt may seem like a mere seasoning but trust me when I say it’s essential! It strengthens the gluten structure while balancing flavors throughout the dough. A well-salted roll elevates everything about it—making each bite taste more profound and satisfying. Always opt for fine sea salt or kosher salt as they dissolve more easily into your dough compared to coarse salts.
- 1½ cups milk. Milk brings richness to our rolls while adding moisture—a key component in achieving that fluffy texture we desire! Warming the milk slightly before adding it helps dissolve the sugar and activates the yeast faster, so aim for lukewarm temperatures (think baby bottle warmth). If you’re looking for dairy alternatives due to dietary preferences, almond milk or oat milk works exceptionally well without compromising flavor!
- 3 tbsp butter (melted). Butter adds richness and tenderness, contributing to that melt-in-your-mouth experience we all crave in homemade bread! Using unsalted butter allows you better control over your dish’s overall salinity since we’ve already added salt separately; plus, melting it beforehand ensures it’s evenly distributed throughout the dough.
- 1 egg + 1 tbsp milk (for egg wash). The egg wash is what gives our rolls their beautiful sheen when they come out of the oven—a visual cue that promises deliciousness inside! Mixing egg with milk provides both color and shine; don’t skip this step if you want those Insta-worthy golden tops!
Now let’s gather our trusty tools necessary for creating these lovely rolls!
Equipment You’ll Need:
Having the right equipment can make all the difference between a smooth baking experience or one fraught with frustration! While these tools may not be ingredients, they are essential partners in creating something wonderful.
- Mixing bowl – A sturdy mixing bowl gives us ample space to combine all our ingredients without fear of spills or splashes! Opting for glass or stainless steel helps retain heat during rising phases—a crucial factor when creating perfectly airy rolls.
- Measuring cups & spoons – Precision matters in baking! Invest in reliable measuring cups (both liquid and dry) along with measuring spoons so you can confidently recreate this recipe over and over again without guesswork.
- Floured surface – Whether it’s your countertop or a dedicated pastry board, having a clean floured surface allows us to knead our dough effectively without sticking—a vital step toward achieving that smooth texture we’re aiming for!
- Baking dish – A square baking dish works wonderfully here because it allows every roll enough room to rise comfortably while maintaining close contact during baking—ensuring soft sides where they touch one another!
- Kitchen towel – A simple yet effective tool! Covering your rising dough keeps warmth trapped inside while preventing drafts from stalling its growth—this step ensures we get beautifully risen rolls every time.
Now we’re ready to start preparing those scrumptious dinner rolls!
Preparing the Easy Dinner Roll Recipe With Just 5 Ingredients
Step 1: Combine Your Dry Ingredients
Start by bringing together your flour, instant yeast, sugar, and salt in your large mixing bowl—this initial combination sets the foundation for our dinner rolls’ flavor profile! Use a whisk or fork here; blending ensures even distribution of each component which is absolutely crucial for consistent results throughout every bite you’ll take later on. As you mix these dry ingredients together, take a moment to appreciate how simple yet vital they are—the harmony of these elements is what makes bread-making so magical!
Step 2: Melt Your Butter & Warm Your Milk
Next up: melt your butter gently in either a microwave-safe bowl or small saucepan until it’s completely liquid gold—it shouldn’t be boiling hot but just warm enough so you can comfortably touch it afterward! Alongside this process, warm your milk until it’s lukewarm as well (think baby bottle temperature). Why do we warm these? Because both components need heat activation—they’ll help jumpstart fermentation once combined with those dry ingredients earlier! Pour this buttery mixture directly into your dry mixture after warming—it’ll create an inviting aroma as everything melds beautifully together.
Step 3: Form Your Dough
At this point, you’ll notice how things have transformed into something resembling shaggy dough rather than individual ingredients—it’s time for some kneading magic! Turn out this shaggy mass onto your floured surface (don’t skimp on flour here!) then begin kneading gently—press down with heel of palm then fold over towards yourself before turning slightly clockwise each time until fully incorporated into one cohesive ball shape takes around five minutes max here but patience pays off immensely later on trust me!
Step 4: Let It Rise
Once you’ve achieved that smooth elasticity characteristic of well-kneaded bread dough (think soft yet springy), place this lovely ball into lightly oiled bowl big enough so there’s ample room left over top during rising phase—cover securely using kitchen towel allowing warmth from surrounding area trap inside creating ideal environment needed encourage doubling size over next hour(s). Don’t rush this step either; giving nature time works wonders ensuring proper fermentation occurs resulting in airy light bites later down line!
Stay tuned as we continue through each stage towards rolling perfection…
Step 5: Shaping the Dough into Rolls
Once your dough has risen beautifully, and you can see that it has doubled in size—a testament to the magic of yeast—it’s time to awaken your inner baker and shape those fluffy rolls. Gently punch down the dough with your fist; this is called deflating and it’s crucial because it releases the carbon dioxide that has built up during the rising process. This step prevents your rolls from being overly airy and ensures they have a lovely structure. Don’t worry if your dough feels a little sticky; a light dusting of flour on your work surface will help manage that without compromising its quality.
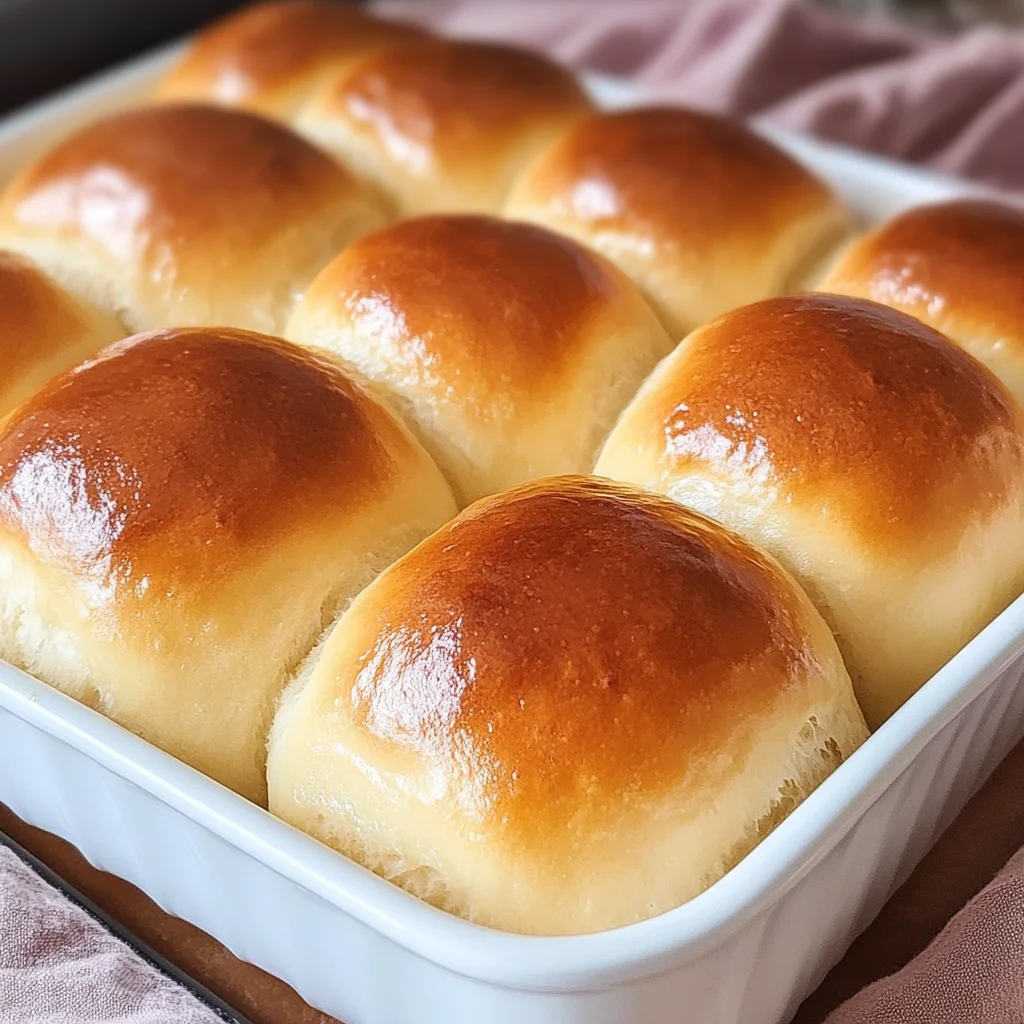
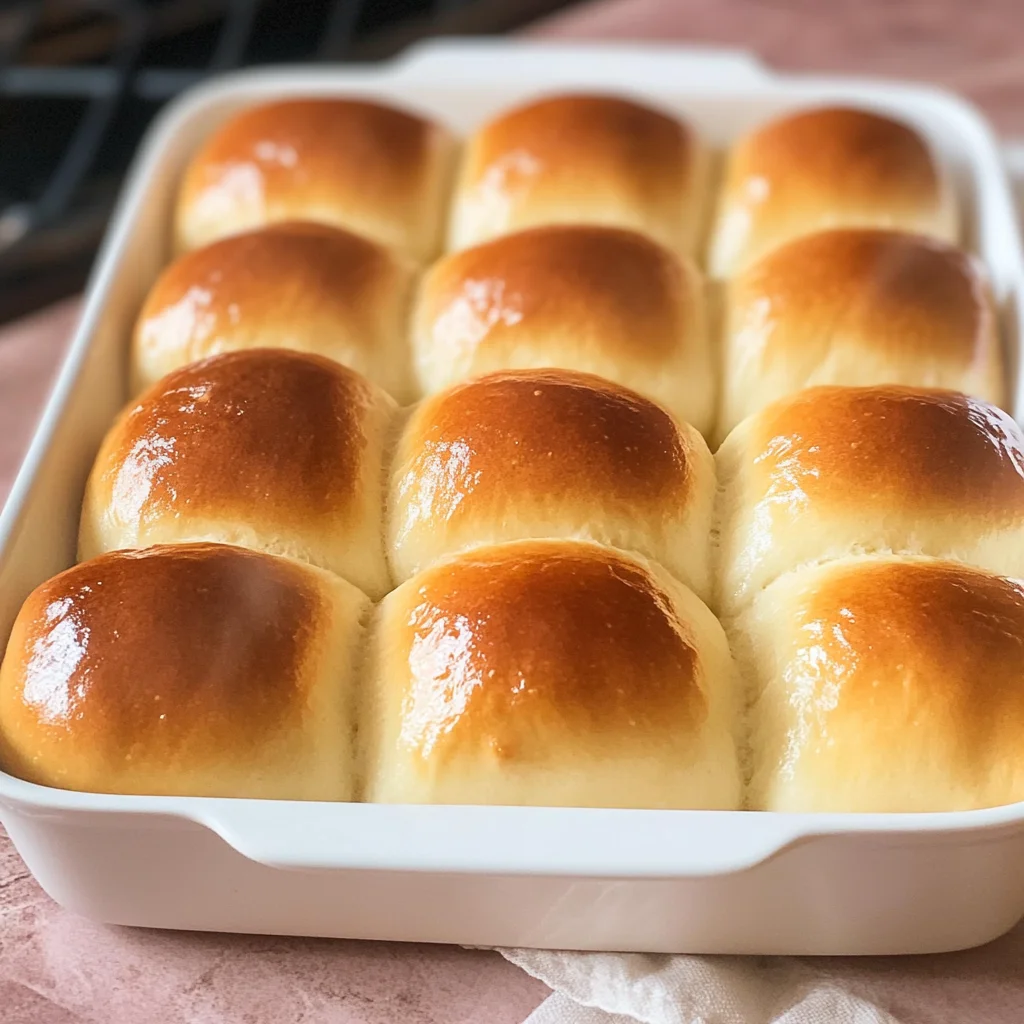
Now, divide your deflated dough into nine equal pieces—this is where precision plays a role, though it doesn’t have to be perfect! Each piece should weigh roughly around 2 ounces, but if you’re like me, you might just eyeball it and go for a bit of rustic charm. Roll each piece into a smooth ball by cupping it in your palm and rotating it gently against the countertop. This technique helps create surface tension which is key for achieving that quintessential dinner roll roundness. As you shape them, keep in mind that these rolls are not just vessels for butter; they’re going to be the soft, comforting companions to your meal, soaking up sauces and gravies. Place each ball into a square baking dish, ensuring they are close enough to snuggle together but not too tight—about an inch apart works wonders.
Step 6: The Second Rise – Letting Magic Happen
After you’ve nestled those lovely dough balls into your baking dish, they will need another rise—this time for about an hour. Cover them loosely with a clean kitchen towel or plastic wrap to create a warm environment while keeping their surface from drying out. This step may feel tedious, but trust me when I say this is where the true transformation happens. During this second rise, the yeast continues its work, producing more air bubbles which will make your rolls light and airy when baked.
Finding the perfect warm spot for this rise can be as simple as placing them near a sunny window or in an oven that’s turned off but warmed slightly by just leaving the light on. You want to watch for visual cues here: after about 60 minutes, the rolls should look puffy and almost touch each other—a sign that they’re ready for the oven! If they haven’t quite reached that state yet, give them an extra few minutes; patience here is non-negotiable because skipping this step could lead to dense rolls instead of those pillowy clouds we all crave.
Step 7: Prepping for Baking – The Egg Wash
As your dough balls rise toward perfection, it’s time to prepare one of my favorite finishing touches: the egg wash! In a small bowl, whisk together one egg with one tablespoon of milk until you achieve a smooth mixture—this golden liquid gold is what will give your rolls that beautiful glossy finish once baked. The proteins in the egg will caramelize as they cook, creating a stunning crust that not only looks appetizing but also adds texture and flavor.
Using a pastry brush (or even just your fingers if you’re feeling adventurous!), gently apply this mixture over the tops of each roll right before they head into the oven. This step might seem trivial, but I promise you—the difference it makes is absolutely paramount! It enhances not only the aesthetic appeal but also contributes to that exquisite crunchy crust we all adore when biting into freshly baked bread. Just be careful not to drown them in egg wash; we want just enough coverage without pooling at the bottom of your baking dish.
Step 8: Baking Your Perfect Easy Dinner Rolls
With everything prepped and ready—the aroma of rising dough filling your kitchen—is there anything more exciting than sliding those rolls into a preheated oven? Set it to 400°F (200°C) and let the magic unfold! Bake those beauties for about 10-15 minutes or until they turn gloriously golden brown on top—a color that beckons you closer with its warmth and promise of deliciousness.
As they bake, keep an eye on them through the oven door’s glass (no peeking too often though!). An excellent way to test doneness is by tapping on one of those rolls lightly; if it sounds hollow inside—that’s music to any baker’s ears! Moreover, if you’re using an oven that’s particularly unpredictable or you’ve inherited one from generations past with quirks of its own, consider rotating your baking dish halfway through cooking time for even browning all around. The enticing aroma wafting through your home at this point is truly intoxicating—it’s like a warm hug welcoming you home!
Conclusion:
What an incredible journey we’ve had together through this Easy Dinner Roll Recipe With Just 5 Ingredients! As we come full circle from mixing the dough to pulling those glorious rolls out of the oven, I genuinely hope my excitement has inspired you as much as these delightful little pillows inspire me each time I make them. They embody simplicity yet deliver profoundly satisfying results that elevate any meal — whether it’s an ordinary weeknight dinner or a special occasion feast. The tender texture combined with that irresistible golden crust creates a symphony of flavors that dances on your palate.
Now let’s talk about why this recipe deserves a special place in your kitchen repertoire! Not only does it require just five ingredients — making it incredibly accessible even on those busy days — but it also brings joy into your home as you knead and shape each roll with love. Picture yourself gathering around the table with family or friends as you serve these warm rolls straight from the oven; imagine their faces lighting up as they break one open and experience that steam rising along with the tantalizing aroma wafting through the air. There’s something truly magical about creating these moments around food.
When it comes time to serve these fantastic rolls, think beyond just butter (though they are perfect slathered with it!). Imagine savoring one alongside a hearty bowl of soup on chilly evenings or using them as mini sandwiches piled high with your favorite fillings for lunch! For an afternoon pick-me-up, try pairing one with homemade jam or honey spread — pure bliss! And let’s not forget how fabulous they are next to roasted vegetables or savory casseroles; they soak up all those delicious juices wonderfully.
Feeling adventurous? This recipe is wonderfully adaptable! You could infuse some garlic powder into the dough for an aromatic twist or sprinkle herbs like rosemary or thyme on top before baking for an extra layer of flavor. Craving something sweet? Why not add some cinnamon sugar before shaping? The possibilities are endless! I invite you to experiment with these variations and make this recipe your own. After all, every new batch tells its own story — so share yours with friends and family, and don’t hesitate to connect with me about your experiences in making these rolls! I can’t wait to hear how they turn out!
Easy Dinner Roll Recipe With Just 5 Ingredients
There’s nothing quite like the comforting aroma of freshly baked dinner rolls filling your home. This Easy Dinner Roll Recipe With Just 5 Ingredients brings warmth and joy to any meal with its fluffy, golden texture and delightful taste. Made with simple ingredients, these rolls are perfect for family gatherings or weeknight dinners. With just a bit of kneading and rising, you’ll create irresistible homemade bread that pairs beautifully with soups, stews, or simply slathered in butter. Get ready to impress everyone at your table with these easy-to-make dinner rolls that embody love and comfort in every bite.
- Prep Time: 15 minutes
- Cook Time: 15 minutes
- Total Time: 30 minutes
- Yield: Approximately 9 servings 1x
- Category: Bread
- Method: Baking
- Cuisine: American
Ingredients
- 3½ cups all-purpose flour
- 1½ tsp instant yeast
- 2 tbsp sugar
- 1 tsp salt
- 1½ cups milk (lukewarm)
- 3 tbsp unsalted butter (melted)
Instructions
- In a large mixing bowl, combine flour, instant yeast, sugar, and salt.
- Warm the milk and melt the butter in separate containers; then add both to the dry ingredients.
- Mix until a shaggy dough forms, then knead on a floured surface for about 5 minutes until smooth.
- Place the dough in an oiled bowl, cover with a kitchen towel, and let it rise for about an hour until doubled in size.
- Punch down the dough, divide into nine pieces, and shape each into a ball. Place them in a greased square baking dish.
- Allow the rolls to rise again for about 60 minutes until puffy.
- Preheat oven to 400°F (200°C). Brush the tops with an egg wash of one egg whisked with one tablespoon of milk.
- Bake for 10-15 minutes or until golden brown.
Nutrition
- Serving Size: 1 roll (50g)
- Calories: 150
- Sugar: 1g
- Sodium: 180mg
- Fat: 4g
- Saturated Fat: 2g
- Unsaturated Fat: 2g
- Trans Fat: 0g
- Carbohydrates: 25g
- Fiber: 1g
- Protein: 4g
- Cholesterol: 10mg