Easter Egg Oreo Cookie Balls
As the vibrant colors of spring unfold, there’s something magical about celebrating Easter with loved ones. The air is filled with laughter, the scent of blooming flowers, and most importantly, the sweet anticipation of delightful treats. One recipe that truly captures this joy and transforms an ordinary day into a festive occasion is Easter Egg Oreo Cookie Balls. These little gems are not just a dessert; they are a celebration of creativity, fun, and togetherness in the kitchen. Each bite delivers a symphony of flavors that dances on your palate—a creamy, sweet interior enveloped in a crisp candy coating, inviting you to indulge in nostalgia while creating new memories.
What makes these Easter Egg Oreo Cookie Balls truly special is how they bring people together. Imagine gathering around the table with your family or friends, chatting and giggling as you crush cookies and shape these adorable egg forms. It’s more than just baking; it’s about sharing love through food—an age-old tradition that resonates deeply within us all. Plus, the joy of decorating these colorful confections gives everyone a chance to express their artistic flair! I promise you, whether it’s for an Easter gathering or simply to brighten up a weekday afternoon, these treats will leave everyone smiling.
Easter Egg Oreo Cookie Balls: A Sweet Spring Delight
These festive treats are as delightful to create as they are to eat! Perfect for kids and adults alike, they’re sure to become a cherished family tradition. Let’s dive into this joyful culinary adventure together!
Ingredients:
Before we jump into making our Easter Egg Oreo Cookie Balls, let’s gather our ingredients. Each component plays an essential role in crafting these delicious bites that will surely impress everyone!
- 14.3 oz package (36 cookies) Golden Oreos, crushed into crumbs. Golden Oreos add a beautiful lightness and buttery flavor to our cookie balls that pairs perfectly with cream cheese’s richness. The crunchiness when crushed adds texture that contrasts beautifully with the smooth filling. When selecting your Oreos, ensure they’re fresh for optimal flavor—the sweetness from the cookies balances the tangy cream cheese perfectly!
- 8 oz cream cheese, room temperature. This is crucial for achieving that luscious, creamy texture we all crave in every bite of our cookie balls. Room temperature cream cheese blends seamlessly with the crushed Oreos, creating a smooth mixture that’s easy to roll into eggs without crumbling apart. If it’s too cold straight from the fridge, you’ll struggle mixing it well—so let it sit out for about 30 minutes before starting.
- 10 oz white candy coating. This coating is where we get that gorgeous glossy finish on our eggs! It melts into a silky pool of sweetness that hardens beautifully once dipped over our cookie mixture. Look for high-quality candy melts designed for dipping; they offer a smoother finish and better taste than generic options. You can find them in craft stores or online.
- Additional 1 oz of white candy coating per color, for decorating. Decorating takes your cookie balls from delightful to absolutely stunning! The extra candy coating allows you to create vibrant designs using gel icing colors—don’t hold back on creativity here! Just remember to use small amounts so you have enough to work with while ensuring each color stands out against the white base.
- Gel icing colors. These little tubes pack a punch when it comes to adding life to your creations! The beauty of gel colors lies in their vibrant pigmentation—just a drop or two can transform your melted candy coating into eye-catching hues perfect for drizzling or piping designs onto your eggs.
Equipment You’ll Need:
Having the right tools at your disposal can make all the difference when embarking on this tasty adventure! While they aren’t ingredients per se, each piece of equipment plays a significant role in ensuring everything runs smoothly.
- Food processor or blender – This handy gadget is essential for crushing those Golden Oreos into fine crumbs effortlessly! A food processor offers more uniformity in texture compared to manual methods like smashing them in a zip-top bag—it saves time and ensures consistency throughout your mixture.
- Mixing bowl – Opt for a large bowl where you can comfortably combine your ingredients without any mess spilling over the sides! A sturdy glass or ceramic bowl retains heat better during mixing if needed and allows you to see when everything is fully combined.
- Parchment paper – As we dip our egg-shaped delights in melted candy coating, parchment paper becomes our best friend by providing a non-stick surface for drying. It prevents any unfortunate sticking while allowing easy clean-up later on—trust me; it’s essential!
- Toothpicks – These little tools serve as perfect dippers when coating each egg—insert one into the bottom before dipping so you have something sturdy to hold onto without getting messy fingers! Plus, they help create those neat little finishing touches by allowing us to fill in any holes left behind after pulling them out.
With everything gathered and ready at hand, we’re set to create something extraordinary together!
I cannot wait for you all to experience how rewarding making these Easter Egg Oreo Cookie Balls truly is—they’re not only delicious but also spark joy through creativity and connection!
Creating Your Delightful Easter Egg Oreo Cookie Balls
Step 5: Dipping into Sweetness
Once your adorable little egg-shaped creations have chilled for about an hour, it’s time to give them a delightful coating that will transform them from simple cookie balls into a stunning Easter treat! Begin by melting your 10 ounces of white candy coating. This is a crucial moment in the process, as the melted candy coating acts almost like a protective shell, encasing those scrumptious Oreo flavors while adding a sweet and creamy dimension to each bite. You can use a microwave-safe bowl and melt the candy in 30-second intervals. Stir between each session to ensure even melting; if you rush this step, you risk burning the chocolate, which can leave a bitter taste instead of that lovely sweetness we crave.
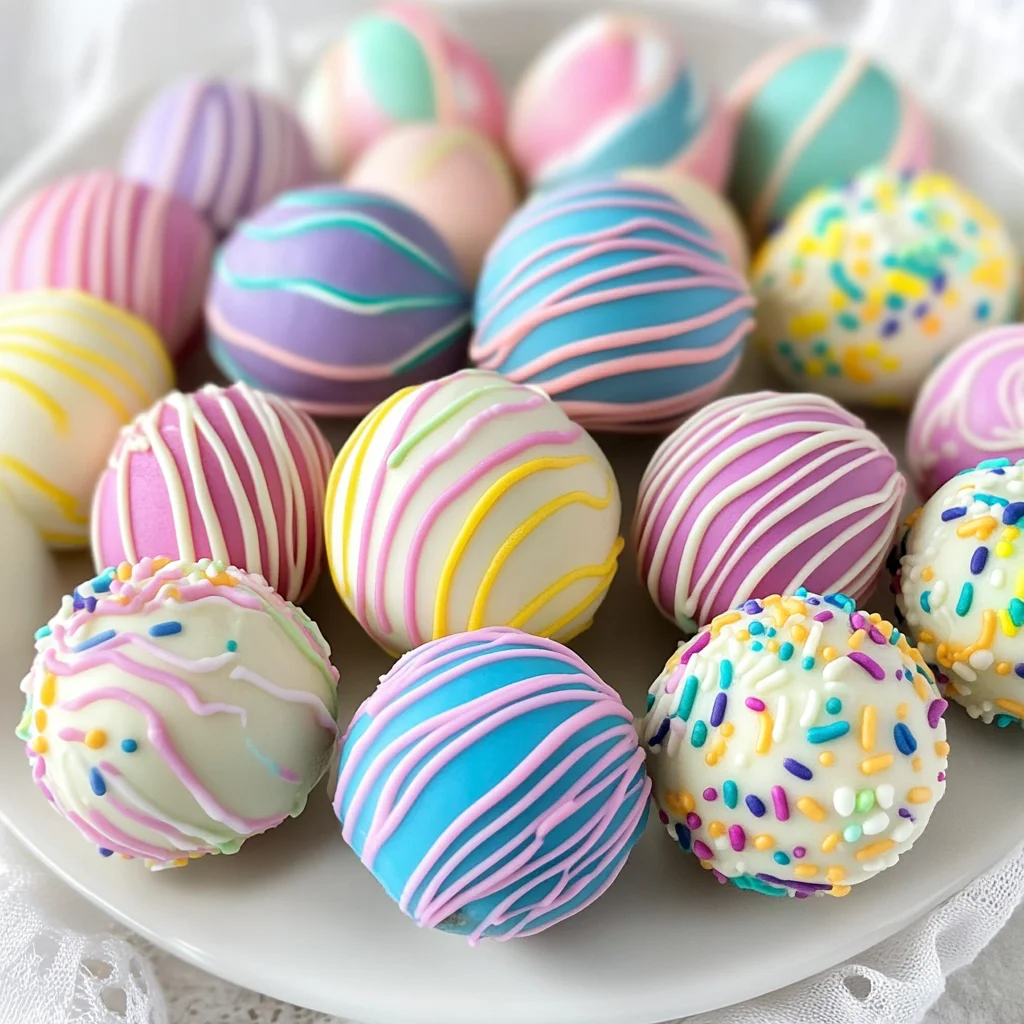
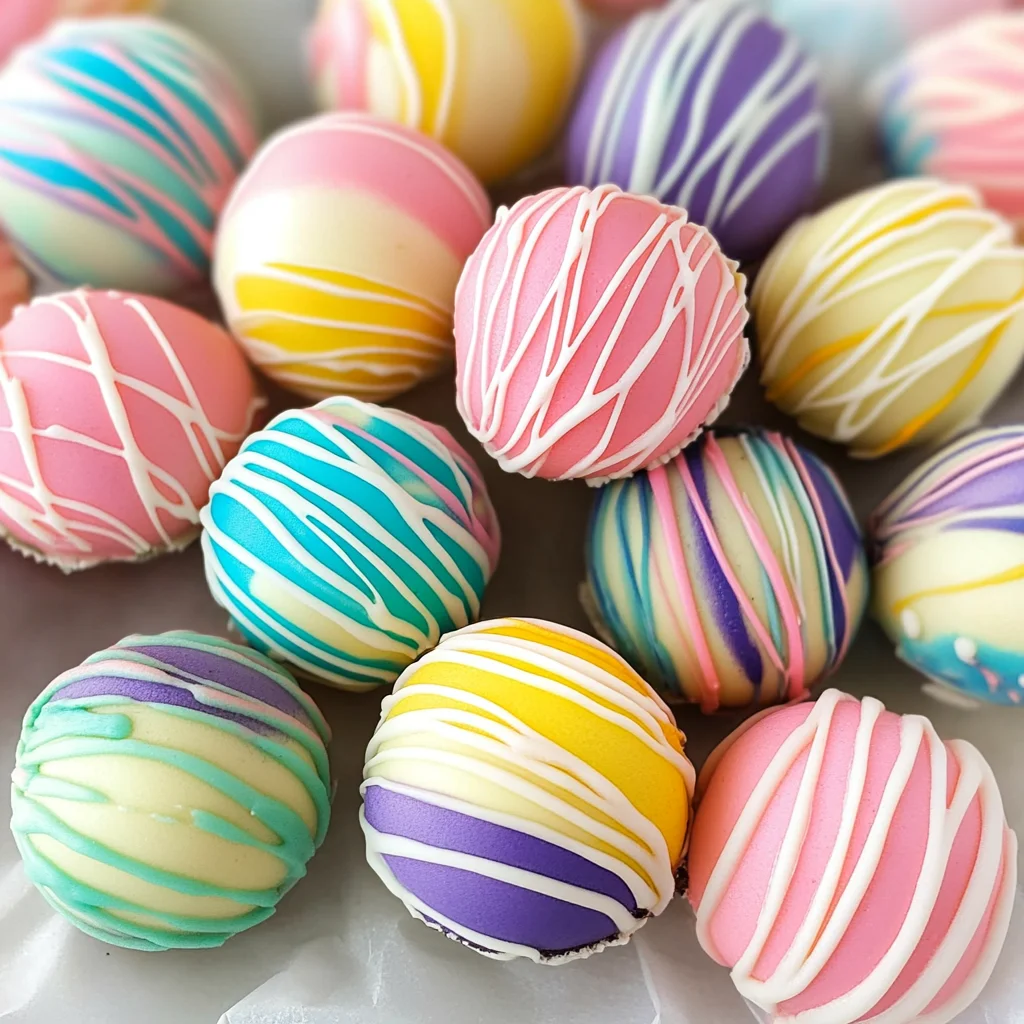
As you dip each chilled Oreo egg into the warm, silky liquid gold of the candy coating, be sure to use a toothpick to make handling easier and cleaner. Submerge each egg gently into the melted coating, allowing it to get fully enveloped. The key here is to let any excess coating drip off before placing them on parchment paper. I find that lightly shaking off any extra coating keeps things tidy and prevents those unsightly puddles from forming around your eggs. Remember, these little details matter because they contribute to both appearance and texture. Once you’ve dipped all your eggs, take a moment to admire their glossy finish before setting them aside; this glossy sheen is what makes them look so enticing!
Step 6: Unleashing Your Creativity
Now comes one of my favorite parts—the decorating! Once the initial layer of candy coating has dried (which usually takes about 10-15 minutes), it’s time to unleash your creativity with colors and designs. You’ll want to melt your additional white candy coating—this time using just about 1 ounce per color—to create vibrant decorations that will turn these treats into colorful masterpieces. As you melt each batch, add gel icing colors until you achieve the shades that speak to your Easter theme. Whether you’re going for pastel hues or bold colors, remember that this is your canvas!
Now comes the fun part: piping or drizzling those colors over your coated Oreo eggs! I love using a piping bag for precision when creating intricate designs or simply drizzling it on for a more whimsical look. Trust me when I say there’s no right or wrong way to decorate—each egg can reflect your unique style! This step not only adds visual appeal but also introduces additional flavors depending on how creatively you decide to embellish them. Just think of all the compliments you’ll receive when friends and family see (and taste!) these beautiful creations!
Step 7: The Importance of Chilling Again
After you’ve adorned your cookie balls with colorful decorations, it’s essential to let them chill again in the fridge for at least another 30 minutes. This chilling period is absolutely paramount because it ensures that everything sets beautifully—both the outer candy coating and any decorative elements you’ve added. If you skip this step, you might end up with melted decorations or soft candies that don’t hold their shape during serving.
While they are chilling, take a moment to appreciate what you’ve created so far—the vibrant colors against the creamy white background are not just visually appealing but evoke feelings of joy and festivity! You’ll know they’re ready when you can gently touch them without leaving fingerprints or smudging any designs—this is an indicator that everything has firmed up nicely.
Step 8: Storing Your Sweet Treasures
Once those delectable Easter Egg Oreo Cookie Balls have set completely after their final chill, it’s time for storage! These little treasures can be kept in an airtight container in the fridge for about a week—if they last that long! They make for such delightful treats during family gatherings or as surprise snacks throughout the day. Just imagine reaching for one of these beauties after dinner; their cool creaminess paired with that decadent chocolate flavor is utterly intoxicating.
When storing them, lay parchment paper between layers if you’re stacking them; this will prevent any sticking or damage to those gorgeous decorations you’ve worked so hard on! Don’t forget—sharing is caring! These treats make fantastic gifts during Easter celebrations and are sure to bring smiles all around.
Conclusion:
As we wrap up this delightful journey through creating Easter Egg Oreo Cookie Balls together, I hope you’re feeling as excited as I am about these addictive little bites of joy! This recipe truly embodies everything that makes dessert-making special—the uncomplicated ingredients blend into a symphony of flavors and textures that just fills your heart with warmth. Creamy cream cheese melds beautifully with the crunch of Golden Oreos enveloped in sweet candy coating; every single bite is profoundly satisfying and utterly intoxicating. It’s not just about eating; it’s about sharing moments filled with laughter and sweetness with loved ones.
Why should you give this recipe a try? Well beyond its incredible taste lies the joy of making something fun and colorful alongside friends or family—there’s something magical about crafting treats together that creates lasting memories. Picture yourself pulling these vibrant egg-shaped delights from the fridge at your next gathering: smiles all around as everyone anticipates that first delicious bite! They’re versatile enough for any celebration—Easter parties, birthdays, or even just cozy evenings at home—and trust me, once you’ve made them once, you’ll find yourself returning time after time.
Imagine savoring one with a cup of rich coffee during your afternoon break—it complements beautifully with that deep flavor profile or enjoying one after dinner while curled up with a good book; whatever the scene may be, it’s bound to elevate your experience! For an extra decadent touch, serve alongside fresh fruit or even drizzled chocolate sauce—your taste buds will thank you!
Feeling adventurous? This recipe is wonderfully adaptable! You could swap out the Golden Oreos for mint-flavored ones or experiment with different colors and designs on your candy coating to create seasonal variations throughout the year. Maybe even throw in some crushed nuts or sprinkles for added crunch—endless possibilities await! I encourage you to dive into this project wholeheartedly; get creative and share your experiences with others because nothing brings people together like good food made from the heart!
Easter Egg Oreo Cookie Balls

Get ready to create a delightful treat that brings joy to any gathering—Easter Egg Oreo Cookie Balls! These vibrant, no-bake cookie balls are perfect for celebrating spring and sharing sweet moments with loved ones. With a creamy filling made from crushed Golden Oreos and cream cheese, each bite offers a perfect balance of flavors, coated in a glossy white candy shell. The fun doesn’t stop there; decorate them with colorful designs to express your creativity! Whether you’re hosting an Easter celebration or simply looking for a fun kitchen project, these treats are sure to impress everyone at the table.
- Prep Time: 45 minutes
- Cook Time: 15 minutes
- Total Time: 1 hour
- Yield: Approximately 24 servings 1x
- Category: Dessert
- Method: No-bake
- Cuisine: American
Ingredients
- 14.3 oz package Golden Oreos (36 cookies)
- 8 oz cream cheese, room temperature
- 10 oz white candy coating
- Additional 1 oz white candy coating (for decorating)
- Gel icing colors
Instructions
- Crush the Golden Oreos into fine crumbs using a food processor.
- In a mixing bowl, combine the crushed Oreos and room-temperature cream cheese until well blended.
- Roll the mixture into egg shapes, about 1½ tablespoons each, and place on parchment paper.
- Chill the formed eggs in the refrigerator for one hour.
- Melt the white candy coating in intervals until smooth; dip each chilled egg into the coating and let excess drip off.
- Allow dipped eggs to set before decorating with melted colored candy coating.
- Chill again for 30 minutes to set decorations.
Nutrition
- Serving Size: 1 cookie ball - 30g
- Calories: 130
- Sugar: 11g
- Sodium: 35mg
- Fat: 7g
- Saturated Fat: 4g
- Unsaturated Fat: 2g
- Trans Fat: 0g
- Carbohydrates: 16g
- Fiber: 0g
- Protein: 1g
- Cholesterol: 15mg