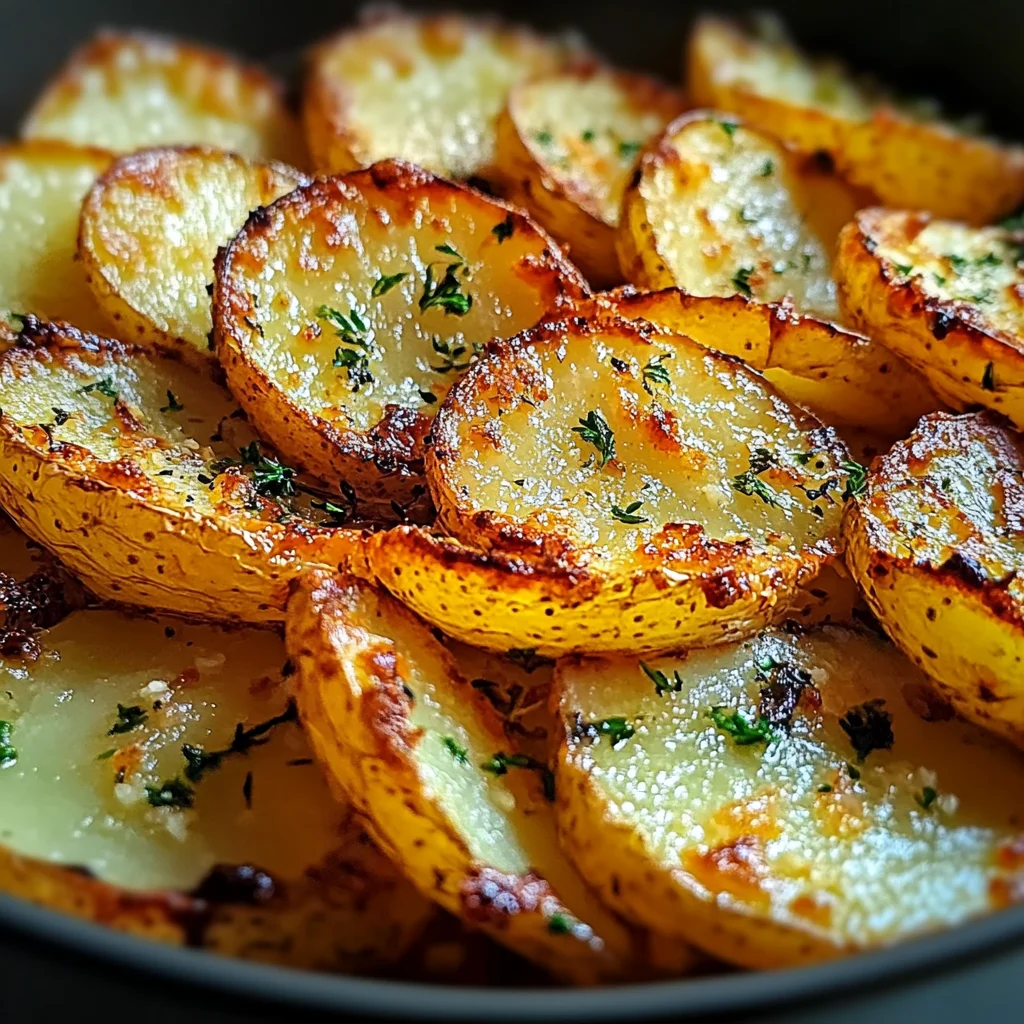
Crispy Sliced Potatoes – Easy Oven Baked Recipe
There’s something profoundly satisfying about crispy sliced potatoes, isn’t there? The mere thought of biting into perfectly golden, crunchy slices, with a soft and fluffy interior, brings a smile to my face. This isn’t just any recipe; it’s a celebration of simple ingredients turned into something extraordinary. When you make these Crispy Sliced Potatoes – Easy Oven Baked Recipe, you’re not merely preparing a side dish—you’re creating an experience that invites warmth and joy into your home. Imagine the aroma wafting through your kitchen as they bake, mingling with the earthy notes of garlic and fragrant herbs, making everyone eagerly gather around the table in anticipation.
Cooking has a way of bridging generations and traditions; it’s one of those beautiful acts that connects us to our roots while allowing us to innovate and express ourselves. I’ve always been captivated by how something so humble as a potato can transform into such a delightful treat with just a few thoughtful steps. These crispy delights are perfect for any occasion—from cozy family dinners to lively gatherings with friends. Trust me when I say that once you serve these up, they will steal the show and leave everyone asking for seconds!
Crispy Sliced Potatoes – Easy Oven Baked Recipe: A Golden Delight
Let’s embark on this culinary journey together! Making crispy sliced potatoes at home is not only easy but incredibly rewarding. It’s all about embracing the process and allowing those simple ingredients to shine through. With just four large potatoes, some olive oil, and a few seasonings, you’re well on your way to crafting a dish that is sure to impress.

Ingredients:
Before we dive into the cooking process, let’s take a moment to appreciate each ingredient we’ll be using. These components may seem straightforward, but their quality and preparation are what truly elevate this dish from good to glorious.
- 4 large potatoes. The star of our show! When selecting potatoes, look for varieties like Russets or Yukon Golds—these types have the ideal starch content that results in crispy edges and fluffy insides when baked. It’s essential to wash them thoroughly; after all, we want every bite to be clean and delicious. Patting them dry afterward helps achieve that coveted crispiness because moisture is the enemy in our quest for crunch!
- 1 tablespoon olive oil. Think of olive oil as liquid gold in this recipe; it creates a delectable barrier that aids in browning while adding rich flavor. Extra virgin olive oil is my go-to here because its robust taste complements the simplicity of the potatoes beautifully. If you don’t have olive oil on hand, feel free to substitute with another high-quality oil like avocado or canola oil—just ensure it has a high smoke point for best results.
- 1 teaspoon garlic granules. Garlic granules bring an aromatic essence that elevates our crispy potatoes from ordinary to extraordinary! They infuse each slice with delightful flavor without overpowering their natural taste. If fresh garlic is your preference, you can certainly use minced fresh garlic; however, be cautious not to burn it during baking as it can turn bitter.
- 1 teaspoon dried mixed herbs. This blend can include anything from thyme, rosemary, oregano—all wonderful herbs that intertwine beautifully with our potatoes. They add depth and complexity that create harmony in every bite. Feel free to get creative here! If you have your favorite herb blend or even fresh herbs available, now’s the time to let them shine.
- 1/2 teaspoon salt. Salt is absolutely paramount in this recipe—it enhances all flavors present and ensures each bite bursts with taste! I recommend sea salt or kosher salt for their texture; they cling beautifully to the potato slices while baking.
Equipment You’ll Need:
Having the right tools makes all the difference in your cooking journey! While these items aren’t technically ingredients, they play an essential role in helping you create something wonderful.
- Large mixing bowl – This is where the magic begins! A spacious bowl allows you ample room for tossing those potato slices with seasoning without making too much mess—a vital step toward achieving even coating.
- Sharp knife – A good-quality chef’s knife or serrated knife will help slice through those potatoes effortlessly. Precision is key when aiming for uniform thickness; this ensures even cooking across all slices which leads to consistent crispiness.
- Cutting board – A sturdy cutting board provides stability while slicing and protects your countertops from nicks and cuts—plus it gives you ample space for maneuvering!
- Baking sheet – Opt for a large baking sheet lined with parchment paper; this non-stick surface helps prevent those lovely potato slices from sticking while also facilitating cleanup afterward. It’s crucial for allowing air circulation around each slice so they crisp up beautifully without steaming.
- Parchment paper – An unsung hero in many kitchens! Lining your baking sheet with parchment paper prevents sticking and makes cleanup much easier—trust me, you’ll thank yourself later!
Preparing the Crispy Sliced Potatoes – Easy Oven Baked Recipe
Step 1: Scrub-a-Dub-Dub Those Potatoes!
The first step might seem mundane but trust me—it sets the foundation for everything else! Begin by washing your large potatoes under cold running water, ensuring you remove any dirt or residue from their skin. After giving them a good scrubdown (a vegetable brush works wonders here), pat them completely dry with a towel. This step is crucial because excess moisture on the surface will impede that glorious crispiness we’re aiming for as they bake—they need all that hot air circulation around them!
Next up comes slicing! With your sharp knife at hand, cut each potato into even slices about 1/8th of an inch thick—uniformity here matters greatly because it ensures even cooking across each piece. You want them thin enough so they become irresistibly crisp yet thick enough to maintain their structure during baking. As you slice away, envision how stunning these will look once plated up—golden brown edges inviting everyone over!
Step 2: Seasoning Magic
Now that we have our potato slices ready, let’s move them over into our large mixing bowl where we’ll work some magic! Drizzle your tablespoon of olive oil over the sliced potatoes; watch how it dances between each piece as you pour it out—it’s pure enchantment! Next comes our garlic granules followed by dried mixed herbs and salt—each ingredient plays its important role in creating layers upon layers of flavor.
With clean hands (this is where I encourage getting tactile!), gently toss everything together until every slice gets lovingly coated in olive oil and seasonings—it should feel satisfying as they glide against one another like old friends reuniting after years apart! Make sure no slice feels left out; this even coating ensures not only great flavor but also helps achieve those coveted crispy edges during baking.
Step 3: Prepping Your Baking Sheet
Let’s get things moving along by preheating our oven first before arranging our seasoned beauties onto the baking sheet! Preheat your oven to 400°F (200°C)—that temperature is where the magic happens! While waiting for it to heat up (and filling your kitchen with mouthwatering aromas), line your large baking sheet with parchment paper—a non-negotiable step if you want easy removal later on!
Once preheated and ready for action, gently arrange those potato slices on the prepared baking sheet in a single layer—this means no overlapping allowed here folks! Spacing them out allows heat circulation necessary for achieving maximum crispiness—a crowded pan leads to steaming rather than roasting which defeats our purpose entirely!
Step 4: Bake Until Perfection
Now comes one of my favorite parts—the anticipation builds as we slide our tray into that hot oven! Set a timer for 25-35 minutes depending on how thickly you’ve sliced those potatoes—you’re looking for fork-tender interiors paired with golden brown outsides developing beautiful crispness around their edges!
Halfway through (around 15 minutes), flip those slices over using tongs or spatula gently—they deserve equal love on both sides after all! Keep an eye out towards end-time; ovens vary slightly so do check regularly towards final minutes until perfection beckons visually—the smell alone will guide you home!
Once they’re done (and trust me you’ll know), carefully remove them from oven letting cool slightly before serving—allowing this brief cooling period lets their crispiness set properly—no one likes soggy fries after all!
And there you have it—the most delightful dish awaits you at home now: crispy sliced potatoes bursting forth with flavor ready to accompany any meal or stand proudly alone as an indulgent snack worthy of its own fanfare! Enjoy every bite knowing you’ve crafted something truly special from scratch using love-infused steps right within reach!
Step 5: Baking to Perfection – The Art of Oven Roasting
Now that your beautifully seasoned potato slices are lined up like soldiers on the baking sheet, it’s time for the magic to happen. Preheat your oven to a sizzling 400°F (200°C). This temperature is absolutely paramount, as it allows the heat to penetrate and create that golden-brown exterior while keeping the insides tender and fluffy. As you place your baking sheet in the oven, take a moment to appreciate the transformation about to unfold; trust me, the aroma of garlic and herbs will soon fill your kitchen like a warm embrace. Set your timer for 25-35 minutes.
Here’s something crucial: halfway through the baking time, around the 12 or 15-minute mark, you’ll want to flip those slices over gently with a spatula. This step ensures that both sides receive equal love from the oven’s heat, promoting even crispiness. What you’re looking for is a beautiful contrast between textures—crispy and golden on the outside while soft and tender within. Keep an eye on them towards the end of cooking; ovens can vary significantly in terms of heat distribution. If you notice some edges starting to brown quicker than others, don’t hesitate to shuffle them around a bit or rotate your baking sheet for uniform cooking. Remember: patience is key here! Allowing those potatoes to develop their crispiness takes time but is so worth it.
Step 6: The Cooling Phase – Letting Crispiness Shine
Once your timer goes off and you catch sight of those perfectly golden potato slices peeking through the oven door, it’s almost time to dig in! But hold on just a moment—resist that urge to serve immediately! This part might seem minor, but letting them cool on the baking sheet for a few minutes before serving is an absolute game-changer in achieving that all-important crunch. As they rest, they will continue to crisp up slightly. You see, when hot food comes out of an oven, it can sometimes have residual steam trapped underneath—especially if served directly onto a plate—leading to sogginess instead of that satisfying snap we crave.
As you let them cool for about 5 minutes, take this moment to gather your favorite dipping sauces or perhaps whip up a quick herb-infused yogurt dip—which pairs beautifully with these crispy delights! You’ll find that once cooled slightly, they transform into little bites of perfection—golden treasures waiting to be enjoyed.
Step 7: Serving Suggestions – Elevating Your Crispy Sliced Potatoes
Now comes one of my favorite parts—the presentation! Serving these crispy sliced potatoes can be as simple or as elaborate as you wish. You could serve them straight from the baking sheet family-style; there’s something wonderfully rustic about gathering around with loved ones and sharing food right off the tray. Alternatively, for a more refined touch, transfer them to a beautiful serving platter and sprinkle fresh herbs like parsley or chives over top for added color and freshness.
Don’t forget about dipping sauces! A zesty aioli or tangy ketchup can elevate these crispy morsels even further, adding another dimension of flavor. If you’re feeling adventurous, try drizzling some balsamic glaze over them—oh my goodness! It adds such an exquisite sweetness that contrasts perfectly with the savory garlic and herbs. And let’s not overlook how adaptable these crispy sliced potatoes are—they make a fantastic side dish alongside grilled vegetables or roasted chicken alternatives (like marinated tofu!). Whatever route you choose, I promise these potatoes will steal the show at any meal.
Step 8: Final Touches – The Last Steps Before Enjoying
Before diving into this delightful feast you’ve just created, take a moment to savor the aroma lingering in your kitchen—a symphony of roasted garlic and herbs wafting through the air is nothing short of intoxicating! If you’ve opted for extra garnishes like freshly grated cheese (or vegan cheese) or additional seasoning like smoked paprika or chili flakes for some heat, now’s your time to shine! Lightly sprinkle these atop your potatoes just before serving; this not only adds flavor but also creates an irresistible visual appeal.
As you prepare yourself mentally for that first bite—the moment when crispy meets soft—you should know that each crunchy slice carries warmth and comfort beyond measure. These aren’t just any potatoes; they embody love, care, and shared moments around the dinner table—truly extraordinary in their simplicity yet profound in satisfaction. Whether it’s a weeknight dinner or a gathering with friends, I guarantee these Crispy Sliced Potatoes—Easy Oven Baked Recipe will always be met with smiles all around!
Embrace this recipe wholeheartedly; it’s not just about eating but creating connections through food—a gateway into memories made together over delicious meals. Now go ahead and enjoy every last crispy bite—you’ve earned it!
Storage and Enjoyment Tips for Your Crispy Sliced Potatoes – Easy Oven Baked Recipe
Ah, the moment has finally arrived! You’ve made these buttery, golden-brown slices of joy, and they’re just waiting to be devoured. But what happens if you have a few leftovers? No worries! Let’s talk about how to properly store your Crispy Sliced Potatoes so that they maintain their delightful crunch and flavor for as long as possible.
Storing Leftover Crispy Sliced Potatoes – Easy Oven Baked Recipe
When it comes to preserving your delicious creations, choosing the right container is absolutely paramount. I recommend using an airtight glass or plastic container to keep those crispy slices fresh. Place a piece of parchment paper between layers if you happen to stack them; this will help absorb any moisture and preserve that coveted crispiness. Stored this way in the refrigerator, your crispy sliced potatoes should last about 3-4 days. Trust me when I say that the taste might mellow slightly after storage, but they will still be incredibly enjoyable! When you’re ready to indulge again, simply pop them back into a preheated oven at around 375°F (190°C) for about 10-15 minutes until they’re heated through and regain that delicious crunch. Don’t rush this step; it’s well worth it!
Freezing Crispy Sliced Potatoes for Later
Now, if you want to take your meal prep game up a notch, consider freezing some of those crispy beauties! To freeze them properly, let your potato slices cool completely after baking, then arrange them in a single layer on a baking sheet lined with parchment paper. This prevents them from sticking together. Once frozen solid—usually about an hour—transfer them into a freezer-safe bag or container, squeezing out as much air as possible before sealing. If stored correctly, they can last up to 2 months in the freezer! Need a quick side dish? Just take out however many slices you desire and bake straight from frozen at 400°F (200°C) for about 20-25 minutes. The convenience of having homemade crispy sliced potatoes on hand is simply extraordinary!
Crispy Sliced Potatoes – Easy Oven Baked Recipe

Indulge in the delightful crunch of Crispy Sliced Potatoes, a simple yet incredibly satisfying oven-baked treat. With their golden-brown exterior and fluffy interior, these potatoes transform into an irresistible side dish that elevates any meal. Seasoned with aromatic garlic and fragrant herbs, they offer a burst of flavor in every bite. Perfect for cozy family dinners or lively gatherings with friends, this recipe invites warmth and joy to your table. The best part? It’s easy to prepare and requires minimal ingredients you likely already have at home. Get ready to impress your loved ones with these delicious crispy delights!
- Prep Time: 10 minutes
- Cook Time: 30 minutes
- Total Time: 40 minutes
- Yield: 4 servings 1x
- Category: Side Dish
- Method: Baking
- Cuisine: American
Ingredients
- 4 large potatoes (Russet or Yukon Gold)
- 1 tablespoon olive oil
- 1 teaspoon garlic granules
- 1 teaspoon dried mixed herbs
- 1/2 teaspoon salt
Instructions
- Preheat your oven to 400°F (200°C) and line a baking sheet with parchment paper.
- Wash and thoroughly dry the potatoes before slicing them into even 1/8-inch thick slices.
- In a large mixing bowl, combine the potato slices with olive oil, garlic granules, mixed herbs, and salt; toss until evenly coated.
- Arrange the seasoned slices in a single layer on the prepared baking sheet.
- Bake for 25-35 minutes, flipping halfway through for even crispiness, until golden brown.
- Allow to cool slightly before serving.
Nutrition
- Serving Size: 1 cup (150g)
- Calories: 180
- Sugar: 0g
- Sodium: 350mg
- Fat: 7g
- Saturated Fat: 1g
- Unsaturated Fat: 6g
- Trans Fat: 0g
- Carbohydrates: 30g
- Fiber: 3g
- Protein: 3g
- Cholesterol: 0mg