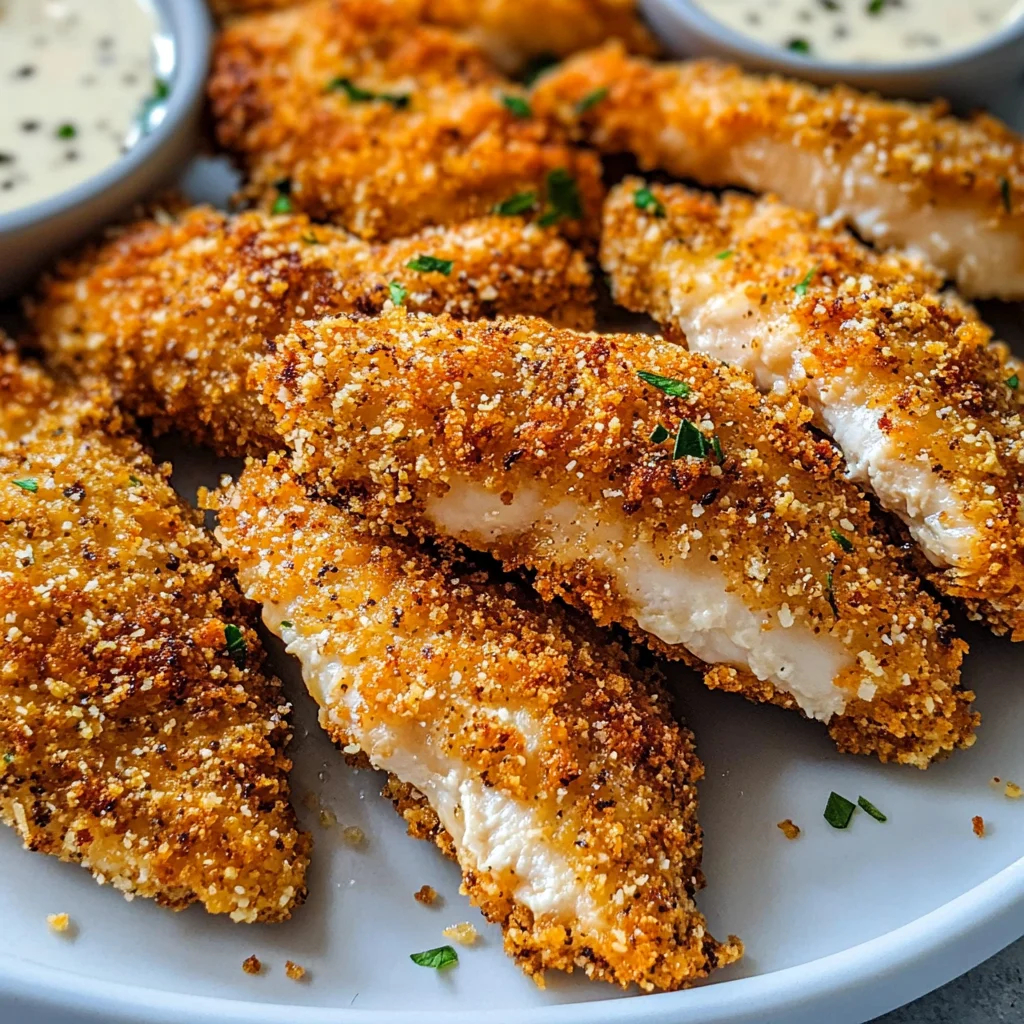
Crispy Greek Chicken Tenders: A Deliciously Easy Recipe for Your Next Meal
As the sun sets and casts a golden hue over the kitchen, I can’t help but feel an overwhelming sense of joy as I think about sharing my Crispy Greek Chicken Tenders recipe with you. This isn’t just another dish—it’s an experience that wraps you in warmth, nostalgia, and comfort. Picture this: tender chicken strips marinated in a luscious blend of Greek yogurt, fragrant herbs, and zesty lemon juice. When baked to perfection, they emerge from the oven golden brown and irresistibly crunchy, inviting you to take that first bite. Trust me when I say these tenders will transport you to a sun-drenched Mediterranean terrace where every meal feels like a celebration.
Cooking is not merely about combining ingredients; it’s about telling a story through flavors, and with each step of this recipe, we weave together tradition and innovation. By embracing the tanginess of yogurt and the aromatic spices characteristic of Greek cuisine, we create something that is not only delicious but also deeply satisfying. Whether you’re preparing a meal for a family gathering or treating yourself to a cozy night in, these Crispy Greek Chicken Tenders will undoubtedly become a cherished addition to your culinary repertoire.
Crispy Greek Chicken Tenders: A Deliciously Easy Recipe for Your Next Meal: Flavors That Sing
I’m so excited to guide you through this delightful recipe! These tenders are perfect for any occasion—whether it’s game day snacks or a weeknight dinner that feels special without requiring hours in the kitchen. The combination of juicy chicken and crunchy breadcrumbs creates an irresistible texture that pairs beautifully with your favorite dipping sauces like tzatziki or honey mustard. Let’s dive into this culinary adventure together!
Ingredients:
As we embark on this flavorful journey, let’s take a moment to appreciate each ingredient that plays its part in creating these mouthwatering Crispy Greek Chicken Tenders. Each one contributes something unique—together they form a harmonious blend that elevates this simple dish into something truly extraordinary.
- 1 pound chicken tenders. Start with high-quality chicken tenders; they’re typically more tender than regular chicken breasts due to their natural moisture content. Look for organic or free-range options if available—they often have better flavor and texture. Chicken tenders are incredibly versatile; they soak up marinades beautifully, making them perfect for our zesty preparation here.
- 1 cup plain Greek yogurt. This creamy delight is essential not only for its rich texture but also because it acts as both a marinade and a tenderizer for our chicken. The acidity of yogurt helps break down proteins gently, resulting in tender meat that’s bursting with flavor. Opt for full-fat yogurt for the best results; it adds depth while keeping the chicken moist during baking.
- 2 tablespoons olive oil. This liquid gold is non-negotiable in our marinade! Olive oil not only enhances flavor but also helps achieve that beautiful golden crust on your baked tenders. When choosing olive oil, look for extra virgin varieties with robust flavor profiles—they’ll impart additional richness to the dish.
- 2 tablespoons lemon juice. Freshly squeezed lemon juice brightens up the marinade with its zesty punch and balances out the creaminess of the yogurt perfectly. I always recommend using fresh lemons rather than bottled juice because nothing compares to their vibrant aroma and taste. Plus, citrus juices can help cut through rich flavors and keep your dish light!
- 3 cloves garlic, minced. Ahh, garlic—the soul of many Mediterranean dishes! It infuses our marinade with its aromatic warmth and adds layers of flavor that are simply irresistible once baked into the chicken tenders. Always opt for fresh garlic cloves; pre-minced versions lack that vibrant punch we’re after here.
- 1 teaspoon dried oregano. This herb is quintessentially Greek and brings an earthy depth to our marinade while complementing the other flavors beautifully. Dried oregano has an intense aroma that becomes even more pronounced when heated—it’s like capturing sunshine in spice form!
- 1 teaspoon dried thyme. Thyme adds complexity with its subtle floral notes; it works harmoniously alongside oregano to create that classic Mediterranean profile we’re aiming for in these tenders. Dried thyme is potent—just a little goes a long way!
- 1 teaspoon paprika. Paprika lends not only color but also a mild sweetness that contrasts wonderfully with the other savory ingredients in our dish. If you’re feeling adventurous, consider using smoked paprika for an added depth of flavor that’ll transport your taste buds straight to Spain!
- 1 teaspoon salt. Salt is absolutely paramount here; it enhances every single flavor in our marinade while ensuring our chicken is seasoned throughout rather than just on the surface—this step cannot be skipped!
- ½ teaspoon black pepper. Freshly cracked black pepper adds warmth and complexity—a simple yet effective way to elevate your dish without overpowering it! Always use whole peppercorns if possible; grinding them just before use releases those essential oils for maximum flavor impact.
- 1 cup breadcrumbs (preferably panko for extra crunch). Panko breadcrumbs are light and airy compared to traditional ones; they create an incredible crunch when baked! They brown beautifully while maintaining their crispiness longer than regular breadcrumbs—perfect for achieving that coveted texture on our tenders.
- ½ cup grated Parmesan cheese. This cheese adds umami-rich goodness while helping create that gorgeous crust we all crave! Look for freshly grated Parmesan instead of pre-packaged varieties—they have better flavor and melt more evenly into our breadcrumb coating.
- Cooking spray or additional olive oil for baking. A light spray or drizzle helps achieve optimal browning without adding too much fat—keeping those tenders crispy while cooking them evenly throughout is key!
Equipment You’ll Need:
Before we dive into preparing these delightful tenders, let’s gather some essential tools that will make your cooking experience smooth and enjoyable! While they aren’t ingredients per se, having the right equipment at hand can be crucial to creating something wonderful.
- Large mixing bowl – A sturdy bowl allows you ample space to combine your marinade ingredients without worrying about spills or messes while ensuring everything gets well mixed together before coating your chicken.
- Whisk – A standard whisk is invaluable here—it helps blend your marinade into one cohesive mixture effortlessly! If you don’t have one handy, a fork can work as an alternative; just ensure everything gets thoroughly incorporated.
- Shallow dish – For coating those tender pieces before baking! A shallow plate or pie dish provides enough surface area so you can easily access each piece without making too much mess—a key part of ensuring even coverage when breading.
- Baking sheet – A good-quality baking sheet ensures even heat distribution as your chicken cooks! Lining it with parchment paper makes clean-up easier while preventing sticking—a must-have trick I’ve learned over time!
- Parchment paper – Not just great for lining sheets but also perfect if you want easy clean-up later on! It keeps your food from sticking while allowing excess moisture to escape during cooking—thus achieving optimal crispiness!
Step 1: Marinating Magic
To kick off this adventure towards crispy perfection, start by placing those lovely chicken tenders into your large mixing bowl—this step sets the stage for all those tantalizing flavors we’re about to unleash! In another bowl (a whisk works wonders here), combine your Greek yogurt, olive oil, lemon juice, minced garlic, oregano, thyme, paprika, salt, and black pepper until everything is blended harmoniously into one creamy concoction—that’s where all the magic happens!
Now comes my favorite part: pour this heavenly marinade over those chicken pieces! Ensure each tender gets lovingly coated by either using tongs or diving in with clean hands (don’t shy away from getting messy!). This process allows flavors to penetrate deeply into every bite—we want maximum tastiness here! Once coated generously in this flavorful embrace (and trust me—you won’t regret it), cover up your bowl tightly either with plastic wrap or a lid before refrigerating it—the longer it sits (upwards of overnight if possible!), the deeper those flavors will develop.
Step 2: Preheating Perfection
While dreaming about how scrumptious your dinner will soon be (seriously—you won’t believe how good these turn out!), let’s prepare ourselves by preheating that oven of yours to 400°F (200°C). This step ensures rapid cooking which locks moisture into those juicy tenders while giving them time enough to crisp up beautifully on the outside—we’re aiming for balance here between tender inside & crunchy exterior!
As it warms up nicely (the aroma wafting through reminds me of summer gatherings), take out your marinated chicken from refrigeration after about an hour—or longer if you’ve marinated overnight—and allow them rest on the countertop at room temperature for around ten minutes prior to baking; trust me on this one—it helps bring even cooking results throughout all pieces once placed within hot oven air where magic awaits!
Step 3: Crusty Coating
Next up? Creating that glorious crunchy layer we’re all craving! Grab yourself a shallow dish again (this time reserved just for breadcrumbs) where you’ll mix together panko breadcrumbs along with freshly grated Parmesan cheese until combined evenly—it’s like creating little nuggets of joy!
Once ready (make sure every breadcrumb sparkles), line either parchment paper or lightly grease your prepared baking sheet using cooking spray/olive oil so nothing sticks as those beauties cook away happily within their own little world nestled side-by-side upon lined surface—a visual treat indeed!
Step 4: Dipping Delight
With everything set up nicely now comes perhaps one of my favorite parts—the actual assembly process where magic truly unfolds before us visually-speaking too! Take each marinated tender carefully out from its flavorful bath (don’t forget about all those delicious bits clinging onto them) then dip into breadcrumb mixture gently pressing down so they adhere well—all sides should get coated beautifully giving off such enticing visuals already… isn’t this exciting?!
After shaking off any excess crumbs lightly from each piece being placed onto prepared sheet (no need wasting precious coating)—give tops another spritz using cooking spray/oil drizzle before sending them off towards awaiting oven which has been calling their name ever since starting prep earlier today… ahhh can’t wait till they are done!
I hope you’re feeling as excited as I am about these delectable Crispy Greek Chicken Tenders already because trust me—they’re worth every moment spent crafting & waiting patiently till finished baking time arrives shortly thereafter—the anticipation builds deliciously high around here… stay tuned!!
Step 5: Marinating Magic – Infusing Flavor and Tenderness
Now that you have your chicken tenders ready to be transformed, it’s time to dive into the world of marinades! In a separate bowl, combine your 1 cup of plain Greek yogurt, 2 tablespoons of olive oil, 2 tablespoons of lemon juice, and the aromatic mix of 3 cloves of minced garlic, 1 teaspoon dried oregano, 1 teaspoon dried thyme, 1 teaspoon paprika, 1 teaspoon salt, and ½ teaspoon black pepper. This concoction isn’t just any marinade; it’s a potion of flavor that will elevate your chicken tenders from ordinary to extraordinary. The Greek yogurt is particularly magical here, not only because it imparts a tangy richness but also due to its ability to tenderize the meat. This happens because the acidity in yogurt breaks down proteins, resulting in irresistibly juicy tenders.
I promise you, this step is crucial! Once you’ve whisked everything together until it’s smooth and well-blended, pour this liquid gold over the chicken tenders in your mixing bowl. Make sure each tender is generously coated—don’t skimp here! Use your hands (gloves optional but recommended for cleanliness) to massage the marinade into every nook and cranny. This isn’t just about flavor; it’s about ensuring that every bite is infused with that zesty goodness we’re aiming for. After you’ve done all that work, cover the bowl tightly with plastic wrap or a lid and tuck it away in the fridge for at least an hour. If you can wait longer, let it marinate overnight for an even more profound flavor profile; trust me on this one!
Step 6: Preparing for Crunch – The Breadcrumb Coating
As you near the end of your marinating time, it’s time to prepare for the next exciting phase: creating that irresistible crispy coating! Preheat your oven to 400°F (200°C)—this is where the magic happens as we create that perfect golden crust. While waiting for the oven to heat up, grab a shallow dish and combine 1 cup of breadcrumbs with ½ cup of grated Parmesan cheese. Using panko breadcrumbs here is absolutely paramount; their larger flakes will give you that delightful crunch we all crave. The cheese not only adds an extra layer of flavor but also helps achieve that beautiful browning during baking.
Once combined, mix them thoroughly so every crumb is coated with cheesy goodness. When you’re ready, take those beautifully marinated chicken tenders out of the fridge—don’t forget to let them sit at room temperature for about 10 minutes before proceeding; this small step helps them cook more evenly and prevents shock when they hit the hot oven. Now comes a fun part! One by one, dip each chicken tender into your breadcrumb mixture. Make sure to press gently so that each piece gets fully encrusted with those crunchy bits—the goal here is full coverage without clumping. As you place them on a baking sheet lined with parchment paper or lightly greased with cooking spray or olive oil, visualize those tenders transforming into golden bites of joy!
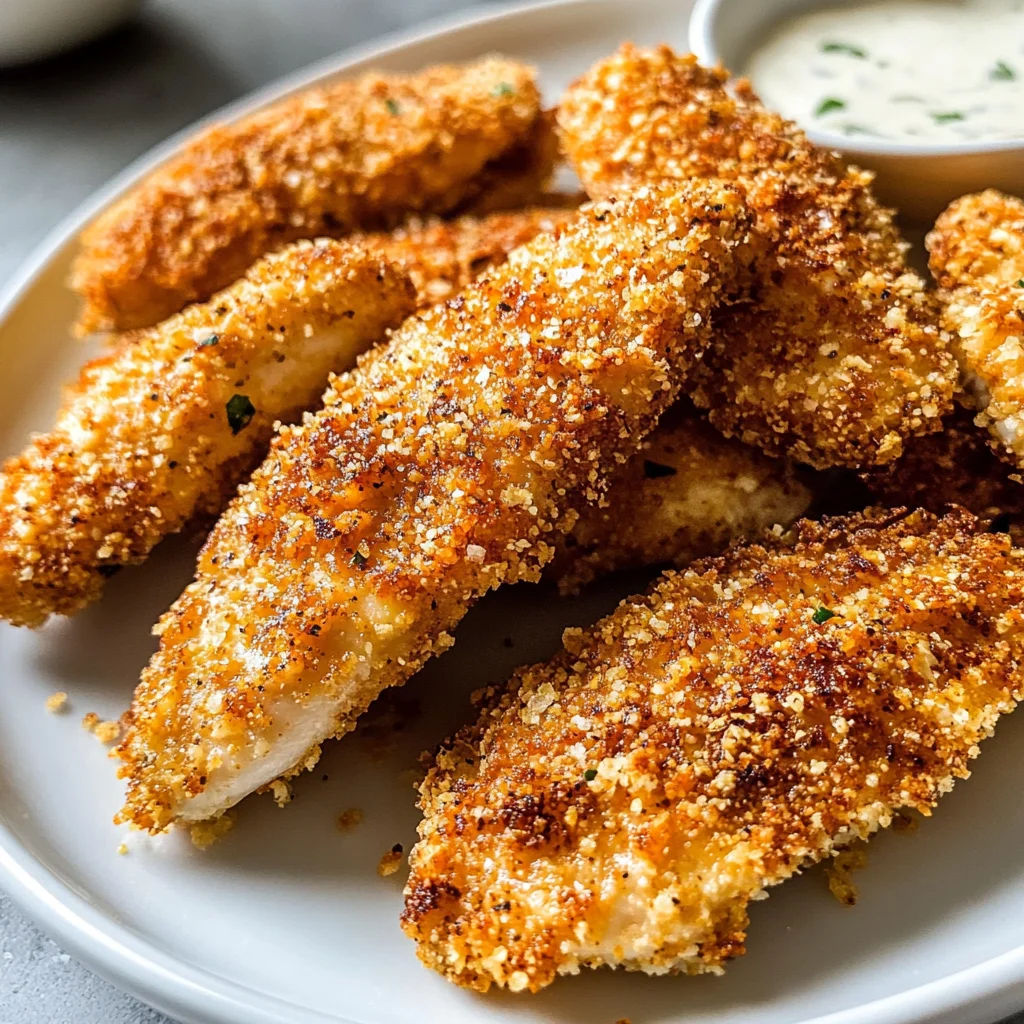
Step 7: Baking Bliss – Achieving That Perfect Crisp
With your oven preheated and those tenders expertly coated, it’s time to bring everything together through baking! Slide that baking sheet into the oven and let the heat work its wonders for 20-25 minutes. Now, here’s where patience pays off—don’t rush this step! The cooking time might vary slightly depending on your oven’s quirks or how thick your tenders are, so keep an eye on them after about 20 minutes. You’ll know they’re done when they turn a lovely golden brown and reach an internal temperature of at least 165°F (75°C).
Halfway through baking—around 10-12 minutes in—gently flip each chicken tender using tongs or a spatula. This ensures an even crispiness on both sides; we want every bite to be equally delectable! As they bake, take a moment to breathe in deeply and appreciate that intoxicating aroma wafting through your kitchen—it’s like a warm hug from Greece itself! Your home is going to smell heavenly, making everyone nearby eagerly anticipate what’s cooking.
Step 8: Resting Ritual – Sealing in Juiciness
Once those chicken tenders are perfectly baked and glistening with crispy perfection, resist the urge to dive right in! Instead, let them rest for about five minutes after removing them from the oven—a non-negotiable step if you want every bite to be juicy and succulent. During this brief resting period, juices redistribute throughout the meat, preventing dryness when you take that first glorious bite.
This moment allows all those flavors you’ve worked so hard to build come together beautifully while cooling slightly so you’re not burning your tongue (trust me; I’ve been there!). As they rest on their parchment-lined throne, use this time wisely: prepare any dipping sauces you plan on serving alongside these beauties or maybe whip up a fresh Greek salad with bright tomatoes and cucumbers for some contrast and balance—it never hurts to add more fresh colors onto your plate!
Conclusion:
As we wrap up this culinary journey together, I can’t help but feel a wave of excitement bubbling within me! We’ve navigated through each step of creating these Crispy Greek Chicken Tenders, and I hope my enthusiasm has inspired you as much as this recipe inspires me every time I make it. What makes this dish truly special is how beautifully it marries the creamy tang of Greek yogurt with aromatic herbs and spices—a symphony of flavors that dance harmoniously on your palate. The crunchy breadcrumb coating adds an irresistible texture that elevates these tenders beyond ordinary chicken dishes.
Why is this recipe a must-try? It’s not merely about taste; it’s about the joy that fills your kitchen as you prepare it—the laughter shared with friends or family while enjoying dinner together. Whether it’s a casual weeknight meal or a gathering with loved ones, pulling these golden tenders from the oven will fill your home with warmth and delicious anticipation. Just picture yourself taking that first bite—the savory crunch giving way to succulent chicken—it’s an experience worth savoring.
Serving suggestions abound! Imagine savoring one of these delightful tenders dipped into homemade tzatziki or perhaps drizzled with honey mustard—absolute perfection! For an afternoon pick-me-up, pair them with crisp veggie sticks or even alongside a refreshing Greek salad bursting with ripe tomatoes and crunchy cucumbers. And don’t forget about roasted vegetables—they balance out the richness perfectly and add another layer of flavor!
Feeling adventurous? This recipe is wonderfully adaptable! Want some heat? Try adding red pepper flakes to the marinade or serve them with a spicy aioli dip for an exhilarating kick! Craving something different? Substitute the breadcrumbs with crushed cornflakes for an added crunch or switch up your herbs based on what you have on hand—basil or dill can bring new life to this dish! I invite you to try these variations, share your experiences, and connect over our mutual love of cooking—let’s celebrate both creativity and culinary delight together!
Crispy Greek Chicken Tenders

Crispy Greek Chicken Tenders are a delightful twist on a classic dish, perfect for any occasion. These tender chicken strips are marinated in creamy Greek yogurt, infused with fragrant herbs and zesty lemon juice, before being coated in crispy panko breadcrumbs for that irresistible crunch. Baked to golden perfection, these tenders are not only delicious but also healthier than their fried counterparts. Serve them with your favorite dipping sauces like tzatziki or honey mustard, and enjoy a meal that’s bursting with flavor and joy. Ideal for family dinners or game day snacks, this recipe is sure to become a new favorite in your kitchen!
- Prep Time: 15 minutes
- Cook Time: 25 minutes
- Total Time: 40 minutes
- Yield: Serves approximately four people 1x
- Category: Main
- Method: Baking
- Cuisine: Greek
Ingredients
- 1 pound chicken tenders
- 1 cup plain Greek yogurt
- 2 tablespoons olive oil
- 2 tablespoons lemon juice
- 3 cloves garlic, minced
- 1 teaspoon dried oregano
- 1 teaspoon dried thyme
- 1 teaspoon paprika
- 1 teaspoon salt
- ½ teaspoon black pepper
- 1 cup panko breadcrumbs
- ½ cup grated Parmesan cheese
Instructions
- In a large mixing bowl, combine the Greek yogurt, olive oil, lemon juice, garlic, oregano, thyme, paprika, salt, and black pepper.
- Add the chicken tenders to the marinade and coat thoroughly. Cover and refrigerate for at least one hour (or overnight for best results).
- Preheat your oven to 400°F (200°C).
- In a shallow dish, mix panko breadcrumbs with grated Parmesan cheese.
- Remove chicken from the marinade and dip each tender into the breadcrumb mixture until fully coated.
- Place the breaded tenders on a baking sheet lined with parchment paper.
- Bake for 20-25 minutes or until golden brown and cooked through (internal temperature of at least 165°F).
- Let cool for five minutes before serving with your choice of dipping sauces.
Nutrition
- Serving Size: 3 tenders (150g)
- Calories: 360
- Sugar: 3g
- Sodium: 760mg
- Fat: 14g
- Saturated Fat: 4g
- Unsaturated Fat: 10g
- Trans Fat: 0g
- Carbohydrates: 34g
- Fiber: 2g
- Protein: 29g
- Cholesterol: 90mg