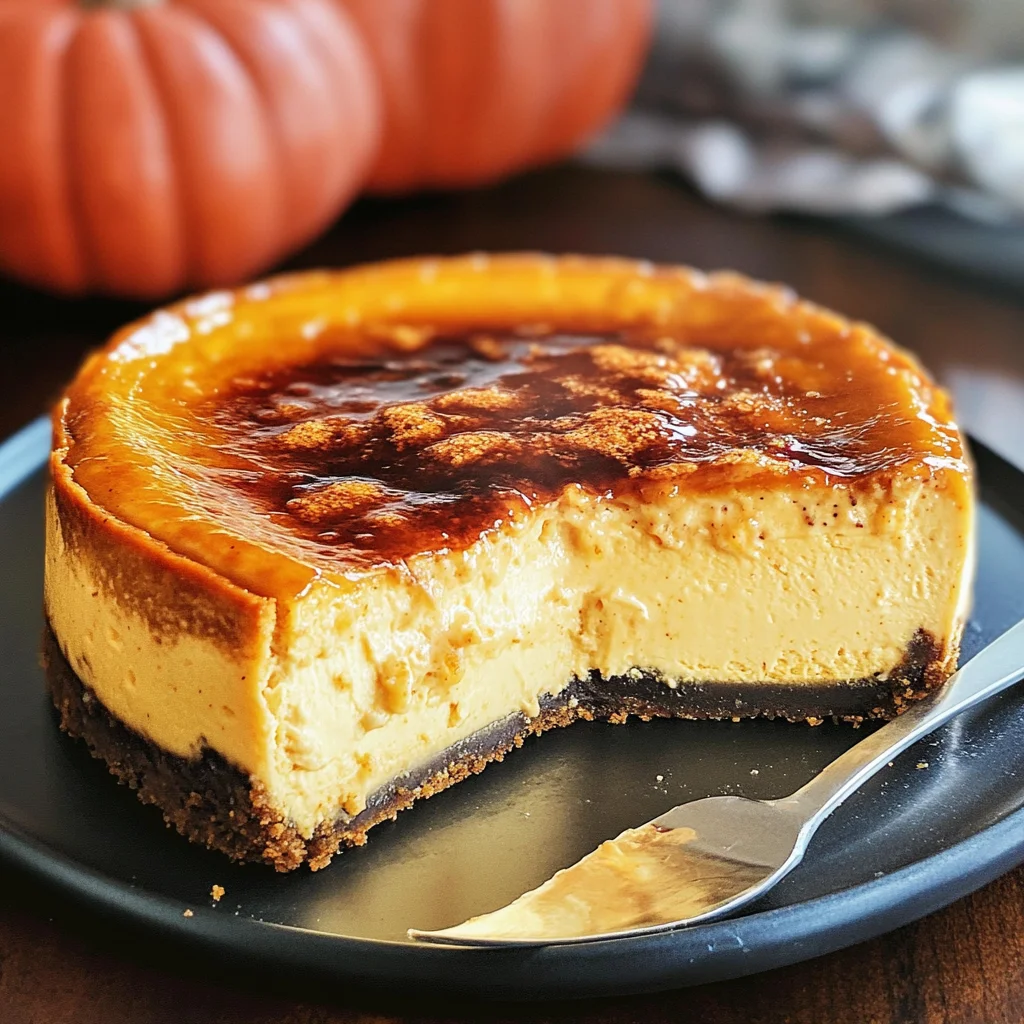
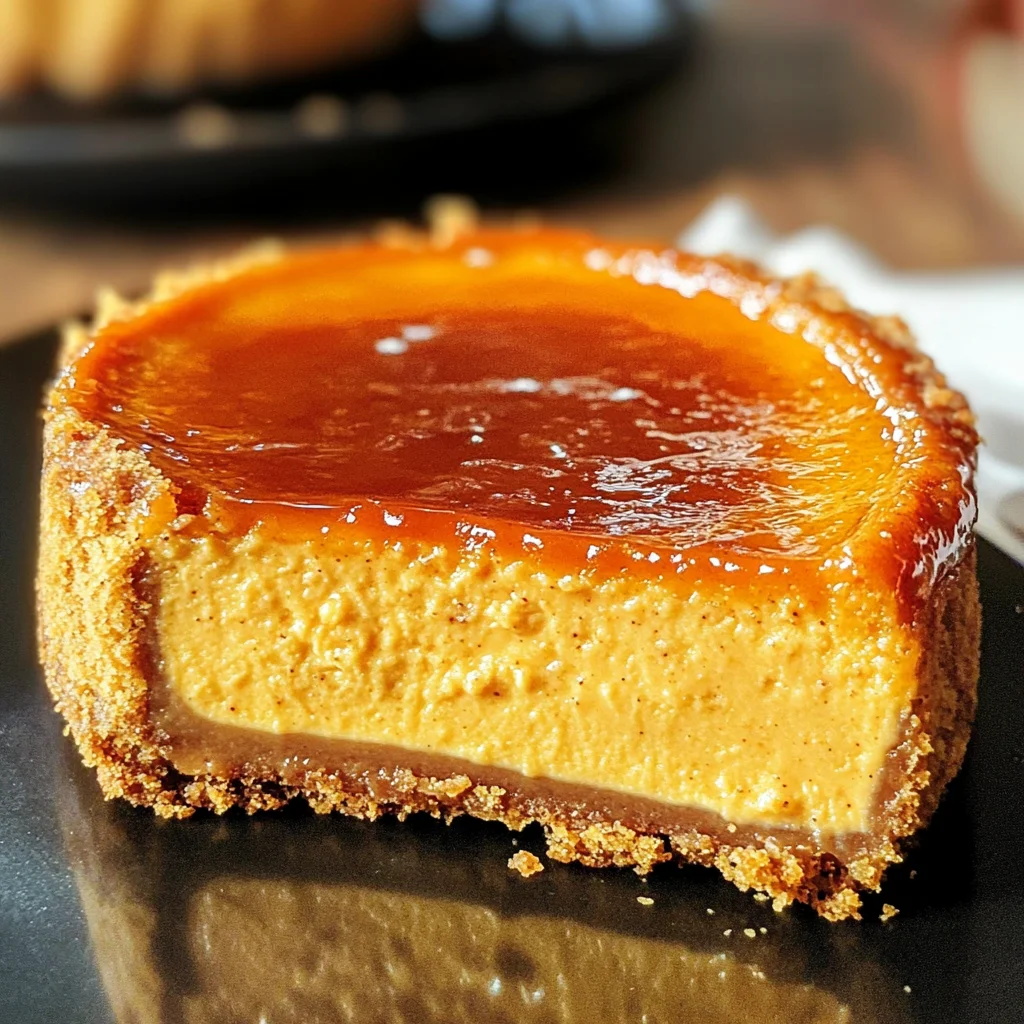
Creme Brulee Pumpkin Cheesecake Recipe
There’s something deeply magical about the combination of flavors and textures in a dessert that transcends the ordinary. Imagine the rich, velvety embrace of a smooth pumpkin cheesecake, infused with warm spices that whisper tales of autumn evenings spent in cozy gatherings. Now, picture this luscious filling resting atop a spiced ginger snap cookie crust, providing that perfect crunch that contrasts so beautifully with the creamy texture of the cheesecake. But we’re not stopping there! As if this dessert weren’t already heavenly enough, we’ll finish it off with a crackling layer of caramelized sugar—the pièce de résistance reminiscent of a classic crème brûlée. This Creme Brulee Pumpkin Cheesecake Recipe is more than just a dish; it’s an experience, one that brings together the warmth of tradition and the excitement of innovation in every bite.
Every slice tells a story—a story filled with laughter, shared moments, and the sweet aroma of baking wafting through the air. This cheesecake is perfect for Thanksgiving feasts or any gathering where you want to impress your friends and family with something truly extraordinary. The combination of pumpkin puree and cream cheese creates an utterly intoxicating filling that is both light yet indulgent. When you finally crack into that caramelized sugar topping with a spoon, it’s like breaking through to pure bliss! Trust me when I say that this dessert will become a staple in your recipe collection, as it captivates all who are fortunate enough to indulge.
Creme Brulee Pumpkin Cheesecake Recipe: A Whimsical Fall Delight
Gather around my dear friends; today we’re embarking on an exciting culinary journey together as we create this delightful Creme Brulee Pumpkin Cheesecake! If you’ve been searching for a show-stopping dessert that beautifully marries two beloved favorites—cheesecake and crème brûlée—then you are in for a treat! Let’s roll up our sleeves, put on our aprons, and dive into creating something magnificent.
Ingredients:
Before we begin, let’s take a moment to appreciate each ingredient that will play its part in crafting this masterpiece. Each component has its unique role and contributes significantly to the final flavor profile and texture.
- 14 oz ginger snap cookies (pulsed to crumbles). These cookies are the foundation of our spiced crust—their distinctive flavor profile adds depth and warmth to our cheesecake while providing an irresistible crunch. When choosing your ginger snaps, look for those with just the right balance of sweetness and spice; they should have a firm texture so they can be easily crushed into crumbs without turning mushy. You can even experiment with different brands or homemade versions if you’re feeling adventurous!
- 1 tsp pumpkin pie spice. This delightful blend typically includes cinnamon, nutmeg, ginger, and cloves—an aromatic combination that evokes memories of fall festivities. It’s crucial for creating that cozy essence within our cheesecake filling; without it, you might miss out on that signature pumpkin flavor everyone loves during this season. Feel free to adjust this amount according to your personal preferences; after all, cooking is about making it your own!
- 5 Tbsp unsalted butter (melted). Butter is what binds our crust together while adding richness and flavor. Using unsalted butter lets us control the saltiness of our dish more effectively—this is absolutely paramount because we want to highlight the sweetness without any salty surprises! Make sure it’s melted but not hot; otherwise, it may alter how well your crumb mixture holds together.
- 1-2 oz ginger snap cookies (chopped). These chopped pieces add texture throughout our crust, creating little bursts of flavor as you delve into each slice. While optional, I highly encourage including them for that extra special touch—they enhance both taste and visual appeal!
- 32 oz cream cheese (softened). The star player in our cheesecake filling! Cream cheese provides that luxurious creaminess we crave in cheesecakes while lending stability to our structure as it bakes. It’s essential to allow it to soften at room temperature before mixing—this process ensures easier blending which leads to smoothness without lumps! Choosing high-quality cream cheese can make all the difference here; trust me on this one!
- ½ cup sour cream. This ingredient introduces tanginess alongside added moisture which balances out the sweetness from other components beautifully—it creates an incredibly rich mouthfeel that’s simply divine! Ensure your sour cream is fresh; older products can have unwanted flavors or effects on consistency.
- 2 eggs (room temperature). Eggs provide structure while also adding richness—crucial elements for achieving that perfect creamy texture we desire in any cheesecake recipe! Having them at room temperature allows them to incorporate seamlessly into your batter rather than chilling down everything else; don’t rush this step as cold eggs can lead to uneven mixing.
- 1 ¼ cup pumpkin puree. Opt for 100% pure pumpkin puree rather than pie filling which contains additional sugars and spices—it gives us authentic pumpkin flavor without distractions! This liquid gold infuses both color and moisture into our batter while seamlessly blending with other ingredients.
- ¾ cup white granulated sugar. Sugar enhances sweetness but also plays an important role in texture transformation during baking—it helps achieve caramelization around edges while contributing moisture retention throughout! Keep an eye on quality; opt for fine granulated sugar since it dissolves better than coarse varieties resulting in smoother batter overall.
- 2 Tbsp cornstarch. This ingredient acts as a stabilizer within our batter helping maintain its shape during baking—especially important given how rich these cheesecakes tend toward being! Cornstarch also assists with achieving that silky-smooth consistency we’re striving for; be sure not to skip or substitute it here unless necessary!
- 2 tsp pumpkin pie spice & 1 tsp ground cinnamon (see earlier notes). These spices work harmoniously together enhancing each other’s strengths while delivering aromatic warmth—a must-have combo especially as winter approaches!
- 1/3 cup superfine sugar. Superfine sugar melts much faster than regular granulated sugar making it ideal for achieving that beautiful caramelized top layer when torched just before serving—it’s absolutely non-negotiable if you’re aiming for perfection!
- You will need a culinary blow torch: While not technically an ingredient per se, having one handy ensures we achieve that stunning brûlée effect on top—it makes all difference between ordinary desserts versus exceptional ones!
Equipment You’ll Need:
Before rolling up those sleeves further down this delicious path ahead let’s talk equipment! Having the right tools at hand elevates not just ease but enjoyment too—trust me when I say these partners-in-crime make all things run smoothly.
- 9 inch springform pan: A springform pan is essential for cheesecakes since its removable sides allow effortless release once cooled—you wouldn’t want anything sticking here after all your hard work! Look for pans made from durable materials which ensure even heating during baking.
- Large roasting pan: This will hold water during baking creating a water bath—a critical step ensuring gentle heat distribution preventing cracks whilst keeping moisture levels optimal throughout bake time.
- Aluminum foil: Perfectly wrapping around your springform pan protects against water seepage ensuring no sogginess occurs within crust layer during baking process—it’s one simple trick worth mastering!
Preparing the Creme Brulee Pumpkin Cheesecake Recipe
Step 1: Prepping Your Oven & Springform Pan
First things first—let’s set ourselves up for success by preheating our oven to 325℉ degrees! While that’s warming up greet your trusty springform pan with some loving care by greasing it generously with non-stick spray or butter—this ensures nothing gets caught when it’s time for unveiling later on! Next comes an important step: placing your springform inside larger roasting pan readying them both for their next adventure together—but don’t forget about wrapping foil around outside edge first if needed for extra protection against water intrusion while baking occurs.
Step 2: Crafting The Ginger Snap Crust
Now onto one of my favorite parts—the crust! Grab those crushed ginger snap cookies you prepared earlier along with melted butter then combine them until everything resembles wet sand clumping together nicely between fingers—that’s how you’ll know it’s ready! Pour mixture evenly across bottom before pressing firmly down using either hands or measuring cup until compacted evenly across surface area—this is key because strong foundation supports weight above perfectly later down road!
Step 3: Blending Up The Creamy Filling
In another bowl beat softened cream cheese until fluffy before gradually incorporating sour cream followed by room temperature eggs one-at-a-time till well combined—you’ll want those luscious layers swirling together beautifully now! Add pumpkin puree along with sugar mixture from previous preparation adding cornstarch last allowing thorough incorporation happening between ingredients assuring smooth consistency prevails throughout entire batter mix hereafter—it might take time but creating harmony among flavors truly matters most!
Step 4: Baking To Perfection
Once combined pour luscious filling directly over crust spreading gently towards edges ensuring even distribution occurs across entire surface area—we’re almost there folks don’t rush now just breathe deeply inhaling aromas surrounding kitchen already tantalizing senses enticing everyone nearby too! Place layered setup inside larger roasting pan then fill outer rim halfway up sides using hot tap water carefully avoiding splashes where possible taking care not submerge anything directly under liquid surface level itself keeping things tidy overall—now slide everything carefully into preheated oven letting magic happen over next hour plus till golden brown edges form signaling readiness achieved soon thereafter!
Stay tuned as I guide you through completing this incredible journey—I promise every moment spent creating this Creme Brulee Pumpkin Cheesecake will be well worth effort involved once served at end where smiles abound sharing stories around table warmed hearts filled joyfully celebrating life itself through delicious creations made lovingly by hands working diligently together!
Step 5: Mix the Creamy Filling to Perfection
Now, let’s get to the heart of our Creme Brulee Pumpkin Cheesecake Recipe — the luscious filling that will get everyone swooning at your dessert table. In a large mixing bowl, combine your softened cream cheese and sour cream. Using an electric mixer (or a good old-fashioned whisk if you’re feeling adventurous), beat these two ingredients together until the mixture is smooth and creamy. This step is absolutely paramount because it not only blends the flavors beautifully but also ensures there are no lumps in your cheesecake. Trust me on this; nobody wants a surprise chunk of cream cheese interrupting that silky texture.
Once your cream cheese and sour cream are perfectly blended, it’s time to introduce the pumpkin puree into the mix. Add in the pumpkin puree along with ¾ cup of white granulated sugar, 2 tablespoons of cornstarch, and those aromatic spices — 2 teaspoons of pumpkin pie spice and 1 teaspoon of ground cinnamon. Why cornstarch, you ask? Well, it acts as a stabilizer that helps give our cheesecake its velvety texture without being overly dense. Blend everything together on medium speed until it’s just combined—don’t overmix! Overmixing can introduce too much air into your batter, leading to cracks in your cheesecake once baked. This is a moment where patience pays off; let the flavors marry together for about 30 seconds longer than you think they need.
Step 6: Incorporate Eggs for Structure
Next up, we’re going to add our eggs — two large beauties that will help bind everything together while adding richness to our cheesecake. It’s crucial that your eggs are at room temperature; this ensures they blend seamlessly into the batter without a chill breaking up our creamy symphony of flavors. Crack each egg into a small bowl first to avoid any shell mishaps, then gently add them one at a time into your creamy mixture. After adding each egg, beat just until well blended; you want them incorporated but not whipped. Overbeating here can also lead to unwanted air pockets.
As you mix in those eggs, take a moment to inhale deeply — this is where the magic starts happening! The aroma of warm spices and sweet pumpkin wafts through the air, hinting at all the cozy feelings fall has to offer. After both eggs are fully incorporated and you’ve achieved that dreamy consistency, scrape down the sides of your mixing bowl with a spatula to ensure everything is well mixed—no stray pockets of pumpkin should be left behind!
Step 7: Assemble Your Ginger Snap Crust
Now that we have our heavenly filling ready, let’s focus on that spiced ginger snap crust—the crunchy base that’ll cradle our cheesecake like a warm hug! Take those 14 ounces of ginger snap cookies you pulsed earlier and combine them in a mixing bowl with 1 teaspoon of pumpkin pie spice and 5 tablespoons of melted unsalted butter. The melted butter not only helps bind the crumbs together but also adds richness and flavor—a little luxurious touch!
Using your fingers or the back of a spoon, mix until all crumbs are coated in butter; it should resemble wet sand when you’re done. Don’t rush this step; taking your time ensures even distribution which leads to a perfectly crunchy crust after baking! Once mixed, pour this delightful crumbly goodness into your prepared springform pan. Press it firmly into an even layer across the bottom using either your hands or the bottom of a measuring cup—this is non-negotiable if you want every slice to hold together beautifully.
Step 8: Baking Your Cheesecake with Love
With our crust firmly in place and the filling ready to go, it’s finally time for baking! Pour that silky pumpkin cheesecake filling over your crust in the springform pan. Now here comes an important technique: we’re going to use a water bath (also known as a bain-marie) during baking which prevents direct heat from impacting our delicate cheesecake too harshly and helps prevent cracks from forming on top as it sets.
To create your water bath, carefully place your filled springform pan inside that larger roasting pan we discussed earlier. Pour hot water into the roasting pan until it reaches halfway up the sides of the springform pan—this helps keep everything nice and moist while baking at 325°F (160°C). Bake for about 60-70 minutes or until gently set around the edges but still slightly wobbly in the center—this wobble is what we want! Remember, cheesecakes continue cooking from residual heat even after they’ve been pulled out of the oven. So don’t worry if it looks underdone; trust me on this one!
Allow it to cool completely at room temperature before transferring it to chill in the refrigerator for at least four hours—overnight if possible! Chilling is crucial because it allows all those beautiful flavors to deepen and meld together while achieving that perfect creamy texture we all crave in a cheesecake.
Final Touches: The Signature Caramelized Topping
Step 9: Create That Beautiful Crème Brûlée Finish
Alright my friend, we’re almost there! Once your cheesecake has chilled properly and is ready for its grand finale, we’ll add that iconic crème brûlée topping that gives this dessert its crown jewel status. First things first—carefully remove your chilled cheesecake from the springform pan by releasing it from its sides gently and transferring it onto a serving plate.
Sprinkle an even layer of superfine sugar (about 1/3 cup) across the top of your cheesecake—make sure it’s distributed evenly so every bite gets that satisfying crunch when you torch it! Now here comes my favorite part: using a culinary blowtorch (if you don’t have one yet, I truly recommend getting one!), start caramelizing that sugar by holding the torch about six inches away from its surface and moving it back-and-forth slowly until all sugar melts into liquid gold with bubbly caramelized edges.
This step isn’t just about aesthetics; by melting sugar into this crispy layer on top, you’re creating an utterly intoxicating contrast between creamy filling below and crunchy topping above—a textural delight for anyone lucky enough to dig in! Allow this topping to cool for just a minute before slicing into this masterpiece; I promise it’ll be worth every second spent waiting!
And there you have it—the Creme Brulee Pumpkin Cheesecake Recipe is complete! With its rich flavors mingling harmoniously with each bite as well as stunning presentation thanks to its crisp topping, I guarantee it’s going to become one of those recipes you’ll cherish forever—and perhaps pass down through generations like I have with mine. Enjoy every luscious slice alongside loved ones; after all, desserts are best shared! Happy baking!
Storage and Enjoyment Tips for Your Creme Brulee Pumpkin Cheesecake Recipe
Now that you’ve crafted this delightful masterpiece of a dessert, it’s time to revel in the anticipation of sharing it with your loved ones—or indulging in it all by yourself, no judgment here! This Creme Brulee Pumpkin Cheesecake is not just any ordinary cheesecake; it’s a fall-inspired love letter to the senses, inviting you to savor every creamy bite topped with that satisfying crunch. Trust me when I say, whether you plan to relish it right away or save some for later, you’ll want to keep these storage tips close at hand to maintain its divine flavors and textures.
Storing Leftover Creme Brulee Pumpkin Cheesecake Recipe
To keep your cheesecake as sumptuous as the day it was baked, store any leftovers in an airtight container. A glass container works wonders as it won’t absorb odors and will help keep those alluring flavors intact. Place your cheesecake in the fridge where it can comfortably chill for up to five days. Now here’s a pro tip: if you’re worried about the crust becoming soggy, you can place a slice of bread in the container with it—this little trick will help absorb any excess moisture and keep your cheesecake’s texture pristine! After a few days in the fridge, you might find that the flavors actually deepen and meld together beautifully, making each bite profoundly satisfying. When you’re ready to serve again, simply let it sit at room temperature for about 30 minutes before diving back in; this will help restore its creamy texture and enhance those incredible flavors.
Freezing Your Creme Brulee Pumpkin Cheesecake Recipe for Later
If you want to prolong the joy of this delicious dessert even further, consider freezing individual slices of your cheesecake! To do this properly, wrap each slice tightly in plastic wrap and then place them into a freezer-safe container or a heavy-duty freezer bag—this double-wrapping action keeps freezer burn at bay. You can freeze your cheesecake slices for up to three months without sacrificing flavor or texture. When you’re ready to enjoy a sweet treat from your freezer stash, simply transfer a slice to the fridge overnight to thaw slowly—this gentle approach will preserve all those wonderful creamy qualities. Trust me; having slices on hand makes for an incredibly convenient option when unexpected guests drop by or when you need a little pick-me-up after a long day. The ease of pulling out a slice from the freezer makes this indulgence even more special!
Creme Brulee Pumpkin Cheesecake
Indulge in the enchanting flavors of our Creme Brulee Pumpkin Cheesecake Recipe, a delightful fusion of creamy pumpkin cheesecake and a spiced ginger snap crust, crowned with a perfectly caramelized sugar topping. This dessert captures the essence of fall, evoking warm memories of cozy gatherings and festive celebrations. The rich, velvety filling made from cream cheese and pumpkin puree is both indulgent and light, while the crispy topping adds an irresistible crunch. Perfect for Thanksgiving or any gathering, this cheesecake promises to impress family and friends alike.
- Prep Time: 30 minutes
- Cook Time: 70 minutes
- Total Time: 1 hour 40 minutes
- Yield: Serves approximately 12 slices 1x
- Category: Dessert
- Method: Baking
- Cuisine: American
Ingredients
- 14 oz ginger snap cookies (crumbled)
- 5 Tbsp unsalted butter (melted)
- 32 oz cream cheese (softened)
- ½ cup sour cream
- 2 large eggs (room temperature)
- 1 ¼ cup pumpkin puree
- ¾ cup white granulated sugar
- 2 Tbsp cornstarch
- 2 tsp pumpkin pie spice
- 1 tsp ground cinnamon
- Superfine sugar for caramelizing
Instructions
- Preheat oven to 325°F (160°C). Grease a springform pan and place it inside a larger roasting pan.
- For the crust, mix crumbled ginger snap cookies with melted butter until well combined. Press firmly into the bottom of the springform pan.
- In a separate bowl, beat softened cream cheese until smooth. Gradually add sour cream and then eggs one at a time, mixing well after each addition.
- Stir in pumpkin puree, sugar, cornstarch, and spices until combined.
- Pour filling over the crust in the springform pan. Fill the roasting pan with hot water halfway up the sides of the springform pan.
- Bake for about 60-70 minutes until edges are set but center is slightly wobbly. Let cool completely before refrigerating for at least four hours or overnight.
- Before serving, sprinkle superfine sugar on top and use a culinary blowtorch to caramelize.
Nutrition
- Serving Size: 1 serving
- Calories: 360
- Sugar: 25g
- Sodium: 320mg
- Fat: 22g
- Saturated Fat: 12g
- Unsaturated Fat: 8g
- Trans Fat: 0g
- Carbohydrates: 34g
- Fiber: 1g
- Protein: 6g
- Cholesterol: 90mg