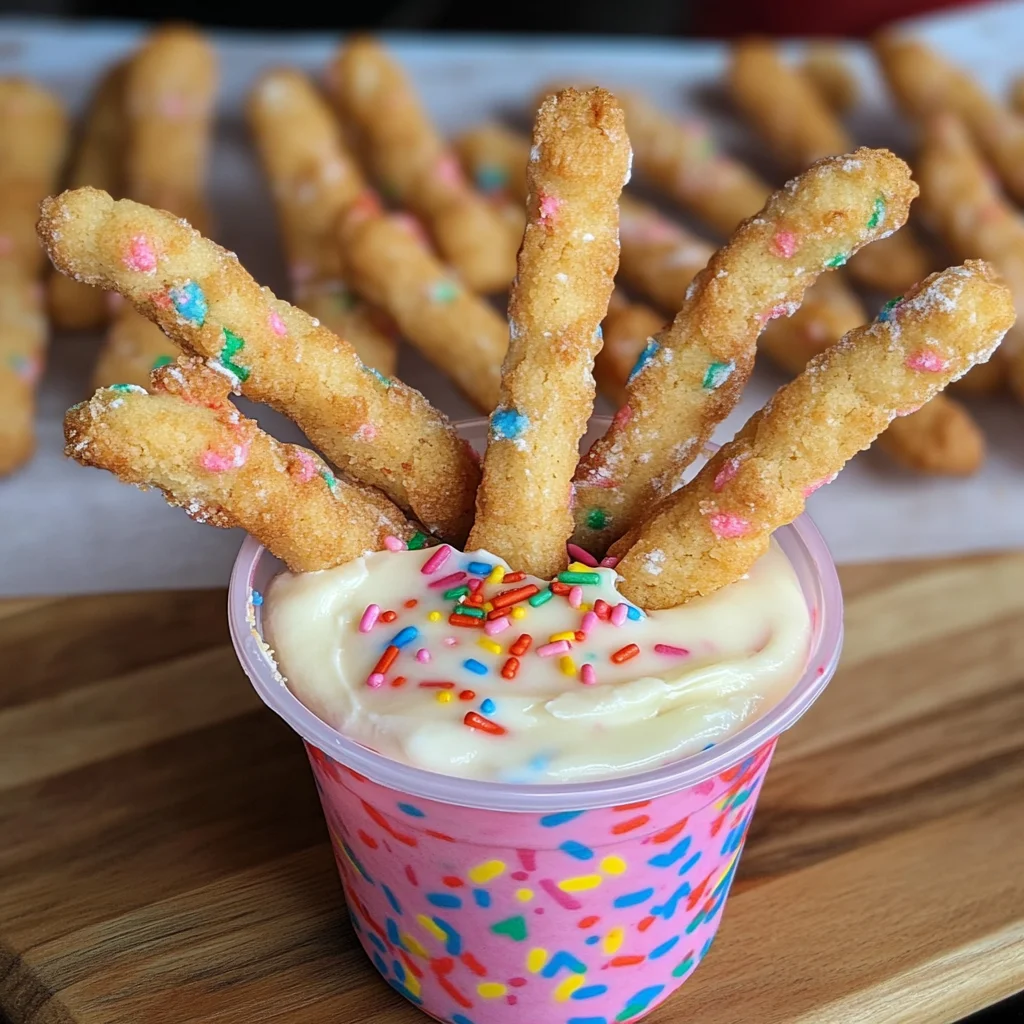
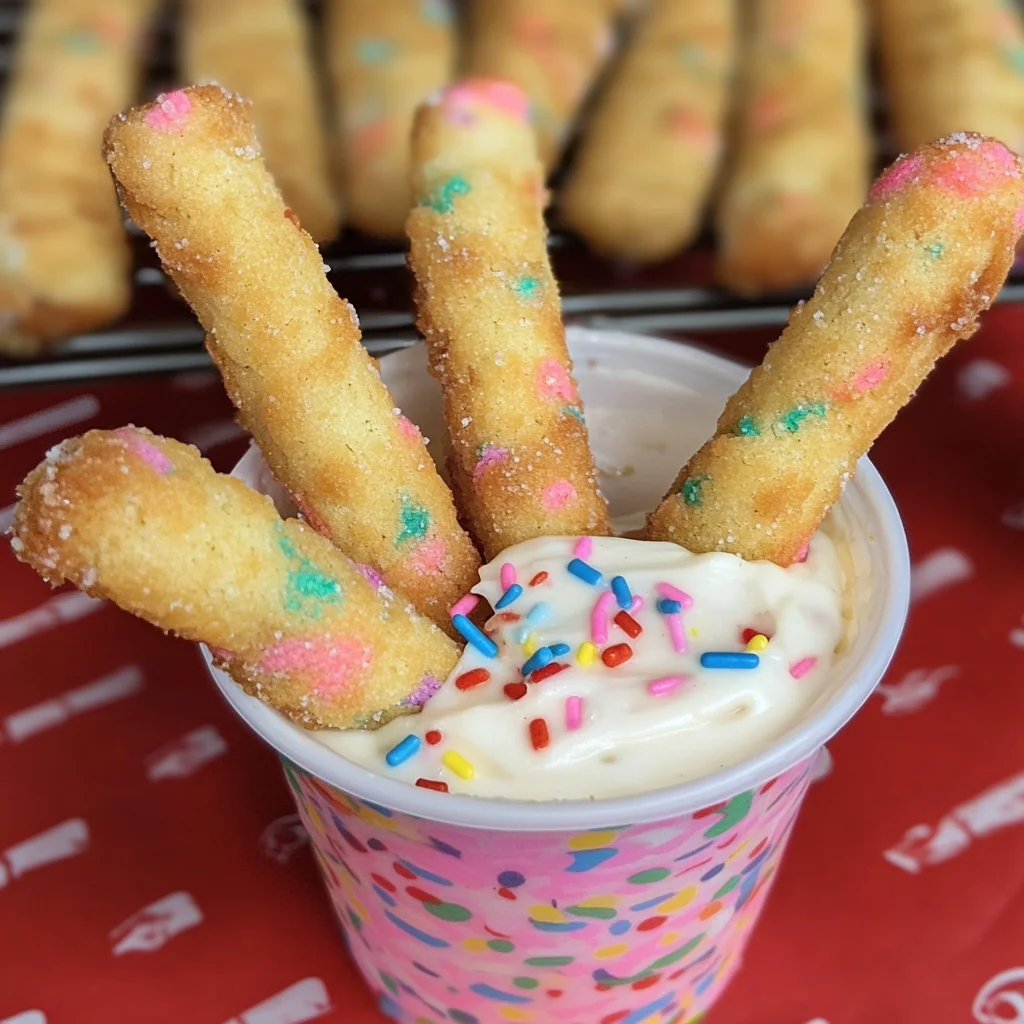
Cookie Fries with Frosting Dip
There’s something truly magical about Cookie Fries with Frosting Dip. Picture this: you’re in a cozy kitchen, the air filled with the comforting aroma of freshly baked cookies, each bite promising a delightful crunch followed by a soft, buttery center. These cookie fries are not just another dessert; they are an experience that transcends the ordinary. The joy of dipping these whimsical sticks into a sweet swirl of frosting will transform your afternoon snack or dessert into a celebration of flavors and textures. With every dip, you unlock layers of nostalgia and joy that remind us of childhood treats while cleverly presenting them in a fun, modern way. Trust me when I say that these little delights will become a staple in your home!
As we embark on this culinary journey together, let’s dive into what makes these Cookie Fries so special. They are buttery and dippable, crisp on the outside yet soft in the center—truly the best of both worlds! The addition of colorful sprinkles or edible confetti not only makes them visually appealing but also adds a delightful burst of sweetness to every bite. These treats are perfect for gatherings, movie nights, or simply when you need a little pick-me-up. And let’s not forget the frosting dip—it’s everything you’ve ever dreamed of in a dip: creamy, sweet, and utterly irresistible.
Cookie Fries with Frosting Dip: A Fun Twist on Your Favorite Treat
Ready to bring some fun into your kitchen? Let’s get started on making these delightful cookie fries that will undoubtedly impress everyone around you. This recipe is straightforward yet packs an incredible flavor punch!
Ingredients:
Every great recipe begins with quality ingredients, and for our Cookie Fries with Frosting Dip, each component plays an indispensable role in creating that perfect bite.
- 1 1/2 cups all-purpose flour. Flour is the backbone of our cookie fries; it provides structure and stability to our creations. When choosing flour, look for quality all-purpose flour that has been properly stored—this ensures it maintains its freshness and effectiveness in baking. The beauty of this ingredient lies in its versatility; it can adapt to many recipes beyond this one! Remember to spoon and level your flour for accurate measurement; too much can lead to dry cookies.
- 1 teaspoon cornstarch. You might wonder why cornstarch is included here. This ingredient acts as a tenderizer which helps create that delicate texture we love so much in cookies. By incorporating cornstarch, we ensure our cookie fries have just the right amount of chewiness without becoming tough during baking—a crucial element for achieving that melt-in-your-mouth feeling.
- 1/4 teaspoon kosher salt. Salt is often underestimated but is absolutely paramount in baking; it enhances flavors and balances sweetness beautifully. Kosher salt is preferred here because its larger grains dissolve more slowly than table salt, allowing for even distribution throughout your dough without overwhelming any single bite.
- 1/4 teaspoon baking powder. This little powerhouse is responsible for leavening our cookie fries! As it reacts with moisture and heat during baking, it creates tiny bubbles that help our cookies rise slightly while still maintaining their signature crispiness on the outside.
- 1/2 cup unsalted butter (slightly melted, 1 stick). Butter brings richness and flavor to our cookie fries like no other ingredient can! Using unsalted allows us to control the overall saltiness of our dough better. When slightly melted, it aids in creaming with sugar effectively while also ensuring a tender texture rather than greasy or overly firm cookies.
- 3/4 cup brown sugar. Brown sugar adds depth and moisture to our cookie fries thanks to its molasses content; this creates that beautiful chewiness we all crave! It also contributes color and enhances the overall flavor profile with caramel notes that make every bite unforgettable.
- 1 large egg (room temperature). Eggs provide structure and stability to baked goods while enriching them at the same time! Using eggs at room temperature helps them incorporate more smoothly into the batter—this step is essential because cold eggs can lead to uneven mixing.
- 2 teaspoons pure vanilla extract. Vanilla extract isn’t just an afterthought—it’s what elevates our cookie fries from ordinary to extraordinary! Opt for pure vanilla extract over imitation varieties whenever possible; you’ll be rewarded with deeper flavors that truly shine through in every delicious bite.
- 1/3 cup colorful edible confetti or sprinkles. Adding sprinkles brings an element of joy—not just visually but also texturally! They add sweetness and excitement as you chew through those gorgeous cookie fries; plus, who doesn’t love something colorful sprinkled throughout their dessert?
- 1/4 cup heavy cream. This decadent cream serves as the base for our frosting dip—the richer the cream, the creamier your dip will be! Heavy cream has enough fat content to create a velvety texture without curdling when mixed with other ingredients.
- 1/4 cup cream cheese (softened). Cream cheese adds tanginess and body to our frosting dip—it’s what gives us that lovely balance against sweetness from powdered sugar while ensuring smoothness when blended together.
- 1 cup powdered sugar. Finally, we finish off our frosting dip with powdered sugar which provides sweetness along with thickness necessary for achieving ideal consistency—a luscious dip worthy of our delightful cookie fries!
Equipment You’ll Need:
Having the right tools can make all the difference when whipping up these scrumptious treats! Here are some essential pieces you’ll want at hand:
- Parchment paper – This non-stick surface is crucial for preventing your cookie fries from sticking during baking while also making cleanup effortless afterward—no one likes scrubbing burnt-on cookies off their pans!
- Mixing bowls – You’ll need several sizes: one for dry ingredients and another for wet ones—having dedicated bowls keeps things organized as you prepare your dough.
- Whisk & hand mixer or stand mixer – A whisk will help combine dry ingredients effortlessly while either type of mixer makes creaming butter and sugar easy-peasy—trust me; your arms will thank you!
- Rolling pin – A rolling pin is key when transforming that chilled dough into perfectly shaped fry sticks—whether you’re using wood or silicone doesn’t matter too much as long as it’s comfortable for you!
- Crinkle cutter or sharp knife – To achieve those charmingly irregular fry shapes reminiscent of real potato fries! A crinkle cutter adds an extra touch while sharing some personality—you might even find it fun making different sizes!
Now that we’ve gathered all our ingredients and tools together let’s dive into making these spectacular Cookie Fries with Frosting Dip—the anticipation is palpable!
Step 1: Prepping Your Baking Sheets
Start by lining two large baking sheets with parchment paper—this step may seem small but trust me; it’s absolutely critical to prevent any sticking once those delicious cookie fries come out of the oven! While you’re at it, take a moment to admire how easy parchment makes cleanup; no more rigorous scrubbing later on!
Step 2: Whisking Together Dry Ingredients
In one bowl, whisk together your all-purpose flour, cornstarch, kosher salt, and baking powder until fully combined—this process ensures even distribution throughout your dough which leads us toward consistent results every time we bake these beauties! Take care not to rush this step; proper incorporation matters greatly here as uneven mixing could lead to some bites being denser than others—definitely not what we want!
Step 3: Creaming Butter & Sugar
Now comes one of my favorite parts—the creaming process! In another mixing bowl (preferably larger), beat together your slightly melted butter along with brown sugar using either a hand mixer or stand mixer set on high speed until light and fluffy—about two minutes should do wonders here! This process helps introduce air into your mixture which contributes greatly toward achieving fluffier cookies down the line; don’t skimp on time here—it’s absolutely worth it!
Step 4: Bringing It All Together
Once you’ve achieved that wonderfully fluffy consistency from step three, it’s time to add in your large egg along with those fragrant two teaspoons of pure vanilla extract before beating again until completely combined (around thirty seconds should suffice). It’s crucial not only because both components enrich flavor but also because they help bind everything together seamlessly before we bring forth those dry ingredients from earlier—you’re doing amazing so far!
With each step we take towards creating these delectable Cookie Fries with Frosting Dip feels like unraveling layers upon layers leading us closer toward something truly extraordinary—I can’t wait for you all to taste them soon!
Step 5: Mixing It All Together for Cookie Perfection
Now that you have your dry ingredients whisked together, it’s time to bring those flavors to life! In a separate mixing bowl, grab your hand mixer or stand mixer—either will do wonders here. You’ll want to add the slightly melted unsalted butter and the brown sugar into the bowl first. Let me tell you, beating these two together is an absolute joy! When they’re mixed on high until light and fluffy, which should take about two minutes, you’ll create a base that’s rich and full of flavor. This step is crucial because it incorporates air into the mixture, giving your cookie fries that lovely texture we all crave. You’ll know it’s ready when the color lightens to a beautiful golden hue and looks almost like whipped cream.
Once you’ve reached that fluffy stage, it’s time to introduce your egg and pure vanilla extract. I always say that vanilla is the unsung hero of desserts—it adds that warm, inviting aroma that makes your kitchen smell divine. Mix these in on medium speed until just combined; this should take about 30 seconds. Be careful not to overdo it—too much mixing can lead to tougher cookies. When combined correctly, you’ll have a luscious batter that signals you’re on the right path to creating something truly extraordinary!
Step 6: The Art of Folding in Dry Ingredients
Now we come to a delicate yet essential part of our journey: combining our wet and dry mixtures. Carefully add the flour mixture into the buttery goodness you just created. Here’s where you’ll want to shift gears—set your mixer to low speed and gently incorporate the dry ingredients into the wet ones. I can’t stress enough how important it is not to overmix at this stage! Overmixing can develop gluten, resulting in cookies that are chewy instead of delightfully tender. You want just enough blending so there are no dry pockets left, but stop as soon as everything comes together.
This is also when you’ll fold in those colorful edible confetti or sprinkles that will make your cookie fries pop with joy! Gently use a spatula or wooden spoon for this part; think of it as cradling the dough rather than beating it up. The sprinkles will add not only visual appeal but also a delightful crunch that contrasts beautifully with the soft center of each fry. Trust me on this—seeing those vibrant colors speckled throughout is going to make your heart sing as you imagine how joyful everyone will be when they see (and taste) these beauties!
Step 7: The Chilling Chronicles
Ah, now we arrive at one of my favorite steps—the chilling process! Once you’ve combined everything beautifully, it’s time for your dough to take a little break in the refrigerator for about 30 minutes. Why chill? Well, allowing the dough to rest has multiple transformative effects. First and foremost, this helps solidify the fat from the butter, which prevents spreading during baking. You want those cookie fries to maintain their fry-like shape rather than turn into puddles! Additionally, resting allows flavors to meld and develop deeper notes—a simple act that elevates your cookies from good to utterly intoxicating.
While you’re waiting—perhaps sip on some tea or coffee—imagine how wonderful it will feel biting into a warm cookie fry dipped in frosting dip later on! Your patience will pay off here; don’t rush this step! I promise you’ll be rewarded with perfectly shaped cookie fries that are crisp outside yet soft inside.
Step 8: Rolling Out Dough for Fry-Like Shapes
Once your dough has chilled beautifully, it’s showtime! Lightly dust a clean work surface with flour—this prevents sticking and ensures easy handling as you roll out the dough. Grab about one-third of your chilled dough and place it onto the floured surface before rolling it out gently with a rolling pin. Aim for about 3/8” thickness; this thickness strikes a perfect balance between crispy edges and soft centers once baked. As you roll, keep an eye out for any sticking; if necessary, sprinkle just a touch more flour on top.
Now comes one of my favorite parts—the cutting! Using either a crinkle cutter or sharp knife (just like slicing real fries!), cut strips roughly ½ inch wide and about 4 inches long. Feel free to let loose with creativity here; having different sizes mimics real fries and adds character to your dessert presentation! This step is undeniably fun—you’ll enjoy seeing how each piece transforms before your eyes!
Baking Your Perfect Cookie Fries with Frosting Dip
Step 9: Freeze Before Baking — A Non-Negotiable Step
After cutting your cookie fries, they need one more chilly moment before heading into the oven—the freezer awaits them! Place those beautifully shaped cookie fries onto baking sheets lined with parchment paper (this keeps them from sticking). Pop them into the freezer for about 20 minutes; yes, I know waiting can be tough sometimes but trust me—it’s absolutely paramount! This freezing step further solidifies any remaining butter within the dough, ensuring they hold their fry shape while baking instead of puffing up.
As they freeze, preheat your oven to 350°F (175°C). Once ready, take one tray at a time from the freezer and bake them on the center rack for approximately 10-12 minutes. These cookie fries should still look soft when you remove them from the oven—that’s normal! Remember, they continue cooking slightly on their hot baking sheet after being taken out so don’t worry if they appear underbaked at first glance; soft centers are what we’re aiming for here!
Step 10: Whipping Up That Irresistible Frosting Dip
While those heavenly cookie fries are baking away in glorious anticipation of being devoured, let’s prepare that frosting dip! In a mixing bowl (you can even use one from earlier), combine heavy cream, softened cream cheese, and powdered sugar together thoroughly until smooth and creamy. This isn’t just any dip—we’re creating something utterly delightful here! The heavy cream adds richness while keeping things light enough not to overpower our precious cookie fries.
Mix these ingredients until fully integrated—you’re looking for a thick yet pourable consistency; if it feels too thick initially or doesn’t blend well enough then consider adding just a splash more heavy cream until smoothness is achieved. This dip will offer an enchanting contrast against our sweet-and-soft cookie fries—think liquid gold that’s simply irresistible!
As you finish making this dreamy dip right alongside those golden-brown cookie fries coming out of the oven soon enough, imagine gathering around with friends or family—all laughing and indulging in this sweet experience together as you dunk those crispy treats into delicious frosting!
Final Thoughts on Cookie Fries with Frosting Dip
And there you have it—your very own batch of Cookie Fries with Frosting Dip awaits! Once you’ve baked these beauties until lightly golden around the edges (they’ll likely cool down further off their trays), arrange them neatly next to that luscious frosting dip you’ve prepared so lovingly. They’re more than just dessert; they’re an experience—a memory waiting to unfold at gatherings or cozy nights at home.
When serving these delightful treats at parties or family dinners—or simply enjoying them all by yourself—you’ll see smiles bloom as each person takes their first bite dipped generously into that creamy frosting dip. Trust me when I say you’ll cherish every moment spent shared over these whimsical delights—they’re bound to become an instant favorite in anyone’s recipe book!
So go ahead—let love fill each bite as you savor every morsel knowing you’ve created something profoundly satisfying straight from your kitchen’s heart!
Storage and Enjoyment Tips for Your Cookie Fries with Frosting Dip
Now that you’ve lovingly crafted your Cookie Fries with Frosting Dip, it’s time to dive into the delightful experience they offer! You can already picture the joy on your friends’ faces as they dip those warm, buttery fries into the sweet frosting—pure bliss! But what happens if you have leftovers? No need to worry, these cookie fries are just as delicious the next day. Let’s talk about how to keep them fresh and tasty so you can savor each and every bite.
Storing Leftover Cookie Fries with Frosting Dip
To preserve your delightful cookie fries, I recommend placing them in an airtight container at room temperature. This simple step is crucial! It keeps them from drying out while allowing their soft center and crisp exterior to maintain that perfect balance of textures. They will stay fresh for about three days—though I promise you, they’ll be gone long before then! If you’re concerned about them losing moisture, try adding a slice of bread into the container; it works wonders to keep things soft and delightful. The flavors intensify when they rest a little while, so don’t be surprised if they taste even better after a day or two! When it’s time to enjoy them again, just serve them at room temperature or pop them in the microwave for a few seconds for that fresh-from-the-oven feeling. Trust me; your taste buds will thank you!
Freezing Cookie Fries for Later
If you find yourself with an abundance of cookie fries (or if you want to prepare ahead for a celebration), freezing is an excellent option! To freeze properly, simply arrange the cooled cookie fries in a single layer on a baking sheet lined with parchment paper and place them in the freezer until firm. Once frozen solid—this usually takes about an hour—you can transfer them into a zip-top freezer bag or airtight container. They can happily live in your freezer for up to three months without compromising flavor or texture. The convenience factor here is absolutely paramount! Just take out the desired number of fries whenever that sweet craving strikes, and let them thaw at room temperature or warm them up for a few minutes in the oven; they’ll taste just as delicious as when they were fresh. It’s like having a secret stash of happiness waiting for you!
Cookie Fries with Frosting Dip

Indulge in the whimsical delight of Cookie Fries with Frosting Dip—a fun twist on your favorite dessert! These crispy-on-the-outside, soft-on-the-inside cookie sticks are perfect for dipping into a creamy frosting dip, making them an ideal treat for gatherings, movie nights, or simply when you need a sweet pick-me-up. Adorned with colorful sprinkles, these cookie fries will transport you back to childhood moments filled with joy and nostalgia. Easy to make and even easier to share, they’re bound to become a staple in your home.
- Prep Time: 25 minutes
- Cook Time: 12 minutes
- Total Time: 37 minutes
- Yield: Approximately 12 servings 1x
- Category: Dessert
- Method: Baking
- Cuisine: American
Ingredients
- 1 ½ cups all-purpose flour
- 1 teaspoon cornstarch
- ¼ teaspoon kosher salt
- ¼ teaspoon baking powder
- ½ cup unsalted butter (slightly melted)
- ¾ cup brown sugar
- 1 large egg (room temperature)
- 2 teaspoons pure vanilla extract
- 1/3 cup colorful edible confetti or sprinkles
- ¼ cup heavy cream
- ¼ cup softened cream cheese
- 1 cup powdered sugar
Instructions
- Preheat oven to 350°F (175°C) and line baking sheets with parchment paper.
- In a bowl, whisk together flour, cornstarch, salt, and baking powder.
- In another bowl, cream melted butter and brown sugar until light and fluffy.
- Mix in egg and vanilla extract until combined.
- Gradually add dry ingredients to the wet mixture; fold in sprinkles gently.
- Chill dough for 30 minutes before rolling it out to about 3/8” thick.
- Cut into fry shapes and freeze for another 20 minutes before baking for 10-12 minutes.
- While baking, mix heavy cream, cream cheese, and powdered sugar until smooth for the dip.
- Serve warm cookie fries with the frosting dip.
Nutrition
- Serving Size: 3 cookie fries (45g)
- Calories: 190
- Sugar: 12g
- Sodium: 80mg
- Saturated Fat: 5g
- Unsaturated Fat: 3g
- Trans Fat: 0g
- Carbohydrates: 27g
- Fiber: <1g
- Protein: 2g
- Cholesterol: 15mg