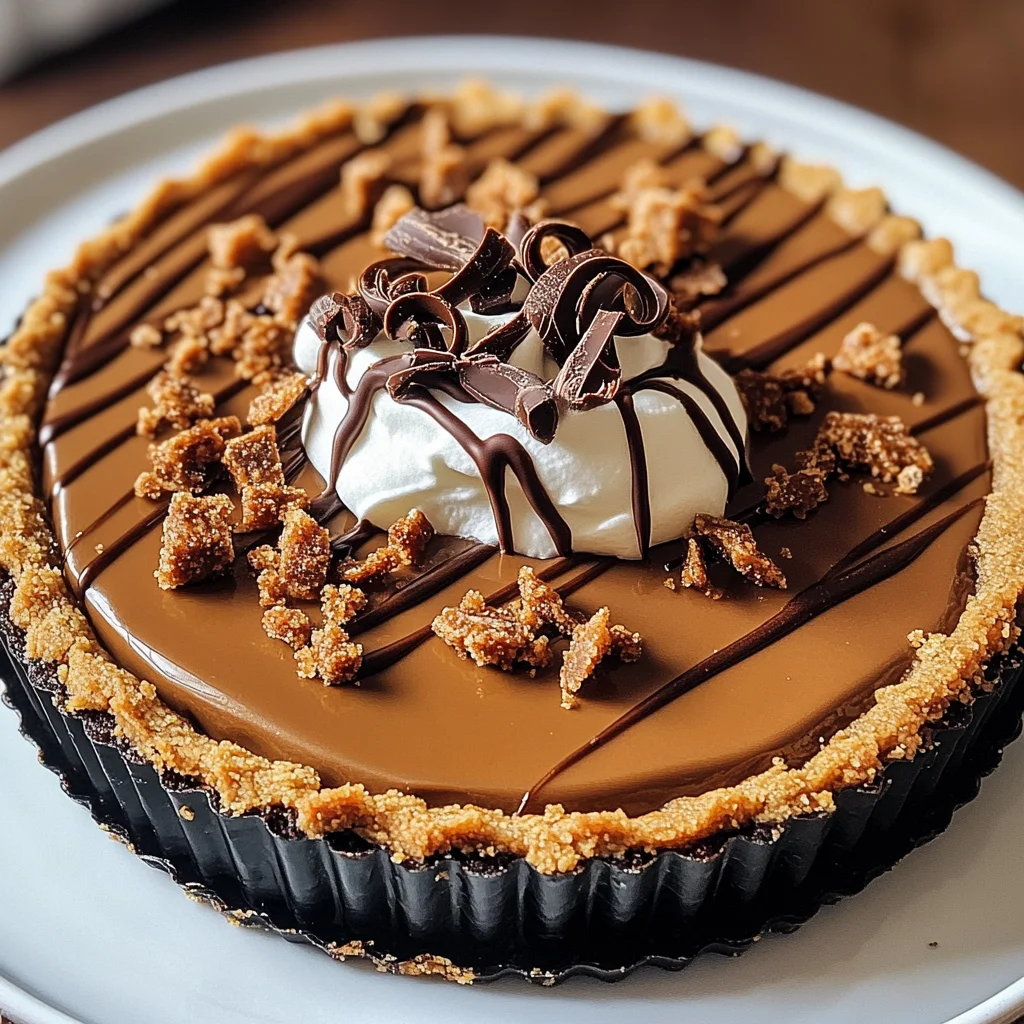
Chocolate Biscoff Tart
The moment you take your first bite of a Chocolate Biscoff Tart, it’s as if you’re being wrapped in a warm, cozy blanket, and all your worries melt away. This recipe is not just about satisfying a sweet tooth; it’s an experience that evokes deep feelings of comfort and joy. Imagine the rich, velvety chocolate mingling with the unmistakable spiced notes of Biscoff cookies, creating a symphony of flavors that dances across your palate. It’s this delightful contrast of textures—the crunchiness of the crust, the silky smoothness of the filling—that transforms an ordinary dessert into something truly extraordinary. I promise you, this Chocolate Biscoff Tart is a celebration of both nostalgia and innovation, a bridge between childhood treats and sophisticated indulgence.
Whenever I make this tart, I think back to family gatherings where desserts were the stars of the show. The way people lean in closer when they see something delicious being served is just magical. This tart fits right into those moments—perfect for birthdays, holidays, or even just as a sweet surprise on a regular Tuesday evening. It’s one of those recipes that has its roots firmly planted in tradition but carries with it a modern twist that makes it feel fresh and exciting. So grab your apron and let’s embark on this culinary journey together; I’m here to make sure every step is as easy and enjoyable as possible!
Chocolate Biscoff Tart: A Heavenly Delight with Every Bite
This Chocolate Biscoff Tart is more than just a dessert; it’s an irresistible combination of flavors and textures that invites you to savor each moment. With its crumbly cookie crust and luscious chocolate filling, it’s bound to become a favorite in your home. Let’s dive into this simple yet indulgent recipe that will impress your friends and family alike.
Ingredients:
As we gather our ingredients for the Chocolate Biscoff Tart, think of each component as an essential note in our beautiful culinary composition. Each ingredient plays a vital role in crafting this masterpiece, contributing its unique flavor and texture to create something truly special.
- 2 cups Biscoff cookies, crushed. These delightful cookies are packed with caramelized sugar and cinnamon spice, giving our tart its signature flavor profile. When crushed into fine crumbs, they form the perfect base for our tart shell—one that’s both sturdy and irresistibly crunchy. Be sure to use fresh Biscoff cookies; their distinct taste elevates this dessert from good to unforgettable.
- 6 tablespoons unsalted butter, melted. Butter is what binds our cookie crumbs together while also adding richness to the crust. Using unsalted butter allows us to control the saltiness of the final product—an important factor when balancing flavors in desserts like this one. Gently melting the butter ensures it mixes well with the cookie crumbs without making them soggy; trust me on this step—it’s non-negotiable!
- 1 cup heavy cream. Heavy cream is our secret weapon for achieving that luxurious filling texture—think silky and decadent! The high fat content helps stabilize the chocolate as it melts together with the other ingredients, creating a luscious ganache-like consistency that will have everyone coming back for seconds (or thirds). When choosing your cream, opt for one without additives for best results.
- 8 ounces semi-sweet chocolate, chopped. Chocolate is undoubtedly the star here—its smoothness combined with just enough sweetness creates an utterly intoxicating filling that melts in your mouth like liquid gold. Look for high-quality semi-sweet chocolate; it makes all the difference! If you can find chocolate bars rather than chips, go for them—they tend to have better flavor profiles since they’re less processed.
- 2 tablespoons Biscoff cookie butter. This ingredient adds an amazing layer of flavor that ties back beautifully to our cookie crust while also introducing a creamy element into our filling. If you’ve never tried cookie butter before, you’re in for a treat! It brings warmth and depth to our tart that’s simply divine.
- 1 teaspoon vanilla extract. Vanilla extract works wonders by enhancing all those rich flavors nestled within our tart while providing an aromatic lift that brightens every bite. Make sure you’re using pure vanilla extract rather than imitation; trust me when I say it will elevate your dessert exponentially.
- Pinch of sea salt. A little salt goes a long way—it acts like magic by amplifying sweetness while also balancing out richer flavors in desserts like this one. Don’t skip out on it; it’s absolutely paramount!
- Extra Biscoff cookies, crushed (for garnish). These crumbs not only add texture but also serve as visual appeal when sprinkled over top—a finishing touch that tells everyone you’ve put thought into every detail.
- Shaved chocolate or chocolate curls (for garnish). These delicate curls are purely decorative but add such elegance! They melt beautifully on your tongue alongside each bite of tart—just another reason why presentation matters.
- Whipped cream (for serving). Light and airy whipped cream complements our dense tart perfectly! It balances richness while bringing an extra layer of sweetness—just ideal for those who love their desserts slightly sweeter.
Equipment You’ll Need:
Having the right tools at your disposal makes all the difference between cooking being a chore or a joyful experience! Think of these pieces not just as equipment but as partners on this delightful culinary journey we’re about to embark on together.
- 9-inch tart pan with removable bottom: This pan is essential because it allows us to easily release our finished tart without damaging its delicate crust or filling—no one wants crumbled edges after all your hard work! The removable bottom makes serving so much easier since you can present it beautifully without needing to transfer it elsewhere.
- Mixing bowls: A sturdy mixing bowl set will be your best friend throughout this process; you’ll need them for combining everything from cookie crumbs to melted chocolate mixtures! Opt for glass or stainless steel; they’re durable and won’t react negatively with any ingredients we’re using here.
- Rubber spatula: This tool is indispensable when folding ingredients together smoothly without deflating any air we’ve incorporated—especially important when working with whipped cream or ganache mixtures!
- Food processor: While not strictly necessary (you could crush cookies manually), using a food processor saves time and effort when breaking down those Biscoff cookies into fine crumbs—the end result will be more consistent too!
- Double boiler or microwave-safe bowl: We’ll need either method to melt our chocolate gently without risking burning it—a crucial step since burnt chocolate can ruin everything we’ve worked towards!
Now you’re well-equipped with both ingredients and tools needed for creating this magnificent Chocolate Biscoff Tart! Let’s dive into making something extraordinary together—it’ll be worth every moment spent in preparation!
Step 1: Prepare Your Crust
Start by preheating your oven to 350°F (175°C)—this allows us to achieve that perfect golden-brown crust later on during baking! Next up, take those lovely Biscoff cookies and crush them finely using either your food processor or by placing them in a ziplock bag and smashing them gently with a rolling pin—whatever works best for you! You want fine crumbs here because they’ll hold together better once mixed with melted butter.
Once crushed, transfer them into a mixing bowl along with 6 tablespoons of melted unsalted butter—you want this mixture combined thoroughly so every crumb has absorbed some buttery goodness! Use your rubber spatula to fold until everything looks evenly coated; it should resemble wet sand at this point—a good sign we’re on track! Press this mixture firmly into the bottom (and slightly up sides) of your prepared tart pan—it’s crucial not only for structure but also because we want all those wonderful flavors locked inside once baked!
Bake your crust in preheated oven for about 10 minutes until fragrant—the edges should look lightly golden but don’t worry if they seem soft initially; they’ll firm up once cooled completely outside oven! After baking time is up allow cooling completely before moving onto next steps—it’s important not rushing things here since patience leads us closer towards perfection…
Step 2: Create That Decadent Filling
While waiting patiently for crust cooling down fully let’s focus on crafting our luscious filling! Begin by placing chopped semi-sweet chocolate into either double boiler set over simmering water or microwave-safe bowl if opting microwave method instead—both methods work beautifully here so choose what suits best based on kitchen setup available right now!
If using microwave method heat at intervals around 20 seconds stirring frequently until melted completely smooth—it usually takes me around two rounds total but keep an eye on things because we don’t want burnt bits ruining everything after all hard work already done earlier today! On other hand if going traditional route watch carefully ensuring water doesn’t touch bottom bowl holding chocolates directly during melting process—this gentle approach helps maintain quality while preventing scorching effects caused by direct heat source otherwise experienced easily otherwise…
Once fully melted remove from heat source adding heavy cream alongside two tablespoons delightful cookie butter next—as soon as incorporate these ingredients well watch transformation happen before eyes becoming silky mixture ready pour over baked cooled crust shortly thereafter…
Step 3: Combine & Chill
With those rich flavors mingling together beautifully now comes time pour everything carefully over prepared crust spreading evenly across surface ensuring no gaps left behind—we want each slice delightfully filled right down center too—not just edges only please!
After pouring ensure leveling out surface gently tapping pan against countertop couple times releasing any air bubbles trapped underneath surface which could disrupt clean slicing later on once chilled properly… Now place entire setup directly inside refrigerator allowing at least four hours chill time minimum preferred overnight if possible—which enhances overall flavor even further plus firms up texture nicely making cutting much simpler goal achieved later ahead too…
Step 4: Garnish & Serve
Once chilling period complete remove from fridge carefully releasing sides around outer rim using small knife gently sliding around edge pushing against pan side slowly loosening grip held tightly previously snug fit protects contents inside during transportation phase earlier—but now reward awaits us eagerly anticipated reveal moment occurs unveiling stunning creation hidden beneath layers waiting patiently…
Garnishing becomes fun part where creativity shines through brightening presentation enhancing aesthetics significantly while adding delightful textures enjoyed eating visually pleasing elements certainly enhances enjoyment factor tenfold… Sprinkle crushed extra Biscoff cookies atop surface followed closely shimmering shavings chosen chocolates curls tastes complementing flavors represented throughout entire dish finally finishing touches added—we have arrived dear friend full circle journey completed now ready indulgence awaits ahead…
The Ultimate Chocolate Biscoff Tart: A Sweet Symphony of Flavors
Step 5: Crafting the Crust – A Foundation of Flavor
Now that you’ve prepared your ingredients, it’s time to bring the crust to life, and trust me, this is where the magic begins! In a mixing bowl, combine your 2 cups of crushed Biscoff cookies with 6 tablespoons of melted unsalted butter. This mixture is going to serve as the sturdy yet luscious base for our tart. The reason we use melted butter here is twofold: it binds the cookie crumbs together while also adding a rich, buttery flavor that complements the spices in the Biscoff cookies. Using a fork or your fingers, gently mix until all the crumbs are well-coated—this should resemble wet sand. When you take a moment to breathe in the sweet, spiced aroma wafting from your bowl, you’ll know you’re on the right track.
Once everything is mixed beautifully, it’s crucial to press this crumbly mixture firmly into a tart pan—don’t skimp on this step! Use the back of a measuring cup or your fingers to pack it tightly into an even layer across the bottom and up the sides. Aim for about ¼ inch thick; this thickness helps ensure that our crust holds up against the decadent filling we’re about to make. You want a crisp and sturdy base that will provide contrast to the creamy chocolate ganache later on. After you’ve pressed it into place, pop it into a preheated oven at 350°F (175°C) for around 10 minutes until it’s golden and fragrant. Keep an eye on it; you’re looking for that perfect balance where it’s baked just enough to firm up but not so much that it becomes overly hard—this is absolutely paramount!
Step 6: Creating the Decadent Ganache – Liquid Gold Awaits
As your crust cools and fills your kitchen with those delightful aromas, let’s turn our attention to creating an utterly intoxicating chocolate ganache. In a medium saucepan over low heat, combine 1 cup of heavy cream with 8 ounces of chopped semi-sweet chocolate. Stir gently as they begin to meld together; patience is key here! This process allows the cream to slowly warm up and infuse its rich creaminess into each piece of chocolate. You want everything to melt evenly without scorching—burnt chocolate can be quite bitter, which we definitely want to avoid.
Once your mixture is smooth and glossy—oh, what a sight that is!—remove it from heat and add in 2 tablespoons of Biscoff cookie butter, 1 teaspoon of vanilla extract, and a pinch of sea salt. Each one of these components plays a vital role in elevating our ganache from simply good to truly extraordinary. The cookie butter adds an extra layer of warmth and spice while balancing out the sweetness perfectly; meanwhile, that pinch of sea salt enhances all those lovely flavors harmoniously. I promise you, when you take your first bite of this tart later on, that symphony of flavors will leave you breathless.
Step 7: Assembling Your Masterpiece – Layering Love
Now comes perhaps my favorite part—assembling this gorgeous Chocolate Biscoff Tart! Grab your cooled crust from earlier; feeling its slight crunch beneath your fingertips only amplifies my excitement for what’s next. Pour that silky ganache straight into your prepared crust, ensuring every nook and cranny gets filled with that luscious chocolate goodness. Use a spatula or even just tilt the pan gently to help spread it evenly if necessary; remember, presentation counts too! As you pour this velvety liquid gold into its new home, take a moment to appreciate how beautiful and inviting it looks—it’s like pure indulgence waiting to happen.
But wait! Before you dive headfirst into devouring this creation (as tempting as that may be), we need to let our tart chill properly in the fridge for at least four hours – yes, I know waiting can be tough! However, chilling allows all those incredible flavors to meld beautifully while helping our ganache set up perfectly. It transforms from being fluid and runny into something decadently creamy yet sliceable—a complete game-changer when serving guests or simply enjoying a quiet evening at home with loved ones. Trust me on this one—it’s worth every minute!
Step 8: Finishing Touches – Elevate Your Tart
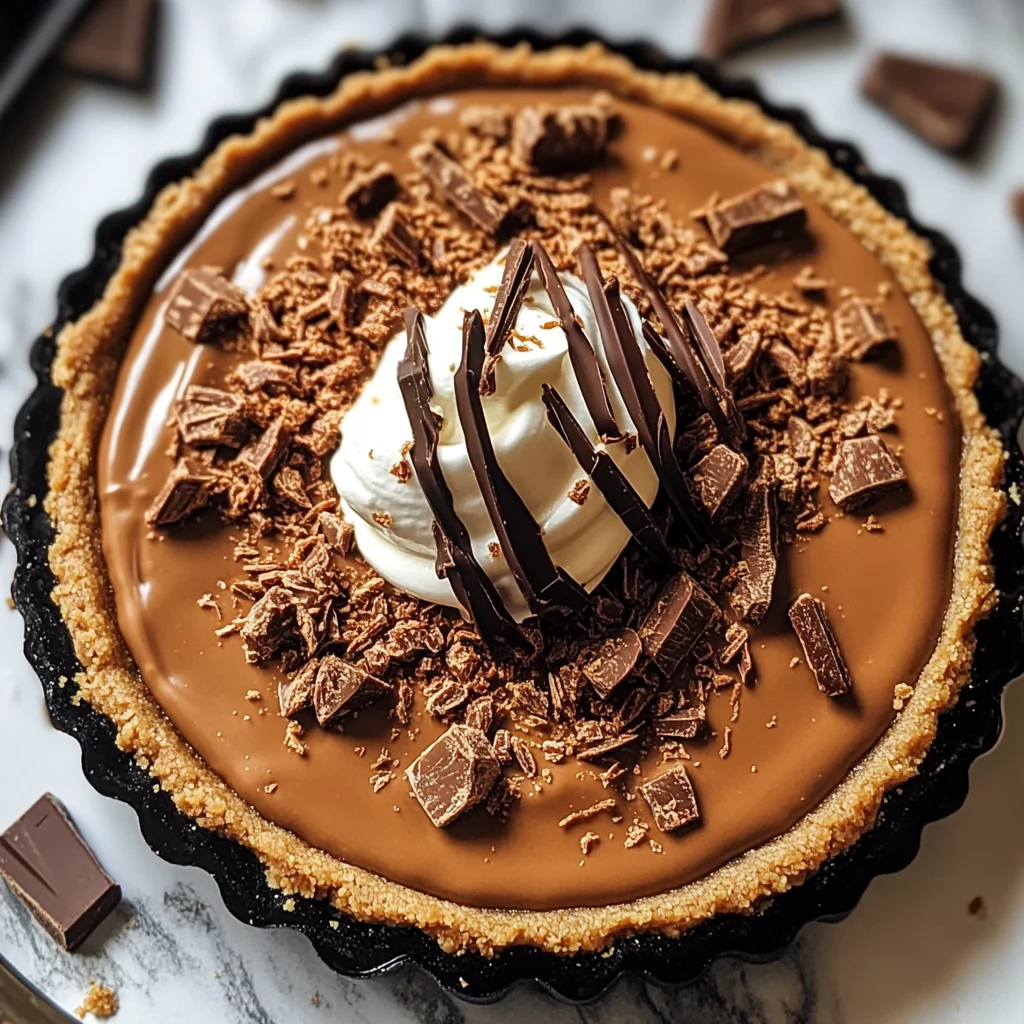
As our tart chills perfectly in the refrigerator like a little treasure waiting for its big reveal, let’s talk about those magical finishing touches! Once you’re ready to serve (and after those long hours have passed!), remove your Chocolate Biscoff Tart from its chilly resting place with anticipation bubbling inside you like whipped cream waiting for its debut. At this point, why not sprinkle some extra crushed Biscoff cookies atop? Not only does this add texture and visual appeal but those crumbles will remind everyone just how delightful each bite can be!
If you’re feeling extra indulgent (and who wouldn’t?), consider garnishing with shaved chocolate or delicate chocolate curls alongside some dollops of whipped cream for an elegant touch—this combination creates an enchanting visual feast that mirrors how deliciously decadent each slice truly is! Just imagine cutting through that silky ganache layered over crunchy crumbs as you lift out piece after piece—it really does feel like serving art on a plate!
Remember—the first cut might not always be perfect; don’t worry if things get messy—that just means you’re diving headfirst into deliciousness! And there you have it: an unforgettable Chocolate Biscoff Tart that’s sure to bring smiles and satisfaction all around. Every bite bursts with flavor while capturing memories worth cherishing—and I can’t wait for you all to experience this joy firsthand!
Storage and Enjoyment Tips for Your Chocolate Biscoff Tart
Now that your Chocolate Biscoff Tart is beautifully set and just waiting to be devoured, let’s talk about how to preserve this delightful creation for as long as possible. I can already picture you cutting into that luscious tart, the silky chocolate filling oozing slightly as you serve it to your loved ones. But life happens, and sometimes we have leftovers—though honestly, I doubt there will be much left after sharing! Regardless, if you do find yourself with some extra slices, storing them properly is crucial to ensure every bite remains as decadent as the first.
Storing Leftover Chocolate Biscoff Tart
To keep your Chocolate Biscoff Tart fresh and scrumptious, store it in an airtight container in the refrigerator. This helps protect it from absorbing any unwanted odors while maintaining its rich flavors. Ideally, it will stay delicious for up to five days; however, I promise you that it’s best enjoyed within the first three days when the textures are still at their peak. For a little secret tip, placing a slice of bread in the container can help retain moisture and keep the tart crust from getting too hard—it’s a trick I’ve used countless times! After a day or two in the fridge, you’ll find that the flavors meld even more beautifully together, creating a harmonized symphony of chocolate and spiced cookie goodness. When you’re ready to enjoy a slice again, simply take it out of the fridge and allow it to sit at room temperature for about 15 minutes before serving. This brief pause allows those luscious flavors to bloom once more!
Freezing Chocolate Biscoff Tart for Later
If you’re looking to save your indulgence for a rainy day or perhaps a special occasion down the line, freezing your Chocolate Biscoff Tart is an excellent option! To do this properly, wrap individual slices tightly in plastic wrap or aluminum foil, then place them inside a freezer-safe container or bag. This double-layer protection ensures that the tart stays fresh and prevents freezer burn—a non-negotiable step if you want to maintain that outstanding flavor! When wrapped correctly, your tart can be stored in the freezer for up to three months. Yes, three months of pure chocolate bliss waiting for you! When you’re ready to indulge again, simply thaw it overnight in the fridge and let it come back to life at room temperature before serving. Trust me on this one; having a slice of this decadent tart ready to go in your freezer is a convenience that will bring joy on busy days or unexpected gatherings.
With these storage tips under your belt, you can confidently enjoy every last bit of your masterpiece without worry!
Chocolate Biscoff Tart

Indulge in the delightful experience of our Chocolate Biscoff Tart, a dessert that brings together rich chocolate and the warm spiced notes of Biscoff cookies. With its crumbly cookie crust and luscious, creamy filling, this tart is not just a treat; it’s an invitation to savor life’s sweetest moments. Whether for a birthday celebration, holiday gathering, or simply a cozy night in, this easy-to-make dessert will impress your friends and family alike. Each bite offers a symphony of flavors and textures, transforming your dessert experience into something truly extraordinary.
- Prep Time: 30 minutes
- Cook Time: 10 minutes
- Total Time: 40 minutes
- Yield: Serves 8
- Category: Dessert
- Method: Baking
- Cuisine: American
Ingredients
- 2 cups crushed Biscoff cookies
- 6 tablespoons melted unsalted butter
- 1 cup heavy cream
- 8 ounces chopped semi-sweet chocolate
- 2 tablespoons Biscoff cookie butter
- 1 teaspoon vanilla extract
- Pinch of sea salt
- Extra crushed Biscoff cookies (for garnish)
- Whipped cream (for serving)
Instructions
- Preheat the oven to 350°F (175°C).
- In a mixing bowl, combine crushed Biscoff cookies with melted butter until well combined.
- Press the mixture firmly into a 9-inch tart pan and bake for about 10 minutes until golden. Allow cooling.
- In a saucepan over low heat, melt the heavy cream with chopped chocolate until smooth.
- Stir in Biscoff cookie butter, vanilla extract, and sea salt until fully combined.
- Pour the ganache into the cooled crust and chill for at least four hours or overnight.
- Garnish with crushed Biscoff cookies and serve with whipped cream.
Nutrition
- Serving Size: 1 slice (85g)
- Calories: 340
- Sugar: 23g
- Sodium: 150mg
- Fat: 24g
- Saturated Fat: 14g
- Unsaturated Fat: 10g
- Trans Fat: 0g
- Carbohydrates: 31g
- Fiber: 2g
- Protein: 4g
- Cholesterol: 45mg