Biscoff Cookie Butter Cookies
There’s something utterly enchanting about the act of baking, isn’t there? The way the kitchen fills with warm, inviting aromas, like a cozy embrace for the senses. When I think about my Biscoff Cookie Butter Cookies, it brings back memories of laughter and joy shared with family and friends around the table. Each bite is not just a treat; it’s an experience that dances between nostalgia and delight. Imagine sinking your teeth into a soft, chewy cookie, only to discover a luscious, gooey center of cookie butter that spills out like liquid gold. It’s that perfect combination of comfort and indulgence that makes these cookies truly extraordinary.
You see, these cookies are more than just dessert; they’re a celebration of flavors that blend seamlessly—a delightful contrast between sweet and salty. The Biscoff cookie butter infuses each bite with hints of caramelized sugar and warm spices, creating a symphony of taste that resonates deep within. Whether you’re crafting these delights for a special occasion or simply craving something sweet on a quiet afternoon, I promise you they’ll leave everyone reaching for seconds (and maybe even thirds!). So let’s roll up our sleeves, gather our ingredients, and embark on this delicious journey together.
Biscoff Cookie Butter Cookies: A Sweet Surprise Awaits!
These Biscoff Cookie Butter Cookies are not just any cookies; they are little pockets of joy filled with creamy cookie butter goodness! You can almost hear them whispering promises of coziness as they bake in the oven—golden edges crisping while the centers remain delectably soft. This recipe is perfect for both novice bakers and seasoned pros alike; it’s simple yet rewarding. By the end, you’ll have 13 stunning cookies to share (or keep all to yourself—no judgment here!).
Ingredients:
Let’s gather our stars for this baking adventure! Each ingredient plays a crucial role in crafting those heavenly Biscoff Cookie Butter Cookies we’re dreaming about.
- 13 teaspoons Biscoff cookie butter. This magical spread is what makes the heart of our cookies so irresistible! Its buttery texture combined with hints of cinnamon and nutmeg creates an incredibly rich flavor profile. Look for high-quality cookie butter—some brands might skimp on flavor or texture. If you’re feeling adventurous, you could even make your own by blending Biscoff cookies into a smooth paste!
- ½ cup unsalted butter (room temperature). Room temperature butter is essential for achieving that perfectly creamy base when we mix it with sugars. This process, known as creaming, incorporates air into the mixture, giving our cookies their delightful lift and chewy texture. If your butter is too cold or melted, it won’t incorporate properly—and we definitely want to avoid flat cookies!
- ½ cup Biscoff cookie butter (additional for dough). We’re adding more cookie butter into the actual dough because why not amp up that flavor? This second dose ensures every bite bursts with that familiar warmth and sweetness we adore.
- ½ cup brown sugar. Brown sugar not only sweetens but also adds moisture and chewiness to our cookies thanks to its molasses content. It creates those lovely caramel notes that pair beautifully with the spices in Biscoff cookie butter.
- ⅓ cup granulated sugar. While brown sugar brings moisture, granulated sugar contributes to achieving that slight crispness along the edges of our cookies. The balance between these two sugars is non-negotiable if you’re looking for texture perfection.
- 1 large egg (room temperature). Eggs bind everything together while also adding richness to our dough. Using room temperature eggs helps them integrate better into the batter; if they’re cold from the fridge, they can cool down your mixture and affect how well your cookies turn out.
- 2 teaspoons vanilla extract. Vanilla is often called the soul of baking—it enhances all other flavors in your cookies without overpowering them. I always recommend using pure vanilla extract over imitation; it makes all the difference in flavor clarity.
- ½ teaspoon baking soda. This leavening agent is responsible for giving our cookies that nice lift during baking! It reacts with acids in ingredients like brown sugar to produce carbon dioxide bubbles—resulting in light and airy treats.
- ½ teaspoon salt. Salt enhances sweetness and balances flavors remarkably well! Don’t skip this step—it’s absolutely paramount for bringing out all those delightful nuances in your cookies.
- 1½ cups all-purpose flour. Flour acts as the backbone of our cookie dough structure; it provides stability while allowing us to achieve that perfect chewiness we crave in every bite.
- 2 tablespoons Biscoff cookie butter (for drizzling on top). Just when you thought these cookies couldn’t get any better! Melting some additional cookie butter to drizzle on top creates an alluring finishing touch that’s both visually appealing and deliciously indulgent.
- Flaked salt (for sprinkling on top). A sprinkle of flaked salt elevates these cookies from good to truly unforgettable by highlighting their sweetness while offering just enough contrast to keep you coming back for more.
The beauty of gathering these ingredients is that each one contributes its unique character to our final creation—together they weave a story of warmth and comfort you’ll want to share with everyone around you.
Equipment You’ll Need:
Before we dive into mixing up this delicious dough, let’s ensure you’ve got all your essential tools ready at hand! Having the right equipment makes baking smoother and more enjoyable—not to mention helps ensure your creations come out perfectly each time!
- Mixing bowls – A set of sturdy mixing bowls will be your best friend throughout this process! I recommend having both medium and large sizes available so you can easily mix batters without worrying about spillage or messes.
- Electric mixer or whisk – An electric mixer makes light work when creaming together your butters and sugars until fluffy—trust me when I say you’ll want this tool for efficiency! If you prefer a bit more exercise (and connection) with your dough-making process, a good old-fashioned whisk works just fine too!
- Cookie scoop or tablespoon – Using a cookie scoop ensures uniformity in size across all your delightful treats! This guarantees even baking times so every cookie comes out perfectly baked rather than some being overdone while others remain undercooked.
- Baking sheets lined with parchment paper – Lining your baking sheets prevents sticking while allowing airflow around each cookie as they bake—I cannot stress enough how crucial this step is! It also simplifies cleanup afterward—a definite win-win!
With these tools prepped alongside our vibrant ingredient lineup, we’re ready to bring those dreamy Biscoff Cookie Butter Cookies to life!
Step 1: Freezing Your Cookie Butter Centers
Let’s start by preparing those delectable surprises hidden inside each cookie! Scoop out 13 one-teaspoon-sized balls of Biscoff cookie butter onto a piece of parchment or wax paper—the trick here is freezing them solid so they don’t melt away completely during baking but instead create gooey pockets within each finished cookie! Place them carefully into the freezer while we move on to prepping our dough; this step ensures each bite bursts open with warm sweetness as you sink your teeth into one later on—absolutely essential!
Step 2: Preheating Your Oven
While those tasty treasures chill out in the freezer, go ahead and preheat your oven to 350°F (175°C). Preheating creates an ideal environment for baking by ensuring heat distributes evenly from start to finish—this means no soggy bottoms or overbaked edges here!
Step 3: Creaming Your Butters
In a medium bowl, combine room temperature unsalted butter and half a cup of Biscoff cookie butter until smooth—that beautiful creamy texture is what we want! Use an electric mixer set at medium speed or whisk vigorously if you’re feeling nostalgic about good old-fashioned techniques—this process known as creaming incorporates air into the mixture which results in lightness throughout our final product! Once combined properly (about two minutes), slowly add both types of sugar—brown sugar first followed by granulated—and continue mixing until light and fluffy; trust me when I say this fluffy base sets us up beautifully for success later down the line!
Step 4: Mixing In Egg & Vanilla
Now comes one of my favorite parts—the addition of egg and vanilla extract! Crack open that room-temperature egg right into your creamy mixture along with those fragrant two teaspoons of pure vanilla extract—you’ll love how aromatic it becomes once blended together nicely! Mix again until fully incorporated; watching everything meld harmoniously gives such satisfaction—it feels like magic happening right before my eyes every time I do it!
Stay tuned because we’re just getting started—each subsequent step brings us closer to achieving those irresistibly chewy Biscoff Cookie Butter Cookies filled with unexpected delights!
Step 5: Forming the Cookies – A Delightful Surprise Awaits
Now it’s time to bring your cookie dreams to life by forming those glorious Biscoff cookie butter cookies! With your dough ready, scoop out generous portions using a 3-tablespoon cookie scoop, ensuring each ball is packed with love and flavor. You should be aiming for a beautiful round shape, about the size of a golf ball. This is crucial because larger cookies will create that wonderfully chewy center we all crave while allowing the exterior to become perfectly golden brown. As you work, take a moment to appreciate the buttery aroma wafting from the mixture—it’s absolutely intoxicating!
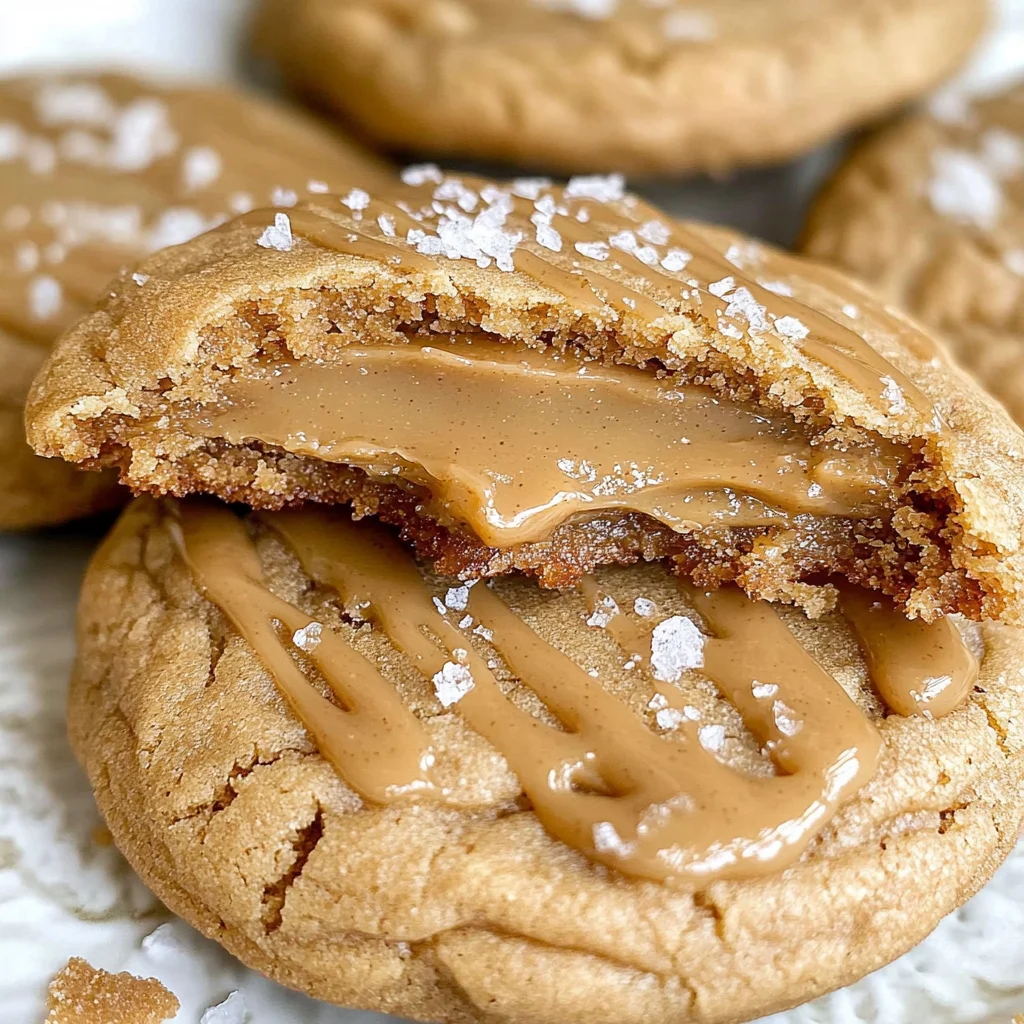
Once you’ve scooped out your cookie dough, it’s time for the pièce de résistance: the frozen cookie butter centers. Retrieve those little mounds of biscoff cookie butter from the freezer. This step is non-negotiable; freezing them ensures they hold their shape during baking and gives you that gooey surprise when you bite into the cookie. Press one frozen ball into each dough mound, ensuring it’s completely enveloped in dough. It’s like tucking in a precious secret just waiting to be discovered! Arrange 6-7 of these delightful dough balls on your parchment-lined baking sheet, leaving enough space between them for expansion—trust me; they’ll spread beautifully as they bake.
Step 6: Baking – The Transformation Begins
Now, let’s step into the oven and let magic happen! Preheat your oven to 350°F (175°C) if you haven’t already; this temperature is just right for achieving that perfect balance between chewy and crisp. When you’re ready, gently slide your baking sheets into the oven and set a timer for 11-13 minutes. I promise you—the moment those cookies start baking, your kitchen will transform into a cozy haven filled with warm spices and sweet aromas that beckon everyone in your home.
As they bake, keep an eye on them around the 11-minute mark; they should be turning golden brown at the edges while still looking soft in the center. This visual cue is essential—underbaking slightly lets them maintain that divine chewiness that will make your taste buds sing! If they look too pale or if the edges aren’t just beginning to crisp up, give them another minute or two but watch closely; no one likes an overbaked cookie! Once they’re done, remove them from the oven and let them rest on the baking sheet for about 5 minutes before transferring them to a wire rack. This resting period allows them to set up beautifully while retaining their soft texture.
Step 7: The Drizzle – Elevating Your Cookies
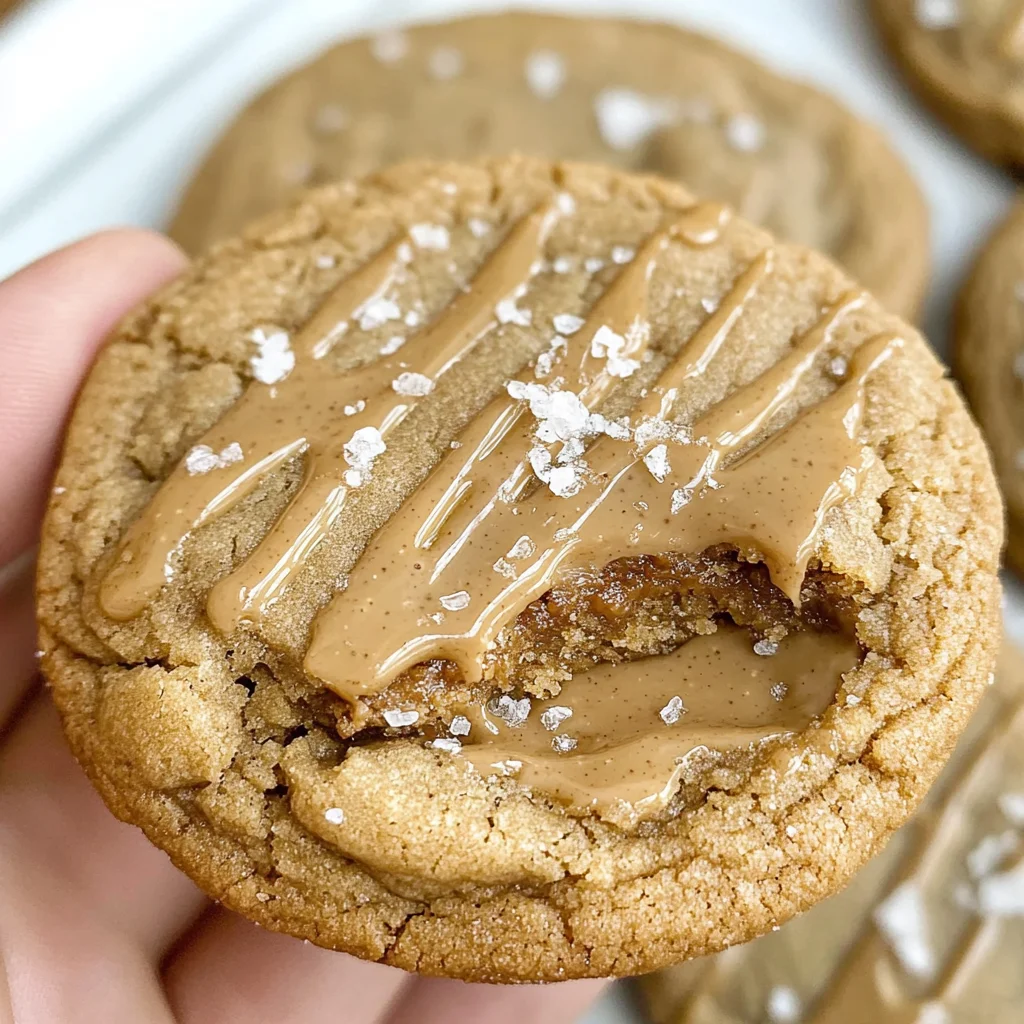
As if these cookies weren’t already extraordinary enough, let’s add one more layer of indulgence with a drizzle of melted Biscoff cookie butter! Take those last two tablespoons of cookie butter and pop them in the microwave for about 15-20 seconds until they become a luscious liquid gold—just perfect for drizzling. Stir it gently to ensure it’s completely melted and smooth; this is where patience pays off as it transforms into a beautifully pourable consistency.
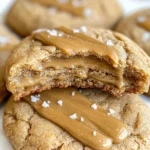
Once you’ve drizzled that heavenly mixture over your freshly baked cookies, sprinkle just a pinch of flaked salt on top. This finishing touch is utterly transformative—it elevates each bite into a symphony of flavors! The combination of sweet and salty creates an extraordinary depth that enhances every element of these cookies. Trust me when I say it’s worth taking that extra moment; this simple addition will make everyone wonder how you achieved such culinary brilliance!
Step 8: Cooling & Enjoying – The Anticipation Builds
After all that hard work (and trust me—it was worth every moment), it’s time to let your Biscoff cookie butter cookies cool completely on a wire rack. As tempting as it may be to dive in right away, give them at least another 10-15 minutes to reach their optimal texture. Cooling not only helps them firm up but allows those delightful flavors to meld together even further.
While you’re waiting, take a deep breath and savor that intoxicating scent wafting through your kitchen. It’s like being wrapped in a hug from your favorite memories—so comforting! Once cooled, grab one (or two… I won’t judge!) and take that first bite; feel free to pause as you experience the contrasting textures—the soft outer layer giving way to the rich cookie butter center is nothing short of revelatory. Don’t forget to share these delectable treats with friends or family; after all, sharing joy makes everything taste even better!
Conclusion:
As we wrap up this journey through crafting the perfect Biscoff Cookie Butter Cookies, I hope my excitement has spilled over into your kitchen! These treats are not just cookies; they are a celebration of contrasts—the crunch from the outer layer meets the luscious gooeyness inside—a truly harmonious blend of textures and flavors that elevates them beyond ordinary desserts. The caramel undertones of Biscoff paired with the sweet creaminess of cookie butter create an unforgettable experience with every bite.
Why should you add this recipe to your must-try list? Well, it’s not just about satisfying your sweet tooth; it’s also about the joy of creating something extraordinary from simple ingredients right in your own home. These cookies shine at any occasion—from cozy nights in with a warm cup of tea to festive gatherings where they’ll undoubtedly steal the spotlight. Just imagine pulling a tray from the oven and watching those golden edges beckon you closer while their intoxicating aroma fills every corner of your space.
Imagine savoring one with your morning coffee as you bask in that quiet moment before the day begins—or perhaps enjoying one as an afternoon pick-me-up alongside a tall glass of cold almond milk. For an indulgent experience that takes you straight to dessert heaven, try pairing these cookies with vanilla ice cream; when that warm cookie meets cold cream, it’s pure magic! Each bite becomes an adventure as layers of flavor intertwine on your palate.
Feeling adventurous? This recipe is wonderfully adaptable! You could swap out some flour for almond flour for a nutty twist or add chunks of dark chocolate for an extra layer of decadence—who wouldn’t want more chocolate in their life? You could even experiment by folding in some crushed nuts or using different flavored cookie spreads if you’re feeling creative. Whatever direction you choose, I encourage you to dive into this recipe with open arms and let it inspire your own culinary journey. I can’t wait to hear how yours turn out—so please share your experiences and delights with me!
Biscoff Cookie Butter Cookies
Indulge in the delightful world of Biscoff Cookie Butter Cookies, where every bite reveals a rich and gooey center that’s simply irresistible! These cookies are more than just treats; they embody comfort and joy, perfect for sharing with loved ones or savoring during a quiet afternoon. With their soft, chewy texture and hints of caramel and spice from the Biscoff cookie butter, these cookies will elevate any dessert table. Plus, they’re easy to make, allowing both novice bakers and seasoned pros to create something special. Whether enjoyed with a hot beverage or as an indulgent snack on their own, these cookies promise to bring warmth and happiness into your home.
- Prep Time: 20 minutes
- Cook Time: 12 minutes
- Total Time: 32 minutes
- Yield: Approximately 13 cookies 1x
- Category: Dessert
- Method: Baking
- Cuisine: American
Ingredients
- 13 teaspoons Biscoff cookie butter
- ½ cup unsalted butter (room temperature)
- ½ cup brown sugar
- ⅓ cup granulated sugar
- 1 large egg (room temperature)
- 2 teaspoons vanilla extract
- ½ teaspoon baking soda
- ½ teaspoon salt
- 1½ cups all-purpose flour
- Flaked salt (for sprinkling)
Instructions
- Freeze 13 one-teaspoon-sized balls of Biscoff cookie butter for at least 30 minutes.
- Preheat your oven to 350°F (175°C).
- In a medium bowl, cream together the unsalted butter and half a cup of Biscoff cookie butter until smooth.
- Gradually add brown sugar and granulated sugar, mixing until light and fluffy.
- Mix in the egg and vanilla extract until fully incorporated.
- In a separate bowl, whisk together baking soda, salt, and flour. Gradually add this mixture to the wet ingredients until combined.
- Scoop out portions of dough, press in the frozen cookie butter centers, then form into balls.
- Place on parchment-lined baking sheets with space between each cookie.
- Bake for 11-13 minutes or until golden at the edges but soft in the center.
- Let cool on the baking sheet for about 5 minutes before transferring to a wire rack.
Nutrition
- Serving Size: 1 cookie
- Calories: 160
- Sugar: 10g
- Sodium: 100mg
- Fat: 8g
- Saturated Fat: 4g
- Unsaturated Fat: 3g
- Trans Fat: 0g
- Carbohydrates: 20g
- Fiber: 1g
- Protein: 2g
- Cholesterol: 15mg