Banana Pudding Easter Truffles
There’s something truly magical about Easter—it’s a time of rebirth, celebration, and sweet indulgence. When I think about the joy of gathering with loved ones around a table laden with delightful treats, my heart sings with the anticipation of sharing something special. That’s why I can’t wait to share my recipe for Banana Pudding Easter Truffles. These little bites are more than just a dessert; they’re a celebration in themselves! Imagine creamy banana pudding mingling with the crunch of vanilla wafers, all lovingly wrapped in a luscious chocolate shell. Each truffle is a soft and sweet surprise that will transport you to sunny days and cherished memories, making it the perfect treat for your Easter festivities.
As we embark on this culinary adventure together, I want you to picture the vibrant colors of spring—pastel blooms and cheerful decorations. This recipe embodies that spirit, full of warmth and charm. The Banana Pudding Easter Truffles are not only delicious but also incredibly easy to make, ensuring that even novice bakers can join in the fun. I promise you, as you craft these delightful morsels, you’ll find joy in every step—from mixing the creamy filling to rolling those perfectly-shaped truffles. Let’s dive into this journey together, shall we?
Banana Pudding Easter Truffles: A Sweet Springtime Delight
If you’re looking for a simple yet utterly delicious dessert to grace your Easter table, look no further than these Banana Pudding Easter Truffles. They encapsulate everything we love about spring—lightness, sweetness, and an air of festivity. Plus, they’re a wonderful way to involve kids or grandkids in the kitchen; who doesn’t love rolling up their sleeves and getting hands-on? So grab your apron and let’s get started!
Ingredients:
As we prepare to create our Banana Pudding Easter Truffles, let me reassure you that each ingredient is chosen with love and care. They come together harmoniously to create a symphony of flavors that will captivate anyone who tastes them.
- 2 cups crushed vanilla wafers: These lovely little cookies serve as the backbone of our truffles! Their sweet crunch adds texture and depth while echoing the classic flavors associated with banana pudding. When purchasing vanilla wafers, look for ones that are crisp but not overly hard; you want them to blend beautifully into the filling without any gritty texture. If you’re feeling adventurous, consider making your own wafers—though store-bought is reliably convenient!
- 1/2 cup cream cheese (softened): The cream cheese is absolutely paramount in achieving that rich and creamy consistency we crave in our truffles. It adds a delightful tanginess that balances out the sweetness from the other ingredients while helping bind everything together. Make sure it’s at room temperature before mixing—this ensures it blends smoothly without any lumps marring our beautiful filling.
- 1 package (3.4 oz) banana pudding mix (dry): Ah, this is where the magic truly begins! The banana pudding mix infuses each truffle with an unmistakable flavor reminiscent of childhood desserts. It thickens the mixture perfectly while contributing that nostalgic taste we all adore. Just remember—we’re using it dry here! No need to prepare it as directed on the box; trust me on this one!
- 2 tablespoons milk: A splash of milk helps achieve just the right consistency for our filling—too little could make it too dry to mold into balls, while too much might lead to a soggy mess (yikes!). Whole milk is fantastic here due to its richness, but if you’re looking for lighter alternatives like almond or oat milk, feel free! Just keep an eye on how it affects the texture.
- 1 teaspoon vanilla extract: A hint of pure vanilla extract elevates this recipe from ordinary to extraordinary! It brings warmth and depth to our truffles, enhancing all those lovely flavors we’re crafting together. Always opt for pure vanilla extract over imitation if possible—the real stuff has such complex flavor notes that you’ll notice the difference immediately.
- 2 cups white chocolate chips or candy melts: This luscious coating gives our truffles their decadent finish! White chocolate provides a wonderfully creamy flavor profile that pairs beautifully with bananas; however, if you’d like something even sweeter or more colorful (think festive!), candy melts are an excellent alternative! Just ensure they’re melted correctly for an ultra-smooth finish.
- Food coloring (pastel colors): If you’re aiming for those delightful pastel hues reminiscent of Easter eggs, food coloring is your best friend here! A few drops mixed into your melted chocolate can transform these truffles into beautiful confections worthy of any festive celebration.
- Crushed vanilla wafers: A sprinkle of these on top provides both crunch and visual appeal after coating our truffles in chocolate—who doesn’t love a little extra texture? They add flair as well as flavor!
- Easter sprinkles: These colorful gems are optional but oh-so-fun! Sprinkling them on top adds whimsy and delight—a nod to all things springtime—and they’re sure to bring smiles when served.
- Colored chocolate drizzle: This final touch lets your creativity shine! Drizzling colorful melted chocolate over your coated truffles not only enhances their look but also adds another layer of sweetness that’s simply divine.
Equipment You’ll Need:
Before we roll up our sleeves and dive into creating these delights, let’s talk about some essential tools that will make this process smoother and more enjoyable. Having the right equipment makes all the difference in achieving success without unnecessary stress!
- Mixing bowls – A good set of mixing bowls is crucial for combining ingredients properly without splattering everywhere! Opt for medium-sized bowls so you have enough room for vigorous mixing without overflow.
- Electric mixer or wooden spoon – Whether you choose an electric mixer or go old-school with a wooden spoon depends on how much elbow grease you’re willing to put in! An electric mixer makes quick work of blending cream cheese into a smooth filling while allowing you more time to enjoy chatting with friends or family during prep!
- Parchment paper – Lining your baking sheet with parchment paper ensures easy cleanup once your truffles are ready to chill—and trust me; you’ll want things tidy when dealing with melted chocolate later!
- Baking sheet – You’ll need this trusty companion for cooling your rolled truffles before dipping them into chocolate bliss. A rimmed baking sheet prevents any accidental spills while keeping everything contained.
Now that we have everything prepped and ready let’s get cooking—prepare yourself for some serious deliciousness ahead!
Preparing the Banana Pudding Easter Truffles
Step 1: Create Your Flavorful Filling
To kickstart our culinary adventure, grab your mixing bowl and combine those crushed vanilla wafers with softened cream cheese and dry banana pudding mix. Trust me when I say this step sets up everything else beautifully! As you blend them together—that satisfying crunch meets creamy goodness—you’ll start smelling hints of nostalgia wafting through your kitchen like a warm hug from childhood memories. Once you’ve combined them well enough so they resemble doughy consistency (this usually takes just 2–3 minutes), add in milk gradually along with vanilla extract until everything melds perfectly into one cohesive mixture.
Step 2: Shape Your Truffle Treasures
Now comes one of my favorite parts—shaping those adorable truffle balls! Using clean hands (or perhaps wearing some fun food-safe gloves), take small amounts of dough—about one inch in diameter—and gently roll them between your palms until smooth round shapes form before transferring them onto lined baking sheets spaced apart evenly so they don’t stick together later on during chilling time. Don’t rush through this step because shaping matters—it ensures even coating later!
Step 3: Chill Out!
With all those delightful balls now resting comfortably on parchment-lined sheets let’s give them some time alone—you know what they say about good things coming to those who wait! Chill these beauties in the refrigerator for at least 30 minutes—or up until 45 minutes—for optimal firmness before we dip them into their sweet silky coat!
Step 4: Melt Away Your Chocolate Worries
While waiting patiently (I know it’s tough!), let’s melt our white chocolate chips or candy melts until smooth—a microwave works wonders here but be careful not overheat as burning can happen quickly if left unattended too long! Heat them gradually in short bursts stirring every 30 seconds until completely melted blissfully silky liquid gold forms readying itself eager embrace when meeting chilled truffle friends soon afterward…
Stay tuned as we continue crafting these joyful treats together—I promise every moment spent here will yield satisfaction beyond measure when shared among family and friends at holiday gatherings or simply enjoyed solo during cozy evenings at home surrounded by laughter-filled conversations around dessert tables galore…
Step 5: The Art of Coating Your Truffles
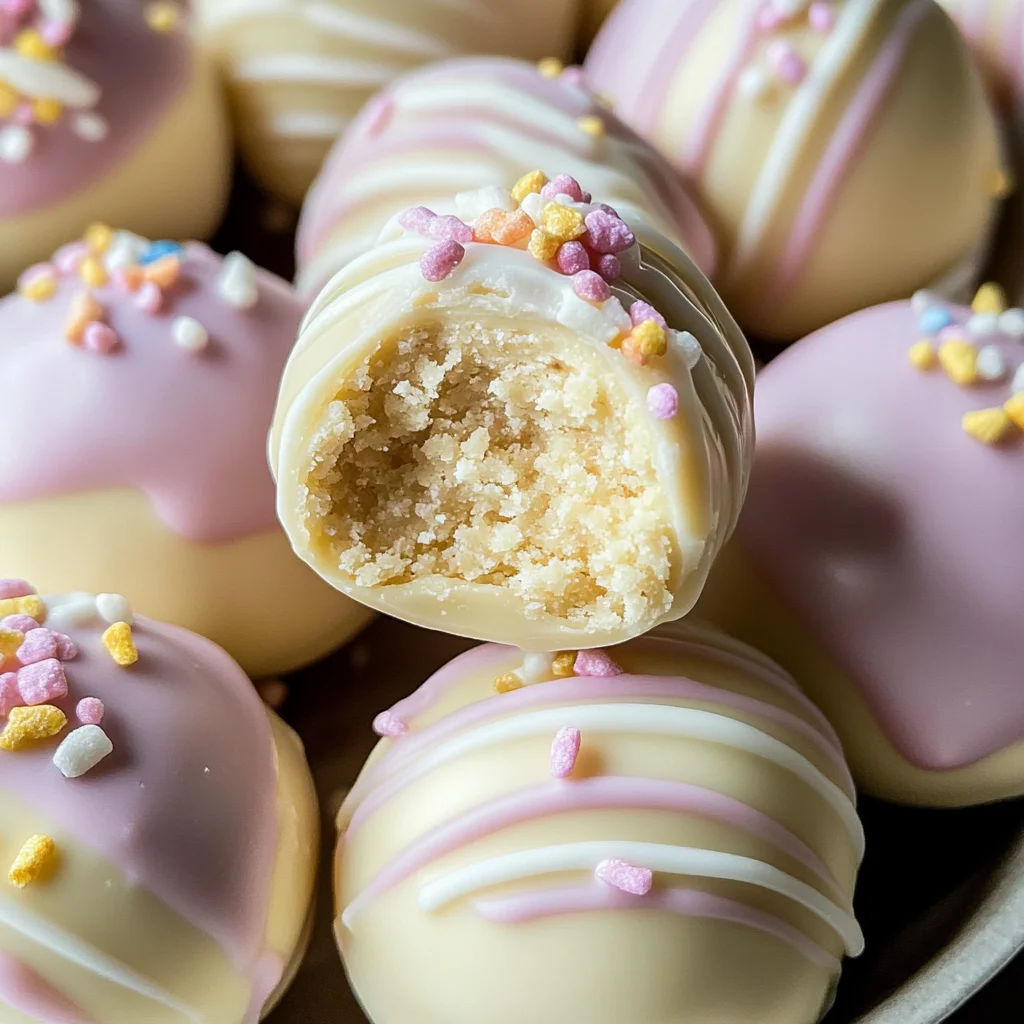
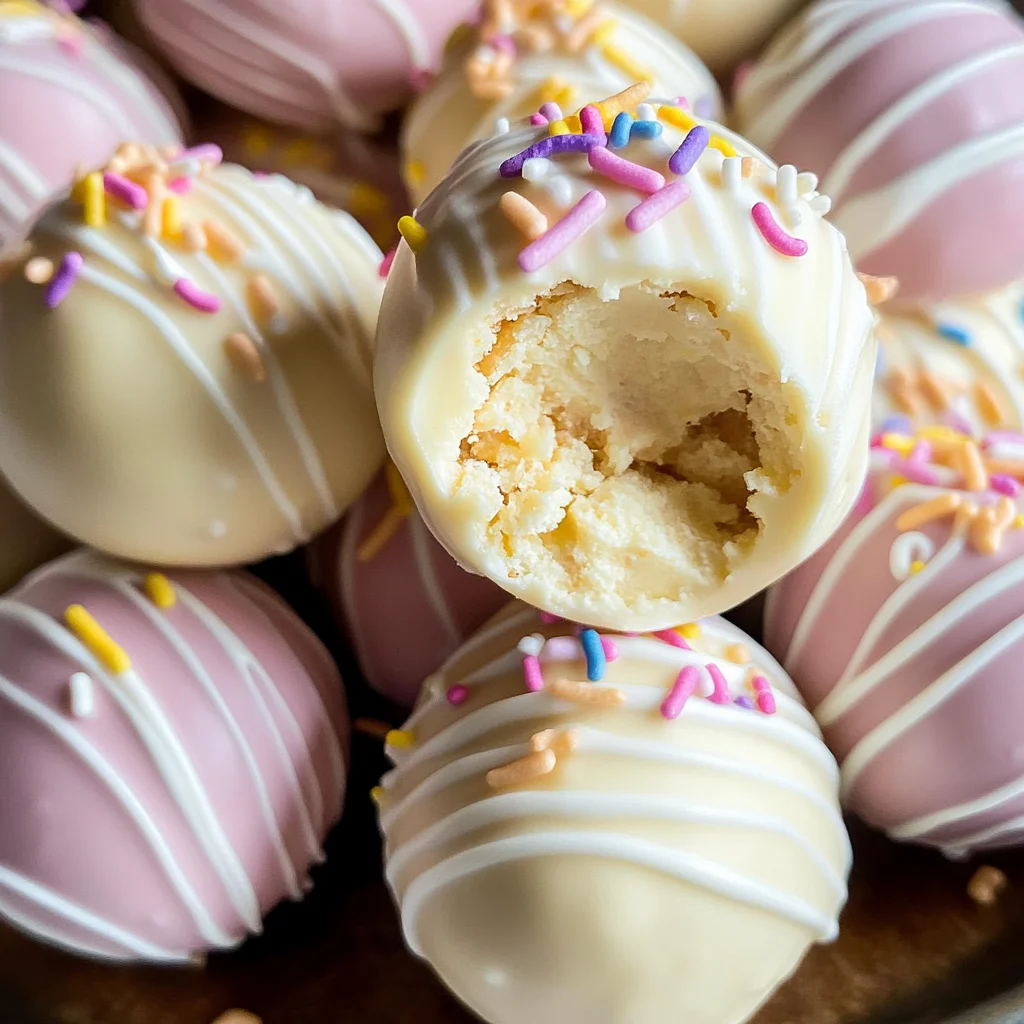
Now comes one of the most delightful steps in crafting these Banana Pudding Easter Truffles—melting the white chocolate! This is where your truffles truly transform. Start by placing your white chocolate chips or candy melts into a microwave-safe bowl. Heat them in the microwave in 30-second intervals, giving them a good stir after each round. This step is absolutely paramount because chocolate can seize up or burn if you rush it; you want that luscious, silky texture that will glisten over your truffles. When the chocolate is fully melted and smooth, you can choose to add a few drops of pastel food coloring to create a visual feast that echoes the joy of springtime.
This step isn’t just about looks; it’s also about enhancing your experience. Those beautiful pastel colors will not only make your truffles pop but also create an inviting atmosphere for your Easter celebration. Trust me on this; seeing those vibrant hues will bring smiles before anyone even takes a bite! Once you’ve achieved that dreamlike consistency and delightful color, you’re ready to coat those chilled truffles. But remember, this isn’t a race—take your time dipping each truffle into the warm chocolate, allowing the excess to drip off before placing them back onto the parchment-lined baking sheet. This careful coating ensures that each bite will be enveloped in creamy sweetness without being overly cloying.
Step 6: The Sweet Symphony of Decoration
Now that you’ve coated your truffles in that velvety layer of chocolate goodness, it’s time to get creative with decoration! While the chocolate is still wet, sprinkle each truffle with crushed vanilla wafers or colorful Easter sprinkles. This step adds not just flavor but an irresistible crunch that contrasts beautifully with the creamy filling inside. Additionally, don’t shy away from drizzling some colored chocolate over the top for an extra flair; it’s all about making them visually stunning and elevating their deliciousness!
Why decorate? Well, presentation matters—a lot! The way food looks can enhance our perception of taste and enjoyment. When you take a moment to beautify these truffles, you’re creating anticipation for those who will indulge in them later. Plus, sharing these charming treats with family and friends during Easter makes the experience all the more special! If you’ve got little ones around, let them join in on this fun part—it’s a fantastic way to create lasting memories together while making these treats even more personal.
Step 7: The Magic of Setting
After decorating your truffles, they need to set properly—a crucial step for achieving that perfect finish! Allow them to rest at room temperature for about 15-20 minutes or until they’ve firmed up nicely. Alternatively, if you’re impatient (I totally understand!), you can pop them back into the fridge for around 10 minutes. This waiting game might feel tedious, but I promise you it’s worth every second! During this time, your chocolate coating solidifies into a shiny shell that beautifully encases those rich banana flavors within.
The science behind this is fascinating: as the chocolate cools down, it transitions from liquid to solid state, creating that satisfying snap when you take a bite. Plus, letting them sit allows those flavors to meld together harmoniously—a symphony of tastes that makes each truffle exponentially better than if you dove straight in after coating them! Don’t skip this essential phase; it’s during these moments of anticipation that you build excitement for what’s to come.
Step 8: Serving Your Masterpiece
Finally, we reach the moment we’ve all been waiting for—serving up those Banana Pudding Easter Truffles! Arrange them artfully in a decorative bowl or gift box and watch as they bring smiles and joy to everyone around you. You could even place some fresh flowers or greenery around them to elevate their presentation further—the bright colors will enhance their appeal! As everyone gathers around to enjoy these incredible bites of bliss, take a moment yourself to revel in how far you’ve come from simple ingredients to these delightful masterpieces.
As you serve these truffles at your Easter gathering or special occasion, don’t forget how much love went into every step—from crushing those vanilla wafers to rolling each ball by hand and delicately draping them in chocolate! Each bite will evoke memories of joyful celebrations and create new ones with every shared moment at the table. Remember, cooking isn’t just about satisfying hunger; it’s about connecting with loved ones and creating experiences together.
Conclusion:
As we wrap up our culinary journey through the creation of these enchanting Banana Pudding Easter Truffles, I hope you feel that same excitement bubbling within you as I do! The harmonious blend of luscious banana pudding and delicate vanilla wafers wrapped in creamy white chocolate is nothing short of extraordinary—each bite transports me back to cherished family gatherings where laughter mingled with sweet delights. It’s this combination of nostalgia and flavor that makes these truffles not just another dessert but rather an experience steeped in warmth and joy.
Why should this recipe be at the top of your must-try list? Well, it’s not just about how utterly delectable these truffles are (though trust me, they are!). The joy of crafting something so delightful with your own hands is truly unparalleled. Picture yourself rolling those golden balls of goodness while sharing laughter with loved ones or surprising friends with homemade gifts during festive occasions like Easter or birthday celebrations. Each moment spent making these treats is filled with love and creativity—a gift that goes beyond taste.
Imagine savoring one of these delightful truffles with a cup of rich coffee or perhaps alongside a refreshing glass of iced tea on a sunny afternoon. For an extra indulgent experience, why not pair them with a scoop of vanilla ice cream or serve them as part of an extravagant dessert platter at your next gathering? The possibilities are endless! Each pairing enhances their charm and elevates each bite into something truly magical.
Feeling adventurous? This recipe is wonderfully adaptable! You could switch things up by incorporating different flavors into the filling—how about adding crushed pineapple for a tropical twist or experimenting with almond extract instead of vanilla? You could even roll some in toasted coconut flakes or crushed nuts for added texture and flavor diversity! The beauty lies in its versatility; I encourage you to make it your own. So go ahead—give it a try, share your creations with friends and family, and connect over delicious food made with love!
Banana Pudding Easter Truffles

Indulge in the delightful world of Banana Pudding Easter Truffles—these creamy bites are a perfect blend of nostalgic flavors and festive fun! Each truffle features a luscious banana pudding filling made with crushed vanilla wafers and cream cheese, all delicately wrapped in a smooth white chocolate coating. Topped with colorful sprinkles or drizzled with pastel hues, these treats not only satisfy your sweet tooth but also bring a touch of springtime charm to your dessert table. Ideal for gatherings or family celebrations, these easy-to-make confections promise joy and smiles with every bite.
- Prep Time: 20 minutes
- Cook Time: 10 minutes
- Total Time: 30 minutes
- Yield: Approximately 24 servings 1x
- Category: Dessert
- Method: No-bake
- Cuisine: American
Ingredients
- 2 cups crushed vanilla wafers
- 1/2 cup softened cream cheese
- 1 package (3.4 oz) dry banana pudding mix
- 2 tablespoons milk
- 1 teaspoon pure vanilla extract
- 2 cups white chocolate chips or candy melts
- Food coloring (pastel colors)
- Crushed vanilla wafers for decoration
- Easter sprinkles for decoration
Instructions
- In a mixing bowl, combine crushed vanilla wafers, softened cream cheese, and dry banana pudding mix until well blended.
- Gradually add milk and vanilla extract to achieve a dough-like consistency.
- Roll the mixture into one-inch balls and place them on a lined baking sheet. Refrigerate for at least 30 minutes to firm up.
- Melt the white chocolate or candy melts in the microwave in short intervals until smooth; consider adding food coloring for festive flair.
- Dip each chilled truffle into the melted chocolate, allowing excess to drip off before placing them back on the lined sheet.
- Decorate with crushed vanilla wafers or sprinkles while the chocolate is still wet, then let them set at room temperature for about 15-20 minutes.
Nutrition
- Serving Size: 1 truffle (30g)
- Calories: 130
- Sugar: 12g
- Sodium: 50mg
- Fat: 7g
- Saturated Fat: 4g
- Unsaturated Fat: 2g
- Trans Fat: 0g
- Carbohydrates: 15g
- Fiber: <1g
- Protein: 1g
- Cholesterol: 10mg