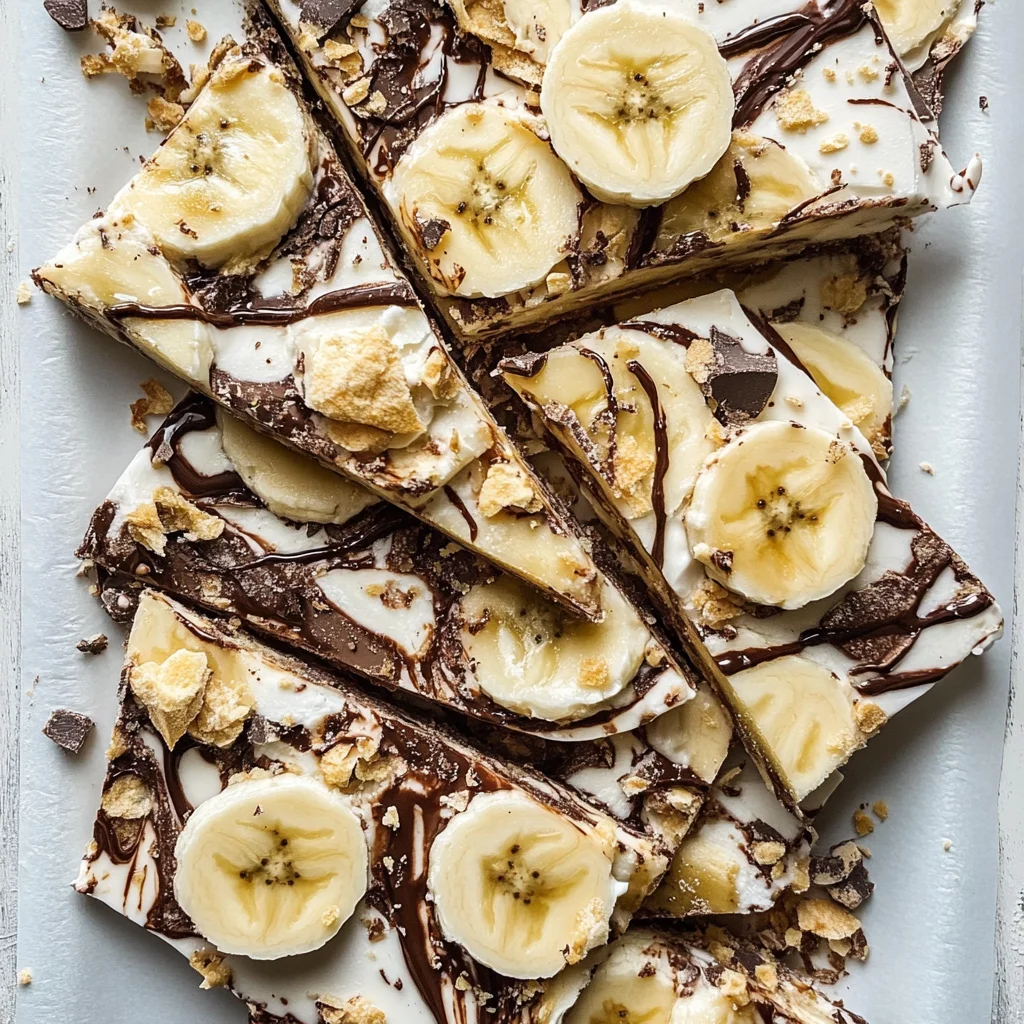
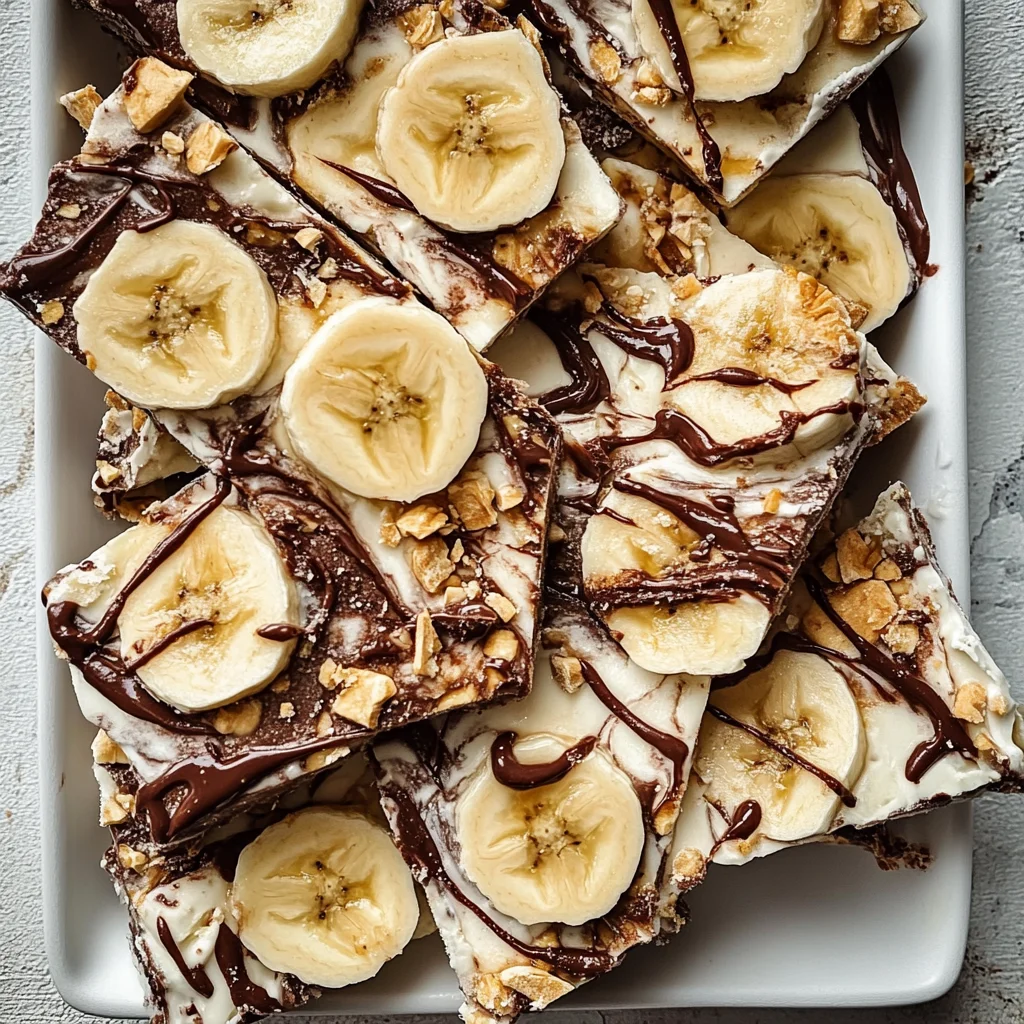
Banana & Nutella Frozen Yogurt Bark
When it comes to creating delightful treats in the kitchen, there are few things as satisfying as combining simple ingredients to create something utterly magical. Today, I’m thrilled to share with you a recipe that has become a cherished favorite in my home—a Banana & Nutella Frozen Yogurt Bark. This is not just a dessert; it’s an experience that brings together the creamy goodness of Greek yogurt, the sweet allure of ripe bananas, and the decadent drizzle of Nutella, all resting on a crunchy graham cracker base. From the moment you take your first bite, you’ll find yourself transported to a world where flavors harmonize beautifully, and textures dance on your palate. I promise you, this is one recipe that will have everyone asking for seconds!
The joy of this Banana & Nutella Frozen Yogurt Bark lies not just in its delectable taste but also in its versatility and ease. Imagine serving this at a gathering or enjoying it as a refreshing snack on a hot day—it’s perfect for any occasion! The layers of flavor—sweet, creamy, and slightly salty if you choose to add that pinch of sea salt—create a symphony that resonates with both children and adults alike. Plus, the best part? It’s so simple to make! With just a little prep time and some patience while it chills in the freezer, you’ll have a stunning treat that’s sure to impress. So, let’s roll up our sleeves and embark on this delightful culinary adventure together!
Ingredients:
Before we dive into making this delectable frozen yogurt bark, let’s gather our ingredients! Each one plays an important role in crafting this delicious treat.
- 2 cups Greek yogurt: This ingredient is absolutely fundamental to our recipe; it’s the creamy canvas upon which all other flavors build. Greek yogurt adds a wonderful richness and tanginess that balances perfectly with the sweetness of bananas and Nutella. When choosing Greek yogurt, opt for plain varieties without added sugars or artificial flavors to ensure you’re only adding what enhances the bark’s natural flavors. Its thick consistency helps achieve that perfect creamy texture that holds everything together beautifully.
- 2 tbsp honey: Ahh, honey—the liquid gold! Not only does it provide sweetness without being overpowering, but it also adds a lovely floral note that complements the bananas wonderfully. I usually reach for raw honey because it has more nutrients and retains its natural flavor better than processed varieties. If you’re looking for alternatives due to dietary restrictions or preferences, maple syrup works exceptionally well here too!
- 1 tsp vanilla extract: This ingredient is non-negotiable for me; vanilla extract elevates every dessert! It brings warmth and depth to our yogurt mixture while enhancing all those lovely flavors we’re layering in. Always choose pure vanilla extract over imitation for optimal flavor—it’s worth it! The aroma alone will make your kitchen feel like a cozy bakery.
- 2 ripe bananas, sliced: Bananas are truly special—they add natural sweetness and moisture to our bark while also providing nutritional benefits like potassium and fiber. Look for bananas with plenty of brown spots; they may be soft but are bursting with flavor! Slicing them just before adding them helps prevent browning too quickly.
- 1/2 cup Nutella, slightly warmed for easy drizzling: Oh Nutella! This chocolate-hazelnut spread is what dreams are made of—it adds richness and an indulgent chocolatey swirly goodness to our bark. Warming it slightly makes all the difference; it becomes easier to drizzle and creates beautiful patterns across your creation.
- A pinch of sea salt (optional): This tiny addition can make all the difference by enhancing sweetness while adding complexity to every bite. It’s like magic when you taste how those flavors mingle! Don’t skip this step if you can help it.
- 1 1/2 cups graham cracker crumbs: These crumbs form the essential crunchy base for our bark—think of them as the sturdy foundation upon which we build our masterpiece! You can crush whole graham crackers in a food processor or put them in a zip-top bag and crush them by hand; either way works beautifully.
- 1/3 cup melted unsalted butter: Butter binds our graham cracker crumbs together while adding richness and flavor. Unsalted is key here so you can control the overall saltiness of your bark—plus, we want those sweet notes shining through!
- 1/2 cup of nuts (optional): If you’re feeling adventurous or want some added texture to your bark, nuts are an excellent choice! Chopped walnuts or almonds sprinkle extra crunchiness throughout every bite. Just make sure they’re finely chopped so they don’t overpower other flavors.
Now that we’ve gathered everything we need let’s get cooking!
Equipment You’ll Need:
Having the right tools at your disposal makes such a difference when preparing any recipe—and believe me when I say they’re essential partners in creating something wonderful like our Banana & Nutella Frozen Yogurt Bark! Here’s what you’ll need:
- Mixing bowls: A good set of mixing bowls is crucial for combining ingredients easily without spills or messes. Opt for glass or stainless steel as they tend to hold up well over time and are easy to clean!
- Parchment paper: This handy item isn’t just about preventing sticking; it makes cleanup effortless after you’ve created your delicious bark! By lining your baking tray with parchment paper, you’ll ensure smooth removal once everything has set.
- Baking tray (around 9×13 inches): The size matters here because we want enough surface area for spreading out our yogurt mixture evenly while allowing it to freeze properly without taking too long.
- Spatula: A good rubber spatula will help immensely when spreading out your yogurt mixture smoothly over the graham cracker base—it ensures even distribution without introducing air bubbles!
Now that we have all our tools ready along with those beautiful ingredients waiting patiently…let’s dive into creating this treat step-by-step!
Step 1: Preparing Our Graham Cracker Base
The first order of business is crafting that deliciously crunchy graham cracker base that will support all those luscious layers above it. Start by combining your graham cracker crumbs with melted unsalted butter in one mixing bowl until everything resembles wet sand—you want each crumb coated perfectly so they hold together when pressed into shape. This process is crucial because it provides structure; if you skip this step or don’t mix well enough, your bark could crumble apart later on—a fate none of us desire!
Once combined thoroughly (I like using my hands sometimes—it feels more personal!), line your baking tray with parchment paper ensuring coverage along all sides—this guarantees easy release later on too! Now comes the fun part: press down firmly yet evenly onto the lined tray using either your hands or back of measuring cup until you’ve created an even layer across—about half an inch thick should do nicely!
Step 2: Mixing Up That Creamy Yogurt Layer
With the base ready and waiting patiently, let’s turn our attention towards whipping up that luxurious Greek yogurt layer! In another mixing bowl combine Greek yogurt—the star player here—with honey (for sweetness) along with vanilla extract (for warmth). Using either spatula or whisk blend until everything melds into one smooth dreamy concoction—you’ll know it’s done when there are no visible lumps left behind.
This step is important as we’re building flavor profiles from scratch here; each addition complements one another magnificently resulting in an airy yet rich topping later on! Don’t rush this step; take time blending as achieving smoothness now means less work later down line during assembly phase—and trust me—it’ll pay off tenfold when taking those first bites later!
Step 3: Assembling Your Layers
Now comes my favorite part—layering all these wonderful components together! Grab back that prepared graham cracker base from earlier then carefully spread over top using spatula ensuring even distribution across entire surface area—you want each bite filled equally with creamy goodness after all! As you cover firmly but gently take care not disturb bottom crust below too much otherwise things might start separating later during freezing…we wouldn’t want sad soggy bites now would we?
Next up? Time for those beautiful banana slices—arranging them evenly over yogurt layer allows everyone indulging get their fair share during serving time plus adds vibrant color contrast visually appealing too—who doesn’t love pretty food?!
Step 4: Drizzling That Heavenly Nutella
We’ve reached perhaps one of most exciting steps yet—the Nutella drizzling stage! Take warm Nutella (warmed just enough so it’s pourable but not too hot) then gently drizzle over bananas & yogurt layer creating whimsical swirls throughout—this visual presentation is absolutely paramount here since aesthetic appeal goes hand-in-hand deliciousness factor after all!
Using knife or spatula lightly swirl through layers allowing flavors blend beautifully into each other creating delightful pockets surprises throughout once frozen solid…oh my goodness—I can hardly wait already imagining tasting these gorgeous creations once done setting time allowed passes by!
Each step taken thus far brings us closer achieving perfect balance between textures & flavors while building anticipation ever higher…it won’t be long now until we indulge ourselves fully within deliciousness awaiting us ahead…stay tuned dear friends—we’re almost there!
Step 5: Spreading the Yogurt Layer Like a Dream
Now that your graham cracker base is firmly pressed and ready, it’s time to add that luscious yogurt layer that will transform this frozen bark into something truly extraordinary. Grab your mixing bowl filled with the Greek yogurt, honey, and vanilla extract—this is where the magic begins! Using a spatula or a large spoon, scoop out the yogurt mixture and gently spread it over the graham cracker base. Take your time with this step; a gentle touch helps create an even layer. Aim for about half an inch in thickness—this is crucial for achieving the right balance of flavors and textures in every bite.
As you spread, you might notice how the creamy yogurt glides effortlessly over the crumbly base, merging into a beautiful canvas of white. The honey adds just the right amount of sweetness while the vanilla extract introduces a warm, comforting aroma that fills your kitchen with joy. This step is not just about layering ingredients; it’s about creating harmony between flavors. By evenly distributing the yogurt, you ensure that each piece of bark will have that satisfying creamy goodness paired perfectly with the crunchy graham cracker below. So don’t rush this step—take a moment to enjoy how simple ingredients can come together to create something so much greater!
Step 6: Layering Fresh Bananas for Natural Sweetness
With your yogurt layer now perfectly smoothed out, it’s time to add those delightful banana slices—trust me when I say this is what makes this Banana & Nutella Frozen Yogurt Bark sing! Slice your ripe bananas into thin rounds; aim for about a quarter-inch thickness. You want them to be just thick enough so they hold their shape but thin enough to meld beautifully with the yogurt and Nutella layers on top. As you arrange these golden disks over the yogurt layer, think about how their natural sweetness will complement the creaminess beneath them—the bananas are like nature’s candy!
Once you’ve added all of your banana slices—make sure they’re evenly spaced—take a moment to appreciate their vibrant yellow color against the white yogurt backdrop. This visual appeal is a big part of what makes homemade treats special; they become more than just food—they’re a feast for the eyes! The bananas will also lend moisture and flavor as they freeze, enriching every mouthful with their soft texture once you dig in later. And if you’re feeling adventurous, feel free to sprinkle some lemon juice on top of the banana slices before layering them; this prevents browning and adds a zesty kick that complements everything beautifully!
Step 7: Drizzling Nutella Heaven
Ah, Nutella—a rich, velvety chocolate-hazelnut spread that has enchanted palates around the world! Now we arrive at one of my favorite moments in making this recipe: drizzling that slightly warmed Nutella over our carefully constructed layers. Warm it gently in the microwave for about 15-20 seconds; you want it just warm enough to make it pourable but not so hot that it loses its luxurious texture. Once you have achieved this perfect drizzling consistency, use a spoon or squeeze bottle to artfully drizzle it over your layered creation.
As you drizzle, let your creative spirit shine! Create swirls and patterns across the yogurt and bananas—this isn’t just about looks; those lovely swirls will bring bursts of chocolatey goodness in every bite. The warmth from the Nutella allows it to merge with the other flavors rather than sit on top like an afterthought; this integration is absolutely paramount! You’ll find yourself captivated by how those decadent ribbons intertwine with creamy yogurt and sweet bananas—a symphony of flavors waiting to be indulged in! Don’t forget to scrape any leftover Nutella from the bowl—you wouldn’t want any of that liquid gold to go to waste!
Step 8: A Pinch of Sea Salt Magic
Before we send our creation off into its icy slumber, let’s talk about an often-overlooked ingredient—a pinch of sea salt! It may seem trivial, but sprinkling just a hint of sea salt over your drizzled masterpiece can elevate all those flavors in ways you never imagined possible. The contrast between sweet and salty creates an utterly intoxicating experience for your taste buds. It brings out the richness of the Nutella while balancing out the sweetness from both honey and bananas.
To do this effectively, take your fingers and pinch a small amount of sea salt between them before gently scattering it across the surface. Less is more here—just a light dusting will do! You want to enhance flavors without overwhelming them. This little touch turns what could be simply delicious into something profoundly satisfying and memorable—trust me on this one! Once you’ve added that pinch of salt, take another moment to admire your work before placing everything into the freezer.
Conclusion:
As we wrap up this delightful journey of creating the Banana & Nutella Frozen Yogurt Bark together, I can’t help but feel excited about what you’re about to experience. From the moment those aromatic bananas meet the silky Nutella swirls atop creamy Greek yogurt on a crunchy graham cracker base, you’ve created something truly special—a symphony of flavors that dance harmoniously with each bite. Each layer contributes to an utterly intoxicating experience that is not only satisfying but also profoundly comforting.
Why should this recipe be on your must-try list? It’s not just about treating yourself; it’s about embracing the joy of making something delightful with simple ingredients that are easy to find. Whether you’re whipping this up for an afternoon snack or impressing friends at gatherings, this frozen yogurt bark shines in all occasions. Picture pulling it from the freezer on a warm day—the sun glistening off its icy surface as you break off a piece and feel that satisfying crunch contrasting with the smoothness of yogurt and rich chocolatey goodness. It’s these moments that create lasting memories.
When it comes time to serve your Banana & Nutella Frozen Yogurt Bark, imagine savoring one alongside a cup of freshly brewed coffee or tea—it creates an exquisite harmony between flavors! For an afternoon pick-me-up, why not pair it with some fresh berries that add a pop of color and tanginess? Or perhaps enjoy it after dinner as part of a casual dessert spread where everyone can dive into their own creations. And if you’re feeling adventurous? Consider drizzling some melted dark chocolate over top or even adding crushed almonds for an extra crunch—there’s no limit to how you can make this treat uniquely yours!
Feeling adventurous? This recipe is wonderfully adaptable; perhaps swap out bananas for strawberries or raspberries when they’re in season—the vibrant colors will make your bark even more inviting! You could also play around with different nut butters instead of Nutella; imagine how delightful almond butter would taste paired with fresh peaches or apricots! The possibilities are endless! So go ahead—try experimenting with variations that excite your palate, share your experience with friends and family, and most importantly, savor every delicious moment spent creating and enjoying your own version of this frozen delight!
Banana & Nutella Frozen Yogurt Bark

Indulge in the delightful experience of Banana & Nutella Frozen Yogurt Bark, a treat that’s as easy to make as it is delicious! This creamy dessert combines the tangy richness of Greek yogurt with the natural sweetness of ripe bananas and the decadent swirl of Nutella, all sitting atop a crunchy graham cracker base. Perfect for warm days or as a fun dessert at gatherings, this frozen creation will have everyone asking for seconds.
- Prep Time: 20 minutes
- Cook Time: Freezing time (at least 4 hours)
- Total Time: 0 hours
- Yield: Approximately 12 servings 1x
- Category: Dessert
- Method: Freezing
- Cuisine: American
Ingredients
- 2 cups Greek yogurt
- 2 tbsp honey
- 1 tsp vanilla extract
- 2 ripe bananas, sliced
- 1/2 cup Nutella, warmed for drizzling
- A pinch of sea salt (optional)
- 1 1/2 cups graham cracker crumbs
- 1/3 cup melted unsalted butter
- 1/2 cup chopped nuts (optional)
Instructions
- Prepare the graham cracker base by mixing crumbs and melted butter until crumbly. Press firmly into a lined baking tray (9×13 inches).
- In a bowl, mix Greek yogurt, honey, and vanilla until smooth. Spread evenly over the graham cracker base.
- Arrange banana slices on top of the yogurt layer.
- Drizzle warmed Nutella over the bananas and yogurt.
- Sprinkle a pinch of sea salt if desired.
- Freeze for at least 4 hours until solid. Once set, cut into pieces and enjoy!
Nutrition
- Serving Size: 1 serving
- Calories: 120
- Sugar: 10g
- Sodium: 50mg
- Fat: 6g
- Saturated Fat: 3g
- Unsaturated Fat: 3g
- Trans Fat: 0g
- Carbohydrates: 15g
- Fiber: 1g
- Protein: 3g
- Cholesterol: 5mg