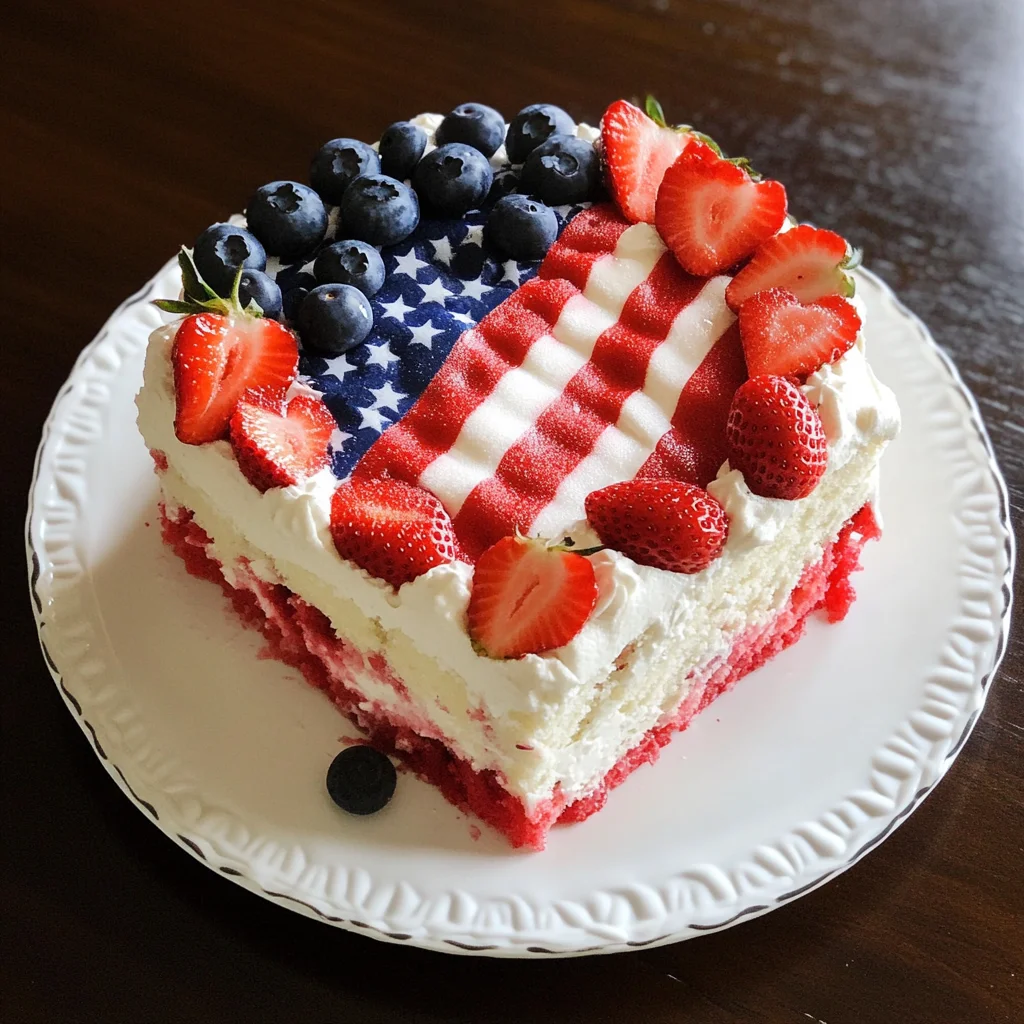
American Flag Strawberry Poke Cake
There’s something truly magical about a well-loved recipe—it holds memories, evokes laughter, and often becomes the centerpiece of family gatherings. Today, I want to share with you an extraordinary dessert that’s not just a treat for your taste buds but also a vibrant celebration of color and flavor: the American Flag Strawberry Poke Cake! Picture this: a moist white cake, lovingly infused with strawberry goodness, adorned with luscious Cool Whip and cream cheese frosting, and finished off with fresh strawberries and blueberries that evoke the spirit of summer and patriotism. This cake is more than just food; it’s an experience that brings people together, ignites conversation, and creates joyful moments around the table. Trust me when I say this American Flag Strawberry Poke Cake will leave you and your guests craving more!
As we embark on this culinary adventure together, what makes this poke cake particularly special is its ability to bridge tradition with innovation. The technique of “poking” holes in the cake may seem simple, but it allows those vibrant flavors to seep into every bite—transforming an ordinary dessert into a sublime delight. Whether you’re celebrating a holiday, hosting a backyard barbecue, or simply wanting to make any day feel special, this cake is your go-to recipe. It’s colorful, refreshing, and utterly satisfying—a true testament to the joys of cooking and sharing delicious food with loved ones.
American Flag Strawberry Poke Cake: A Deliciously Patriotic Delight
Let’s dive into making this delightful dessert! The American Flag Strawberry Poke Cake is not only visually stunning but also brimming with flavor that embodies the essence of summer gatherings. Each slice showcases a beautiful pattern reminiscent of our national flag while delivering layers of sweetness that are sure to bring smiles all around.
Ingredients:
Before we get started on our culinary creation, let’s gather our ingredients. Each component plays a vital role in crafting this mouthwatering poke cake that will undoubtedly become a cherished recipe in your kitchen.
- 15 oz boxed white cake mix. This is the foundation of our cake—light and fluffy yet sturdy enough to hold up against all those delicious toppings. When choosing your cake mix, look for one without artificial flavors or colors for a more authentic taste. The beauty of using a boxed mix is its convenience; it saves time while still delivering delightful results.
- 1 cup boiling water. Boiling water serves as an essential element in creating a tender crumb for our cake. This step activates the leavening agents in the mix more effectively than cold water would. It helps ensure that your cake rises beautifully while keeping it moist throughout.
- 3 oz box strawberry-flavored Jell-o. This ingredient infuses our cake with vibrant strawberry flavor and adds that iconic red hue we associate with summer festivities! The gelatin not only enhances taste but also keeps the cake moist after it bakes—resulting in each bite being absolutely irresistible.
- 1/2 cup cold water. Cold water balances out the boiling water we used earlier and ensures that our Jell-o mixture is perfectly smooth before pouring it over the cake. It’s crucial for achieving that delightful flavor infusion without compromising texture.
- 8 oz tub Cool-Whip non-dairy whipped topping. This light, airy topping adds both sweetness and creaminess to our frosting layer! Plus, since it’s non-dairy, it’s perfect for those who are lactose intolerant or prefer plant-based options without sacrificing flavor or texture.
- 8 oz package cream cheese (softened). Cream cheese gives our frosting that rich tanginess which beautifully complements the sweetness of the Cool Whip. To achieve optimal results, ensure your cream cheese has reached room temperature—this is crucial for creating a smooth frosting that spreads easily across your cake.
- 1 cup powdered sugar. Adding powdered sugar sweetens our frosting while giving it body and structure without becoming too heavy or dense. It dissolves easily into the mixture ensuring we have no gritty texture—a must for achieving creamy perfection!
- 1 teaspoon vanilla extract. Vanilla is like liquid gold in baking! Its aromatic notes lift all other flavors in our frosting while providing warmth that balances out sweetness beautifully.
- 1 pound strawberries (sliced thin). Fresh strawberries are not only visually appealing but also provide juicy bursts of flavor which contrast wonderfully against the creamy frosting and soft cake layers beneath them. When selecting strawberries at your grocery store or farmers’ market, choose ones that are bright red with firm skin—these will deliver maximum sweetness.
- 1 to 2 cups blueberries (amount varies by size of berries). These little gems add not just flavor but also gorgeous color to our patriotic dessert! Their slight tartness complements the sweetness from both strawberries and frosting perfectly—making every bite feel like summertime bliss!

Equipment You’ll Need:
Having the right tools can make all the difference when creating something wonderful in your kitchen! While they may not be “ingredients,” these essential partners will help you navigate through each step smoothly so you can focus on enjoying the process—and ultimately savoring your delicious creation!
- 9×13 inch baking pan: This size pan provides ample space for your poke cake to rise beautifully while allowing plenty of room for all those delightful toppings later on! If you don’t have one at hand, you can always use two smaller round pans instead—the important thing is achieving even baking throughout!
- Mixing bowl: A sturdy mixing bowl is essential when combining all ingredients together seamlessly—look for one that’s large enough so you won’t risk splattering any batter as you mix vigorously.
- Hand mixer: While you could always whisk by hand if you’re feeling ambitious (and have some serious arm strength!), using an electric hand mixer saves time while ensuring everything blends thoroughly—especially those stubborn clumps from softened cream cheese!
- Fork: A simple fork plays an essential role here—it’s what you’ll use to poke holes into your cooled cake before pouring over that luscious Jell-o mixture! Make sure it’s large enough so you can create deep holes without tearing apart too much of the delicate crumb below.
- Plastic wrap: Covering your freshly prepared poke cake helps seal in moisture as it chills in refrigeration—all while keeping any odors from other foods at bay during its resting period!
With all these ingredients gathered and equipment ready at hand—we’re primed to embark on this delightful journey together as we prepare our American Flag Strawberry Poke Cake!
Step 1: Bake Your Canvas
Let’s start by preparing our base—a lovely white cake! Preheat your oven according to package instructions before greasing your 9×13 inch baking pan generously—you want it ready so nothing sticks when it’s time to remove our masterpiece later on! Follow directions on the back of your boxed white cake mix; typically involves adding eggs alongside boiling water mentioned earlier along with some oil into dry mix until everything comes together smoothly (the batter should be free from lumps!). Pour this silky mixture into prepared pan evenly before placing into preheated oven for suggested time until golden brown—the aroma wafting through will be utterly intoxicating!
Step 2: Poke Holes of Flavor
Once baked to perfection (and perhaps after drooling just a bit), allow your beautiful creation to cool down slightly—about 20 minutes should do nicely—but don’t let it cool completely because we need those hot pockets ready to absorb all that flavorful jell-o goodness! Using your large fork gently pierce holes throughout surface area; aim for around every inch or so creating evenly spaced openings where liquid can seep through later on—it may seem like such an insignificant step right now yet trust me when I say this process elevates flavors beyond compare!
Step 3: Infuse with Strawberry Goodness
Now comes arguably my favorite part—the magic moment when vibrant colors collide! In a mixing bowl carefully combine boiling water alongside strawberry-flavored Jell-o powder until completely dissolved—it should almost resemble ruby-red liquid gold teasing us from within its confines! Next pour cold water directly into mixture stirring briskly until combined before gracefully pouring over entire surface area of poked-cake ensuring even distribution across every nook & cranny alike (you’ll see how beautifully it absorbs!). Cover tightly using plastic wrap then place inside fridge allowing flavors meld beautifully together over three hours—it’ll be worth every second spent waiting patiently—I promise you!
Step 4: Craft Your Heavenly Frosting
While we’re letting those flavors mingle away happily chilling inside their frosty lair—we can take this opportunity to whip up some dreamy frosting that’ll crown our creation perfectly upon completion! In another mixing bowl combine softened cream cheese along side Cool Whip dollop then sprinkle powdered sugar across top followed by splash vanilla extract too—this combination creates heavenly creamy bliss rivaled only by clouds floating above us! Beat everything together using hand mixer until smooth & luscious; if any clumps remain fear not simply heat gently within microwave (20 seconds) then stir well achieving ultimate consistency needed whilst spreading gracefully atop chilled poke-cake afterward…This step ensures each slice served becomes utterly extraordinary thanks solely due diligence taken here today!
Stay tuned as we continue assembling this stunning dessert masterpiece — I can’t wait for you to experience each glorious layer bursting forth flavor-wise once completed!
Step 5: Whipping Up the Dreamy Frosting
Now that your cake has cooled and absorbed all that luscious strawberry flavor from the Jell-O, it’s time to create a frosting that will elevate this American Flag Strawberry Poke Cake to celestial heights! In a mixing bowl, combine your 8 ounces of softened cream cheese with an equal amount of Cool-Whip. The cream cheese adds a tangy richness that balances beautifully with the sweetness of the Cool-Whip. This step is crucial because it creates a creamy base that not only enhances the overall flavor but also lends an irresistible texture to your cake. Trust me, you want this frosting to be smooth and velvety—nobody enjoys clumps of cream cheese interrupting their dessert experience!
With your hand mixer at the ready, add in 1 cup of powdered sugar and 1 teaspoon of vanilla extract. Start mixing on a low speed to prevent a sugary cloud from engulfing your kitchen! Gradually increase the speed until everything is well combined and you achieve that dreamy consistency. You’ll know it’s perfect when it looks like fluffy clouds ready to grace your cake. If you happen to spot any rogue clumps of cream cheese during this process, don’t fret; simply pop the bowl in the microwave for about 20 seconds to soften it further, then give it another good stir. This is non-negotiable if you want that perfectly smooth frosting—so take your time here!
Step 6: Spreading Joy
Once you’ve created this heavenly frosting, take a moment to admire its silky texture before spreading it atop your delightful cake. Use an offset spatula for this step if you have one; it allows for better control and an even spread across the surface. Start from the center and work your way outwards, gently pushing the frosting towards the edges. It’s important to distribute this luscious topping evenly because every slice should be a perfect representation of balance between cake and frosting. As you spread, envision how each slice will look adorned with those vibrant strawberries and blueberries—it’s truly something magical!
This step is not just about aesthetics; it’s also about ensuring each bite delivers an unforgettable experience. The creamy frosting acts as a bridge between the moist cake and fresh fruit, creating a symphony of flavors in every mouthful. Take care not to rush through this stage; I promise you, patience pays off when you’re crafting something as extraordinary as this dessert.
Step 7: Crafting Your Flag Design
Now comes one of my favorite parts—the decoration! This is where we transform our humble cake into a stunning representation of patriotism and summer celebrations. Begin by taking those gorgeous thinly sliced strawberries and arranging them in rows at one end of the cake to mimic the stripes of our flag. I suggest using five rows—this gives you that classic flag appearance while ensuring there’s still plenty of room for those lovely blueberries.
Then, let’s not forget about our blue stars! Scatter those beautiful blueberries in the top left corner where they’ll stand out against the white frosting background, just like stars twinkling in a night sky. This design isn’t just visually appealing; it also adds layers of flavor with every bite—a burst of juicy blueberry followed by sweet strawberry and creamy frosting will leave everyone begging for more! As you lay down each piece of fruit, take a moment to appreciate how these simple ingredients come together to create such beauty—it’s truly empowering!
Step 8: Chill Out for Perfection
Once your American Flag Strawberry Poke Cake is beautifully adorned, it’s time for perhaps one of the most important steps: chilling! Cover your masterpiece with plastic wrap or aluminum foil (gently!) and place it in the refrigerator for at least three hours—or even overnight if you can wait! You might be wondering why chilling is so essential? Well, my friend, allowing this dessert some time in the fridge lets all those flavors meld together harmoniously while keeping everything nice and fresh.
Chilling also helps set the frosting so it doesn’t slide off when you’re cutting into those patriotic slices later on. It makes serving much easier because no one wants their hard work toppling over into chaos on their plate! At this stage, you’ll find anticipation building up—imagine slicing into that cool treat on a hot summer day; it’s like opening up a present filled with sweetness! So please don’t skip this step—even though waiting can feel challenging—patience truly transforms this already wonderful dessert into something extraordinarily delicious.
Conclusion:
As we wrap up this delightful journey through creating our American Flag Strawberry Poke Cake together, I hope you’re feeling inspired and excited about trying this recipe yourself! The layers of fluffy white cake soaked in strawberry goodness combined with that dreamy cream cheese frosting create a symphony of flavors that’s not only eye-catching but profoundly satisfying—a true celebration on every plate. It’s those simple yet vibrant ingredients that elevate this dessert beyond ordinary cakes; it’s all about capturing joy in every bite.
This recipe is an absolute must-try—not just for its taste but also for the joy that comes from making it. Picture yourself gathering with friends or family during holidays or weekend get-togethers as they marvel at your beautiful creation. The process itself is filled with fun moments—like poking those holes to pour in that luscious Jell-O—and there’s a certain magic when you watch everyone dig in eagerly after you’ve adorned it with fresh fruit. Each slice brings smiles and nostalgia, making every occasion feel extra special.
For serving suggestions, imagine savoring one decadent piece alongside a hot cup of coffee or tea as an afternoon pick-me-up. Or perhaps after a backyard barbecue under twinkling stars on warm summer nights—what could be better? For an even more indulgent experience, consider pairing it with vanilla ice cream that slowly melts over each delectable slice; there’s something about that creamy addition that takes your tastebuds on another adventure altogether!
Feeling adventurous? This recipe is wonderfully adaptable! Swap out strawberries for raspberries or blackberries if you’re looking for something different; both would add their own unique flair while keeping things festive and fun. Or try adding layers of lemon curd between slices for a zesty twist! The possibilities are endless, and I encourage you to experiment and find combinations that speak to your heart—your personal touch makes all the difference. I can’t wait to hear how your version turns out; please share your experiences with me—I promise I’ll be cheering you on every step of the way!
American Flag Strawberry Poke Cake

Celebrate the essence of summer with this vibrant American Flag Strawberry Poke Cake! This delightful dessert features a moist white cake infused with luscious strawberry flavor, topped with a creamy Cool Whip and cream cheese frosting. Adorned with fresh strawberries and blueberries, it’s not just visually stunning but also packed with refreshing flavors that will bring joy to any gathering. Perfect for holidays, barbecues, or simply to brighten up your day, this poke cake is a true showstopper that transforms any occasion into a festive celebration!
- Prep Time: 30 minutes
- Cook Time: 30 minutes
- Total Time: 1 hour
- Yield: Serves approximately 12 slices 1x
- Category: Dessert
- Method: Baking
- Cuisine: American
Ingredients
- 15 oz boxed white cake mix
- 1 cup boiling water
- 3 oz box vegan strawberry-flavored gelatin
- 1/2 cup cold water
- 8 oz tub non-dairy whipped topping (Cool Whip)
- 8 oz softened cream cheese
- 1 cup powdered sugar
- 1 teaspoon vanilla extract
- 1 pound fresh strawberries (sliced thin)
- 1 to 2 cups blueberries
Instructions
- Preheat your oven according to the cake mix package instructions. Grease a 9×13 inch baking pan.
- In a mixing bowl, combine the cake mix with boiling water and mix until smooth. Pour the batter into the prepared pan and bake according to package instructions until golden brown.
- Allow the cake to cool slightly for about 20 minutes, then use a fork to poke holes evenly across the surface.
- Dissolve the vegan strawberry gelatin in boiling water, then add cold water. Pour the mixture over the poked cake, ensuring even distribution. Cover with plastic wrap and refrigerate for at least three hours.
- To make the frosting, beat together softened cream cheese and Cool Whip until smooth. Gradually add powdered sugar and vanilla extract until fully combined.
- Spread the frosting evenly over the chilled cake. Decorate with sliced strawberries in rows for stripes and blueberries for stars in the top left corner.
- Refrigerate again briefly before serving to allow flavors to meld.
Nutrition
- Serving Size: 1 slice (111g)
- Calories: 210
- Sugar: 24g
- Sodium: 150mg
- Fat: 7g
- Saturated Fat: 3g
- Unsaturated Fat: 4g
- Trans Fat: 0g
- Carbohydrates: 35g
- Fiber: <1g
- Protein: 2g
- Cholesterol: 22mg