Cheddar and Herb Soda Bread
Ah, the magic of baking! There’s something profoundly satisfying about transforming simple ingredients into a warm, comforting loaf of bread that fills your home with an intoxicating aroma. When I think of the Cheddar and Herb Soda Bread, I’m reminded of cozy evenings spent in the kitchen, where each knead and every rise feels like a little piece of art unfolding. This isn’t just bread; it’s a celebration of flavors, a symphony of herbs and sharp cheddar that dances on your palate. The earthy notes of fresh herbs combined with the creamy richness of cheddar create an experience that transcends mere sustenance—this is comfort food in its purest form.
If you’ve ever felt intimidated by baking from scratch, let me reassure you: soda bread is one of those magical recipes that welcomes everyone into the fold. With no yeast involved, this quick bread rises thanks to baking soda and buttermilk, making it not only speedy to prepare but also incredibly rewarding. Picture yourself pulling a golden-brown loaf from the oven, the crust crackling as it cools under a soft towel. Trust me when I say this bread is perfect for any occasion—from casual dinners to festive gatherings. It pairs beautifully with soups or stews and makes an utterly delightful addition to your breakfast table when slathered with butter or homemade jam.
Cheddar and Herb Soda Bread: The Heartfelt Comfort of Homemade Baking
Welcome to this delightful culinary journey! Today, we’re diving into the world of Cheddar and Herb Soda Bread—a recipe that embodies warmth and love in every bite. As we embark on this adventure together, keep in mind that this isn’t just about following steps; it’s about embracing the process and enjoying every moment.
Ingredients:
Before we get our hands doughy, let’s gather our ingredients. Each component plays an essential role in creating that beautiful loaf you’ll soon be savoring.
- 4 cups all-purpose flour (plus extra as needed). The backbone of our soda bread, all-purpose flour provides structure while allowing for some flexibility in texture—ideal for quick breads like this one! When choosing flour, opt for a high-quality brand; it makes all the difference in achieving a light crumb. If you find yourself needing more flour during kneading or shaping, don’t hesitate to sprinkle in a bit more; just be cautious not to overdo it!
- 1 ½ tsp baking soda. This ingredient is absolutely paramount as it’s what gives our soda bread its characteristic rise without yeast! As soon as it comes into contact with the buttermilk’s acidity, it begins its work—producing those delightful bubbles that create a tender crumb. Be sure to check your baking soda’s expiration date; old baking soda won’t provide the necessary lift.
- 1 tsp salt. Ah yes, salt—the unsung hero of every recipe! It enhances flavors and balances the richness of our cheese while also strengthening the dough’s structure. Use fine sea salt for even distribution throughout your mixture; trust me when I say a pinch too much can elevate everything from bland to breathtaking!
- 2 tbsp chopped fresh chives. These vibrant green beauties bring a mild onion flavor that dances on your tongue with every bite. Fresh herbs are vital here; they lend brightness and freshness that dried herbs simply can’t replicate. When selecting chives at your market, look for ones that are crisp and vibrant—like little green jewels!
- 1 tbsp each chopped fresh thyme, rosemary, and sage. A medley of these fragrant herbs adds depth to our loaf that will have your friends raving about how wonderful your kitchen smells! Each herb contributes its unique profile—the warmth of thyme, the earthiness of rosemary, and the subtle pine notes from sage create an aromatic experience we want in every mouthful.
- 1 cup shredded cheddar cheese. The star ingredient! Cheese adds richness as well as moisture to our bread while providing flavor bursts throughout each slice. Opt for sharp cheddar if you love that bold taste—it pairs beautifully with our fresh herbs—and shred it yourself for optimal meltiness since pre-shredded cheese often contains anti-caking agents.
- 1 ¾ cups buttermilk. This is where things get creamy! Buttermilk not only brings tanginess but also reacts wonderfully with baking soda for leavening—making your loaf fluffy while imparting moisture that keeps each slice tender long after it’s baked. If you’re out of buttermilk, don’t fret; simply sour regular milk by adding a tablespoon of vinegar or lemon juice per cup!
Equipment You’ll Need:
Before we dive into making this beautiful loaf come to life, let’s talk about some essential tools you’ll need along the way! Having these right partners at hand will make your experience smoother and infinitely more enjoyable.
- Mixing bowl: A sturdy mixing bowl is crucial for combining all those lovely dry ingredients before introducing any wet ones. It should be large enough to accommodate everything without overflowing—trust me; you want space to mix without mess!
- Wooden spoon or spatula: These trusty companions are perfect for stirring together ingredients gently without overworking the dough—a key factor in producing tender bread!
- Baking sheet: A flat baking sheet allows our soda bread plenty of space to spread out while baking evenly on its bottom surface.
- Sharp knife: You’ll need this tool not only for scoring the top but also for cutting through that crispy crust when it’s time to slice up your masterpiece—the sharper it is, the cleaner your cuts will be!
Now that we have everything prepped let’s roll up our sleeves and dive into preparing this delightful Cheddar and Herb Soda Bread!
Step 1: Preheat & Combine
First things first—preheat your oven to 425°F (220°C). This step ensures that once your dough hits those hot surfaces, it starts cooking immediately—leading to that glorious rise we’re aiming for! In a large mixing bowl (your trusty companion), combine 4 cups all-purpose flour with 1½ teaspoons baking soda and 1 teaspoon salt using either a whisk or wooden spoon until evenly mixed—a vital step because we want everything incorporated uniformly before adding other flavors. Next comes the exciting part: fold in those freshly chopped herbs along with 1 cup shredded cheddar cheese until they’re nicely dispersed throughout—imagine how heavenly this mixture already smells! Finally, pour in 1¾ cups buttermilk gradually while stirring gently until everything comes together into one cohesive mass—you’re creating magic here!
Step 2: Knead Gently
Once you’ve combined all those delicious ingredients into what resembles shaggy dough (don’t worry if it seems sticky), turn out onto a lightly floured countertop—a clean workspace is essential here! Use additional flour sparingly if necessary as you bring the dough together gently using your hands; remember—this isn’t pizza dough—we’re not looking for too much gluten development so resist any urge to knead vigorously here! Just a couple of gentle folds will suffice until you’ve formed a smooth ball—that’s where all that wonderful texture comes from!
Step 3: Shape Your Dough
Now comes another exciting moment: shaping time! Pat down your lovely ball gently until it’s about an inch thick (aiming for roughly seven inches wide). Take care not to compress too much air out—the goal is maintaining some fluffiness inside once baked! Then transfer this beautifully shaped circle onto a lightly floured baking sheet while dusting off excess flour from its top surface so it doesn’t clump during baking—which would lead us straight away from perfection!
Step 4: Score & Bake
With everything ready now comes one last impressive touch before heading into the oven—a cross score across its top using your sharp knife (about half-inch deep). Scoring allows steam release during cooking while giving us charming rustic vibes when serving later on—it’s absolutely non-negotiable if you want aesthetics alongside flavor! Now slide your masterpiece into preheated oven bliss and bake at high heat (425°F) for just fifteen minutes before reducing temperature downwards—to around375°F—for another thirty-five minutes total until golden brown emerges with hollow sounds echoing back when tapped underneath—a clear sign indicating success awaits within those crusty outer layers…
Each step brings us closer together through shared experiences surrounding food—the heartwarming essence behind why I adore cooking so immensely! Let’s savor these moments spent crafting unforgettable memories through simple yet extraordinary flavors found within Cheddar Herb Soda Bread…
Step 5: The Art of Scoring – Preparing for the Oven
Now that your dough has transformed into a lovely ball, it’s time to prepare it for its moment in the oven. This is where we introduce a technique known as scoring. You may be wondering, Why do we score bread? Well, my friend, it’s not just for aesthetics! Scoring allows the bread to expand while baking, ensuring that it rises beautifully and doesn’t crack in unpredictable places. When you make that cross on top of your dough, you’re guiding it to open up in the way you desire, creating a visually stunning finish that’s just as pleasing to the eye as it is to the palate.
Using a sharp knife—this is crucial because a dull knife can drag and tear instead of cut—gently make a cross into the top of your dough about half an inch deep. As you do this, take a moment to appreciate how this simple act transforms your rustic loaf into something truly special. Once you’ve scored your bread, dust the top with a little extra flour; this not only adds flavor but also creates a beautiful crust as it bakes. Trust me on this: every little detail matters when making Cheddar and Herb Soda Bread!
Step 6: Into the Heat – Baking Your Bread
With your dough prepped and ready, it’s time for the magic to happen! Place your baking sheet in the preheated oven at 425°F. You’ll want to bake it at this higher temperature initially for about 15 minutes. This blast of heat is absolutely paramount—it helps set the crust quickly and encourages a beautiful rise right from the start. As those first minutes tick by, you’ll begin to smell an utterly intoxicating aroma wafting through your kitchen; it’s like an invitation to savor what’s coming next.
After those initial 15 minutes have passed and your kitchen smells heavenly, reduce the oven’s temperature to 375°F and continue baking for another 30-35 minutes. At this point, I encourage you to peek through the oven window rather than opening the door; letting all that heat escape can hinder your bread’s rise. You’ll know your Cheddar and Herb Soda Bread is done when it sounds hollow when tapped on the bottom—a delightful auditory cue that signifies perfection! Golden brown and smelling like pure bliss, this bread will be worth every second.
Step 7: Cooling Down – The Importance of Wrapping
Once you’ve pulled your gorgeous loaf from the oven (and let me tell you, it’s hard not to dive right in), it’s essential to let it cool properly. Immediately wrap your freshly baked soda bread in a clean tea towel; this step might seem trivial but trust me—it’s crucial! By wrapping it up while it’s still warm, you’re allowing steam to circulate around the bread which will soften that crispy crust we’ve worked so hard for. It transforms from being merely crunchy to gorgeously tender—truly extraordinary!
Letting it cool like this takes about 20-30 minutes—yes, patience is required here—but I promise you it’s worth every moment spent waiting! During this time, those flavors will meld together even more profoundly, enhancing every bite you take later on. So keep yourself busy—perhaps pour yourself a cup of tea or gather some friends around—and get ready for what’s next!
Step 8: Slicing and Serving – The Grand Reveal
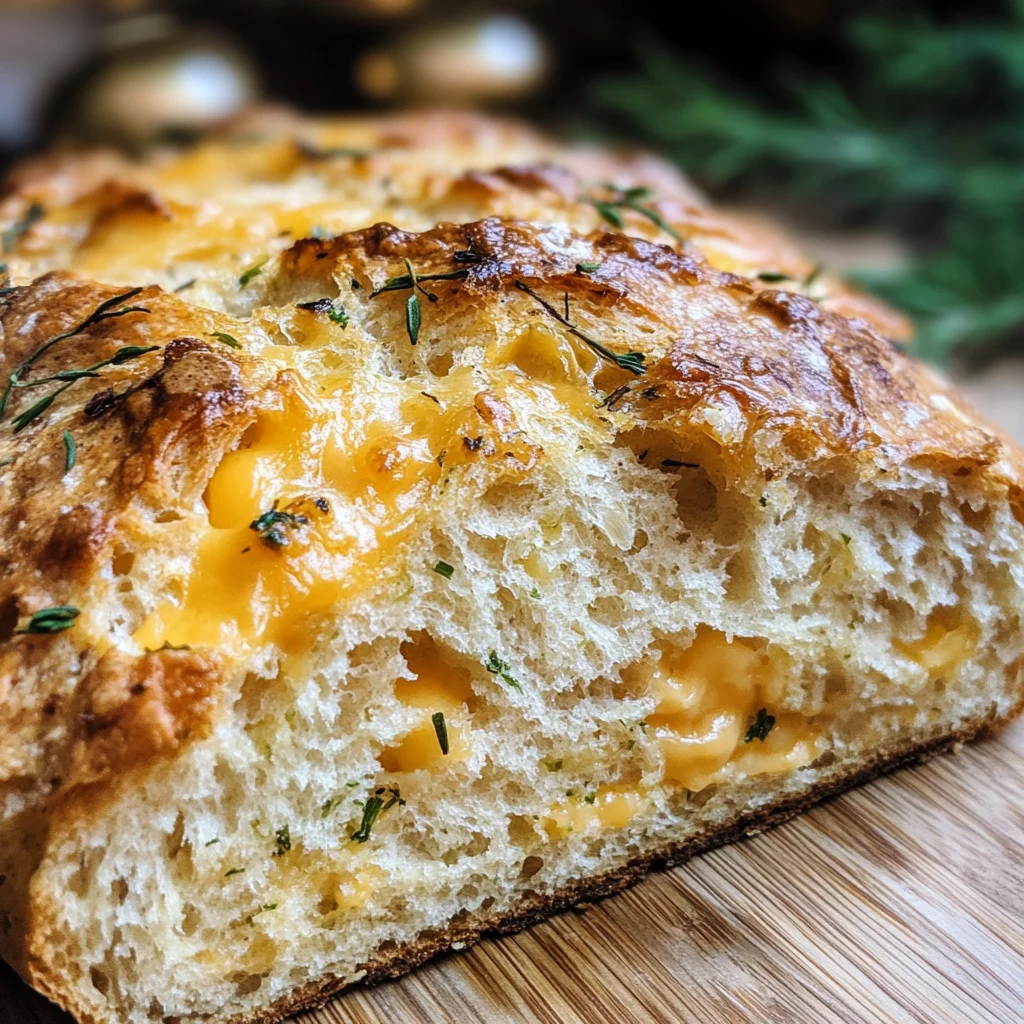
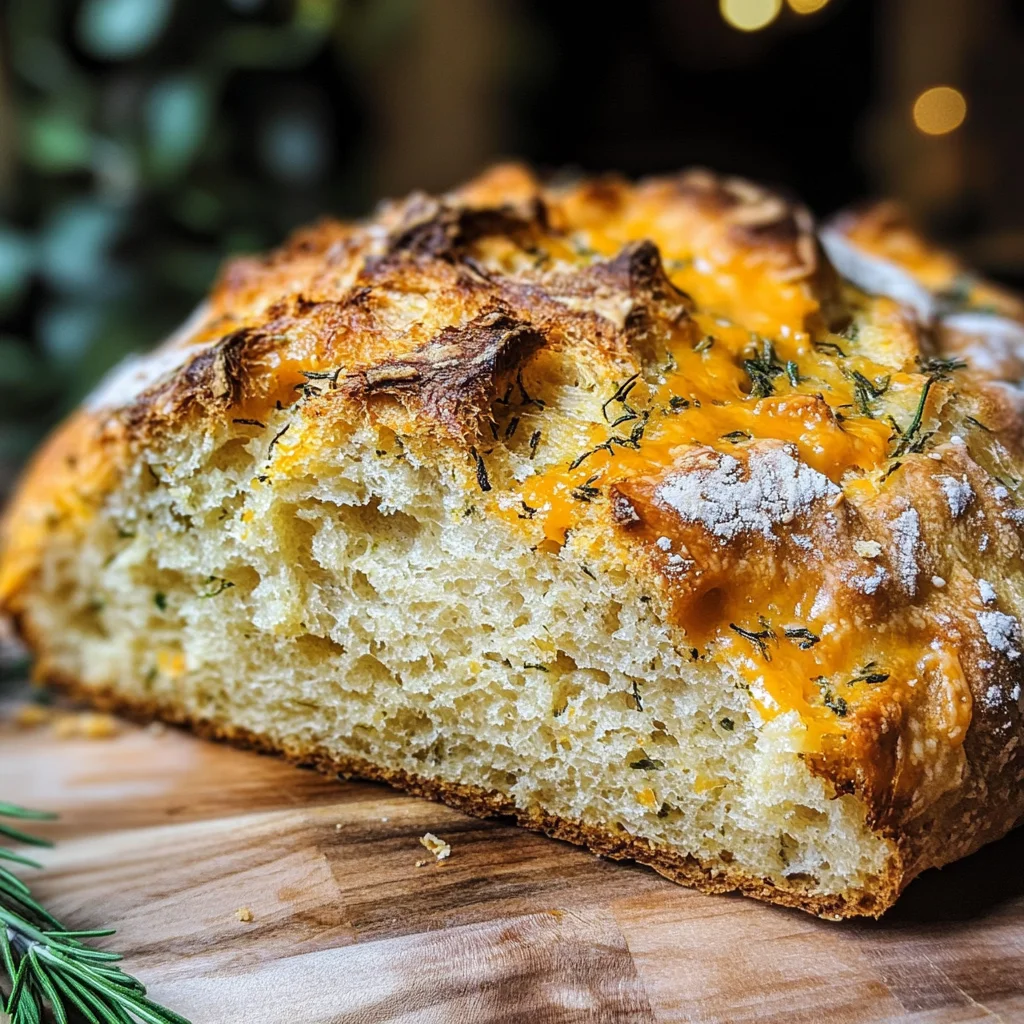
Now comes one of my favorite parts—the grand reveal! After allowing your Cheddar and Herb Soda Bread to cool slightly in its cozy tea towel cocoon, it’s finally time to slice into that golden crust. As you cut through the loaf with a serrated knife (because we want clean edges!), notice how beautifully airy and soft the inside is while still having those lovely cheese flecks peeking through—the perfect contrast!
What makes serving this bread so special is how versatile it is; whether enjoyed warm with butter melting into each crevice or served alongside soups or salads as an accompaniment, each bite transports you straight into comfort food heaven. I love pairing mine with a bowl of hearty vegetable soup or even just spread with some good-quality olive oil for dipping—it’s such a comforting experience! And don’t forget; sharing homemade bread always invites deeper connections with those around you—there’s something profoundly satisfying about breaking bread together.
Conclusion:
As we wrap up our journey through this cherished recipe for Cheddar and Herb Soda Bread, my heart swells with excitement at the thought of sharing such joy with you. I hope you can feel the love woven into each step as we explored how simple ingredients transform into something profoundly satisfying. It’s more than just bread; it’s about creating memories around the table with friends and family, where every bite resonates with warmth from those aromatic herbs mingling together in perfect harmony with creamy cheddar cheese.
This recipe is truly a must-try because it’s not only delicious but also incredibly accessible! Whether you’re an experienced baker or just starting out, making this soda bread offers an instant sense of accomplishment without requiring hours in the kitchen. Picture yourself pulling this golden-brown loaf from your oven; the aroma fills your home like an inviting hug! You’ll find yourself reaching for slices again and again — perhaps paired with soups on chilly evenings or as part of an elegant brunch spread.
Imagine savoring one warm slice with a pat of butter melting into its fluffy interior while sipping on your favorite herbal tea. For an afternoon pick-me-up, serve it alongside fresh salads topped with vibrant veggies; there’s nothing quite like that contrast between crunchy greens and tender bread! And if you’re feeling adventurous, try layering it with some roasted vegetables or turning leftover slices into delightful mini sandwiches filled with fresh spreads — oh my goodness!
Feeling adventurous? This recipe is wonderfully adaptable! You can play around by adding different cheeses like gouda or pepper jack for an exciting twist on flavors; consider incorporating sun-dried tomatoes for added richness or swapping in different herbs depending on what you have available! The possibilities are endless! I invite you to try this recipe yourself, share your experience with others, and connect over this beautiful creation. Let’s celebrate good food together!
Cheddar and Herb Soda Bread
Cheddar and Herb Soda Bread is a delightful and easy-to-make quick bread that combines the rich flavors of sharp cheddar cheese with fragrant fresh herbs. This comforting loaf rises without yeast, thanks to baking soda and buttermilk, making it perfect for both novice bakers and seasoned pros. Imagine pulling a golden-brown loaf from the oven, its crust crackling as it cools, filling your kitchen with an irresistible aroma. Whether enjoyed warm with a pat of butter or served alongside hearty soups and salads, this savory bread is sure to elevate any meal. Experience the joy of homemade baking with this simple yet satisfying recipe that brings warmth and connection to your dining table.
- Prep Time: 15 minutes
- Cook Time: 50 minutes
- Total Time: 1 hour 5 minutes
- Yield: Approximately 12 servings 1x
- Category: Bread
- Method: Baking
- Cuisine: American
Ingredients
- 4 cups all-purpose flour
- 1 ½ teaspoons baking soda
- 1 teaspoon salt
- 2 tablespoons chopped fresh chives
- 1 tablespoon each chopped fresh thyme, rosemary, and sage
- 1 cup shredded cheddar cheese
- 1 ¾ cups buttermilk
Instructions
- Preheat your oven to 425°F (220°C).
- In a large mixing bowl, whisk together flour, baking soda, and salt until well combined.
- Gently fold in chopped herbs and shredded cheddar cheese until evenly distributed.
- Gradually stir in buttermilk until a shaggy dough forms.
- Turn the dough onto a lightly floured surface and knead gently until just combined.
- Shape into a round loaf about an inch thick and place on a floured baking sheet.
- Score the top with a sharp knife to allow steam to escape.
- Bake for 15 minutes at 425°F, then reduce temperature to 375°F and bake for an additional 30–35 minutes until golden brown.
- Allow cooling wrapped in a clean towel for optimal texture before slicing.
Nutrition
- Serving Size: 1 slice
- Calories: 150
- Sugar: 0g
- Sodium: 250mg
- Fat: 5g
- Saturated Fat: 2g
- Unsaturated Fat: 3g
- Trans Fat: 0g
- Carbohydrates: 22g
- Fiber: 1g
- Protein: 5g
- Cholesterol: 10mg