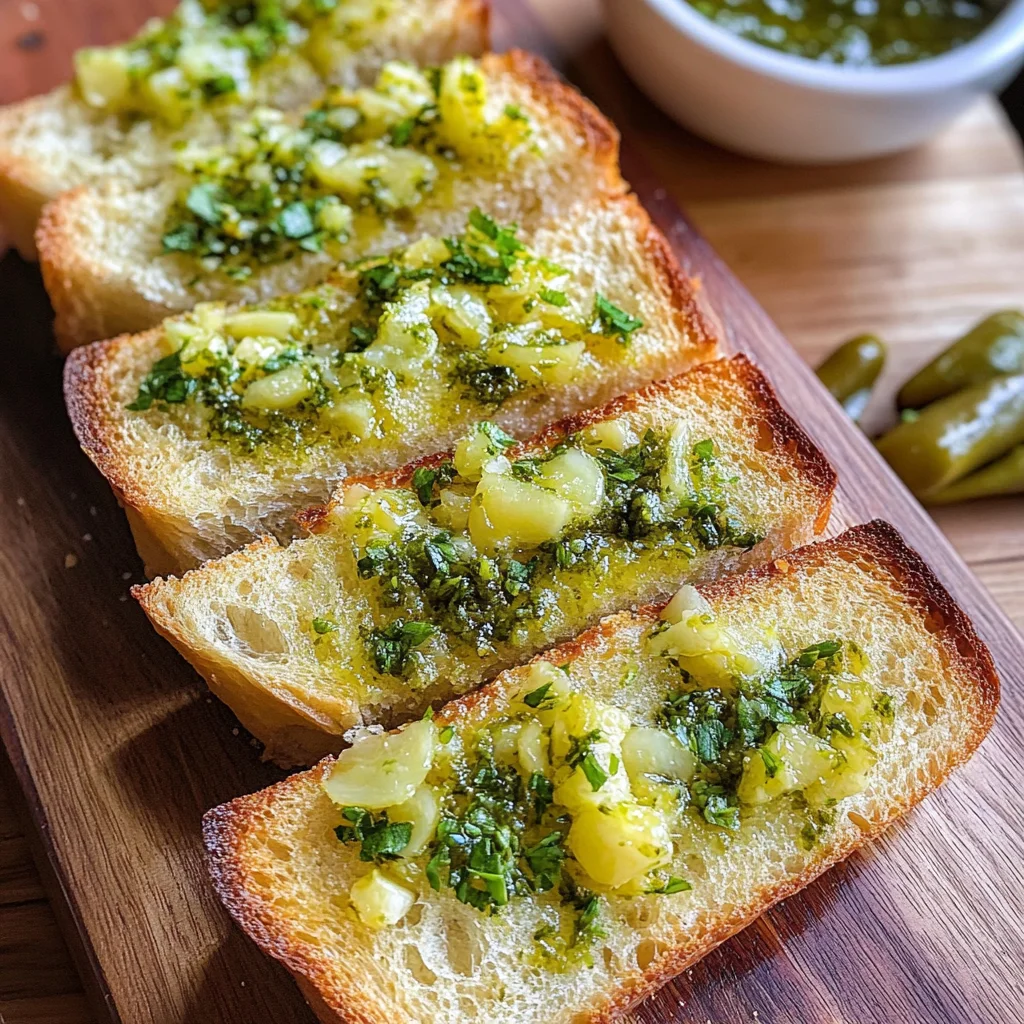
Peperocini Garlic Bread
There’s something so magical about the aroma of freshly baked bread wafting through your kitchen, isn’t there? It’s like a warm hug for the senses, inviting you to gather around the table and share stories with loved ones. And when that bread is transformed into Peperoncini Garlic Bread, it becomes an experience that transcends mere food; it’s a celebration of flavors, traditions, and the joy of cooking. This recipe is not just about slathering butter on bread—oh no! It’s about creating a symphony of flavors where the robust garlic dances with zesty peperoncini, all enveloped in the comforting embrace of golden-crisped bread. I promise you, this Peperoncini Garlic Bread will elevate any meal to something extraordinary.
From family gatherings to cozy weeknight dinners, this garlic bread holds its own as a beloved side dish that never fails to impress. You see, garlic bread has been a staple in many households, often paired with pasta or served alongside salads. But what sets this particular recipe apart is the delightful kick from peperoncini peppers. Their tangy heat adds an unexpected twist that harmonizes beautifully with the rich buttery spread. Trust me; once you take your first bite, you’ll find yourself reaching for more—not only will it satisfy your cravings for comfort food, but it will also spark conversations and smiles around your table.
Peperocini Garlic Bread: A Flavorful Twist on a Classic
Welcome to this delightful culinary journey where we’ll create a truly unforgettable Peperoncini Garlic Bread together! Whether you’re preparing for a family dinner or simply craving something comforting yet exciting, this recipe is guaranteed to be a hit. The combination of creamy butter infused with aromatic garlic and fresh parsley brings an irresistible richness, while the chopped peperoncini introduces a playful zing that keeps every bite interesting. So grab your apron and let’s dive into making this simple yet extraordinary dish!
Ingredients:
As we embark on this culinary adventure together, let’s take a moment to appreciate each ingredient that goes into our Peperoncini Garlic Bread. Each one plays a vital role in crafting that ultimate flavor experience we’re after.
- 1 loaf of Italian bread or French bread. The choice between Italian or French bread can set the stage for how your Peperoncini Garlic Bread turns out. I prefer using Italian bread for its slightly denser texture and wonderful crust; however, if you adore the lightness of French bread, go right ahead! Look for a loaf that’s fresh and crusty on the outside yet soft on the inside—this contrast is key to achieving that perfect bite. If you’re feeling adventurous or want to cater to dietary needs, whole grain options could also work wonderfully!
- 6 tablespoons of unsalted butter (softened) (vegan as desired). Butter is often regarded as liquid gold in kitchens across the world! Its silky texture and rich flavor are absolutely paramount for our garlic bread—it binds everything together beautifully and creates that luscious mouthfeel we crave. Make sure your butter is softened at room temperature; otherwise, it won’t spread evenly over the bread, which can lead to uneven cooking later on. If vegan options are preferred or needed, there are fantastic plant-based butters available now that will yield similar results without sacrificing taste.
- 3 cloves garlic (finely minced). Ahh, garlic—the heart and soul of flavor in many recipes! Its pungent aroma transforms into an intoxicating sweetness when baked; finely mincing ensures maximum flavor infusion throughout our buttery spread. Fresh garlic is non-negotiable here; pre-minced options simply can’t deliver that vibrant kick we’re aiming for. As you chop away at those cloves, breathe deeply—the smell is pure magic.
- 1 heaping tablespoon of freshly chopped parsley. This herb adds not only freshness but also color to our garlic butter mix! Fresh parsley brightens up heavier flavors and balances out richness perfectly—it’s like bringing sunshine onto your plate! When selecting your parsley at the market or grocery store, opt for vibrant green leaves without wilting spots; they should look lively and full of life.
- Salt and pepper to taste. These essential seasonings are often underestimated but play crucial roles in enhancing overall flavor profiles. A pinch of salt brings out natural sweetness in garlic and butter while balancing out any richness present in the dish—don’t shy away from tasting as you go! Freshly cracked black pepper adds warmth and depth; make sure it’s ground well so it disperses evenly throughout your mixture.
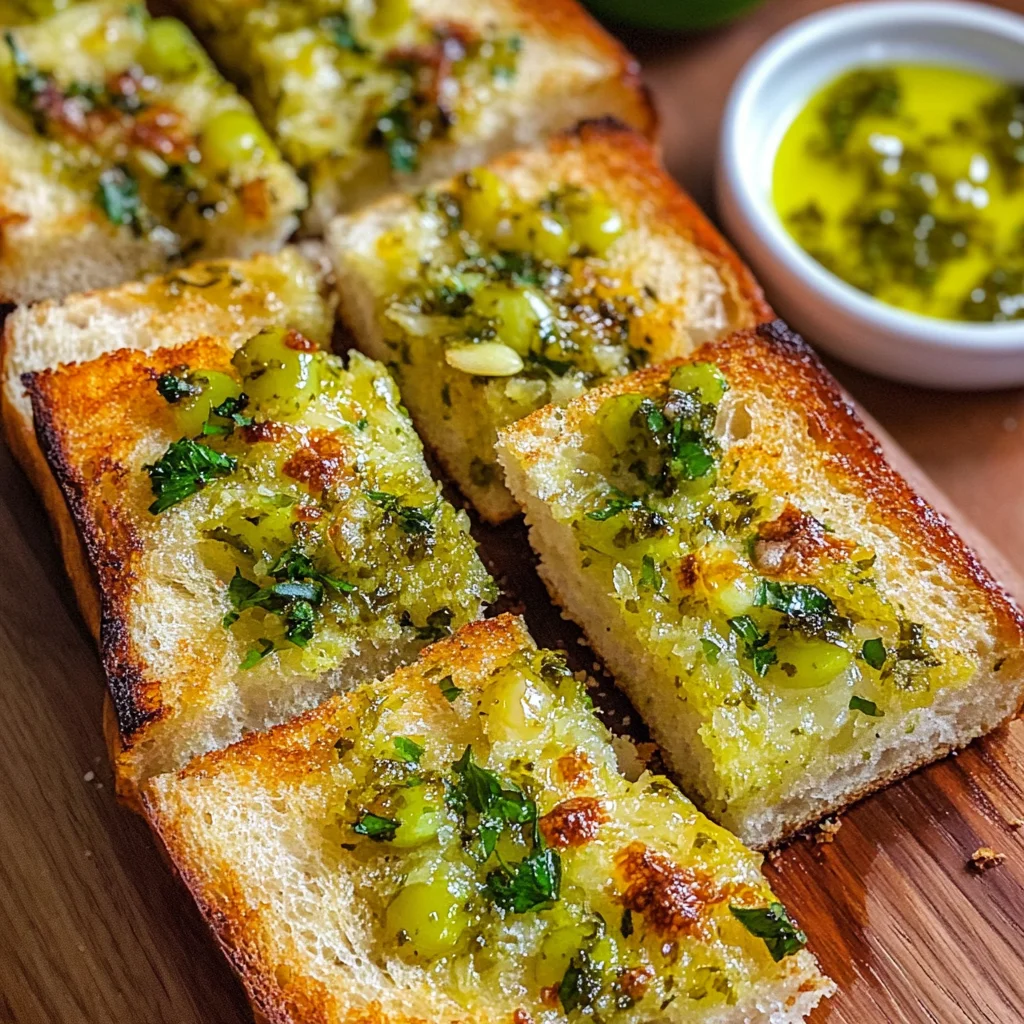
- ¼ cup of peperoncini (chopped). Here’s where things get exciting! Chopped peperoncini peppers bring both heat and tanginess—a delightful surprise amongst all that buttery goodness! Their unique flavor profile elevates our garlic bread from ordinary to extraordinary—trust me on this one! When purchasing them bottled or fresh (if available), choose those with vibrant colors—this reflects their ripeness—and remember to adjust quantities based on how much zing you enjoy!
Equipment You’ll Need:
Having the right tools makes all the difference when creating something wonderful in your kitchen—it’s like having trusty companions by your side during this delicious adventure! Let’s gather what we need before diving into preparing our Peperoncini Garlic Bread.
- Baking sheet – A sturdy baking sheet will ensure even heat distribution while our garlic bread bakes up crispy and golden brown without burning too quickly on any side.
- Sharp knife – You’ll need a sharp knife for slicing through that loaf of Italian or French bread effortlessly—this makes cutting through crusts easier while minimizing any chance of squishing down those soft interiors!
- Mixing bowl – A good-sized mixing bowl allows ample space for combining softened butter with minced garlic and parsley without making too big of a mess—it’s all about keeping things tidy while being creative!
- Spatula or butter knife – This will come handy when spreading our flavorful mixture onto each half of the loaf; trust me—it feels rewarding spreading that gorgeous garlicky concoction evenly across each piece!
Now that we have all our ducks lined up in a row regarding ingredients and equipment let’s jump right into preparing this delectable Peperoncini Garlic Bread!
Step 1: Preheat Your Oven – Setting The Stage For Magic
Before anything else can happen in this culinary creation process, preheating your oven is absolutely crucial—and I mean crucial! Set it to 350 degrees Fahrenheit so it’s nice and hot by the time we pop our assembled masterpiece inside later on. This step ensures even cooking throughout every inch of our precious loaf—if we skip it or rush through this phase then parts may remain doughy while others turn overly crisp…and nobody wants that disappointment after working hard!
Step 2: Slice Your Loaf – Creating Perfect Halves
Next up comes an exhilarating moment—we’re going to transform our lovely loaf into two halves by slicing it horizontally down its center using a sharp knife! Don’t rush this step; take care as you cut through each crusty layer since preserving shape matters here too—think about presentation when serving later on! As you complete this task reveal those soft interiors ready to soak up all those delicious flavors we’re about to introduce.
Step 3: Prepare Your Flavorful Mixture – Infusing Love
In a small mixing bowl, combine your softened butter with minced garlic and chopped parsley—a match made in heaven if I do say so myself! Using either spatula or spoon stir vigorously until well-blended—you want every bit infused with robust flavors from fresh herbs mingling beautifully alongside aromatic notes from freshly minced garlic…the anticipation builds as aromas begin wafting around you already making mouths water before even baking begins!
Step 4: Spread Generously – Embracing Every Cranny
Now comes my favorite part—the spreading! Take generous dollops of this heavenly mixture onto cut sides of each half—don’t hold back here…you want full coverage because every bite deserves maximum flavor impact once baked up crispy afterward! Ensure even distribution while focusing special attention near edges where crust meets soft centers—that way no corner misses out on tasting all goodness bestowed upon them here today!
As we continue onward toward deliciousness levels never reached before…stay tuned for more steps filled with passion & love behind making truly unforgettable Peperoncini Garlic Bread…because trust me—you’re gonna want MORE than just one slice when finished baking occurs soon enough!!
Step 5: The Perfect Spread – Butter, Garlic, and Parsley Collaboration
Now comes one of the most delightful moments of this whole process—the creation of that utterly intoxicating garlic butter mixture! In a small bowl, take your softened unsalted butter (or vegan alternative if that’s your preference) and add in the finely minced garlic. This is where the magic truly begins to unfold. Garlic, when combined with butter, transforms into a rich, aromatic essence that envelops each bite of bread, bringing a depth of flavor that is simply irresistible. I can still remember the first time I tasted garlic bread made this way; it was like a warm hug for my taste buds.
Once you have added the garlic to the bowl, sprinkle in your heaping tablespoon of freshly chopped parsley. Not only does this herb add a pop of vibrant color to your garlic butter, but it also brings a fresh brightness that cuts through the richness beautifully. Mixing these ingredients together until they are well incorporated is crucial—this ensures every inch of your bread will be coated in this luscious concoction. Trust me on this: don’t rush this step! Take your time to really blend everything together; you want those flavors to mingle and dance before they hit the oven. The result will be a spread that not only tastes heavenly but also smells divine as it bakes.
Step 6: Spreading Joy – An Even Coat for Maximum Flavor
Now that your garlic butter is all stirred up and ready to go, it’s time to spread this delightful mixture over your halved loaf of Italian or French bread. With a butter knife or even the back of a spoon, generously dollop the mixture onto each half of the bread and then use smooth strokes to spread it evenly from edge to edge. I always tell my friends that this step is about more than just slathering on some butter; it’s about creating layers of flavor that will meld together as they bake. You want every bite to burst with garlicky goodness!
This step is particularly important because an uneven spread can lead to some bites being too bland while others may overwhelm you with too much garlic. Aim for an even layer where every inch feels like a mini celebration in your mouth! After you’ve spread the buttery goodness across the bread halves, it’s time for the pièce de résistance—topping them off with those chopped peperoncini. These tangy little gems not only add a delightful kick but also enhance the overall flavor profile beautifully. A light sprinkle of salt and pepper brings everything together harmoniously, ensuring each bite is profoundly satisfying.
Step 7: The Oven’s Warm Embrace – Baking Perfection Awaits
Preheat your oven to 350 degrees Fahrenheit—this temperature is absolutely paramount for achieving that perfect balance between crispy edges and soft insides. As you slide your prepared bread into the oven, take a moment to appreciate how simple ingredients can transform into something extraordinary when given just a bit of heat and love. You’ll want to let them bake for about 10-13 minutes; however, keep an eye on them during those last few minutes because ovens can vary so widely in their heat distribution.
What you’re looking for during baking is an enticing golden-brown crust that signifies crispiness without losing the soft texture inside. Remember, patience is key here! Don’t be tempted to crank up the heat thinking it will speed up the process; cooking at too high a temperature can lead to burnt edges while leaving the center doughy—a complete tragedy! Instead, embrace those moments while they bake by taking in those heavenly aromas wafting through your kitchen like liquid gold filling your home with warmth and comfort.
Step 8: The Final Countdown – Timing Your Enjoyment
As you approach that magical 10-minute mark, begin checking on your Peperocini Garlic Bread closely; gently pull out one half using tongs or an oven mitt (safety first!). Letting it rest on a cutting board for just a moment allows you to assess its crispiness level without burning yourself—trust me; I’ve learned this lesson the hard way! At this point, if you’d like some extra crunchiness (who wouldn’t?), feel free to leave them in for another minute or two until they reach your desired level of doneness.
When they come out looking perfectly toasted yet still invitingly soft inside—oh my goodness—it’s time for celebration! But wait! Don’t rush ahead just yet. Allow them to cool for about one minute before slicing into them; letting them rest briefly helps maintain their structure and prevents those delicious toppings from sliding off when you’re ready to serve. That anticipation makes biting into these beauties even sweeter!
Baking Your Perfect Peperocini Garlic Bread
With all these steps behind us, we’re nearing the finish line! The next phase involves final touches and serving suggestions that elevate this dish from simply “delicious” to “absolutely unforgettable.”
Step 9: Serving Up Happiness – The Grand Finale
Now comes perhaps my favorite part—serving up this glorious Peperocini Garlic Bread! Once you’ve allowed it to cool slightly and you’ve sliced it into perfect portions (you can cut it into strips or classic wedges depending on how you’re feeling), it’s time to present it proudly at your table. For an extra touch of flair, consider garnishing with additional chopped parsley or even some grated vegan cheese sprinkled over top right before serving—it adds such beautiful color and richness.
As you gather around with family or friends, watch their eyes light up as they take their first bites. It’s moments like these—the laughter shared over crispy edges contrasting against soft interiors—that make cooking worthwhile. Pairing this garlic bread with a zesty salad or alongside pasta dishes enhances its charm further; after all, nothing says comfort food quite like warm bread infused with bold flavors!
I promise you’ll find yourself making this Peperocini Garlic Bread again and again—not just because it’s easy but because every bite holds memories waiting to be created anew around tables filled with joy and laughter. So gather everyone around, serve up those beautiful slices hot from the oven, and indulge in what I can confidently say is one of life’s simplest yet greatest pleasures! Enjoy every bite!
Storage and Enjoyment Tips for Your Peperocini Garlic Bread
Now that your Peperocini Garlic Bread is out of the oven, golden and aromatic, it’s time to dig in! I can already imagine the delightful crunch as you take that first bite, with the warm, buttery garlic mingling perfectly with the zesty peperoncini. But what if you have some leftovers? Don’t worry; this garlic bread is just as enjoyable the next day, making it a fantastic companion for any meal. Let’s talk about how to store those delicious remnants so you can savor that flavor even longer.
Storing Leftover Peperocini Garlic Bread
To keep your Peperocini Garlic Bread fresh and delicious, store any leftovers in an airtight container or wrap them tightly in aluminum foil. This will help maintain the moisture within while also preventing the bread from drying out. If stored properly at room temperature, it should stay fresh for about 2-3 days. I always recommend placing a slice of bread inside the container to absorb excess moisture, which helps keep everything perfectly crisp. Trust me on this—when you reheat it later, it will taste almost as good as when it came out of the oven! And speaking of reheating, simply pop slices back into a preheated oven at 350 degrees F for about 5 minutes or until warmed through—this method really brings back that delightful crunch.
Freezing Peperocini Garlic Bread for Later
If you find yourself with more Peperocini Garlic Bread than you can eat in a few days (which I sincerely doubt!), freezing is an excellent option! To freeze your garlic bread, slice it into individual pieces or leave it whole—whichever you prefer—and wrap tightly in plastic wrap followed by a layer of aluminum foil to prevent freezer burn. When stored correctly in the freezer, it will stay good for up to three months. The convenience factor here is absolutely paramount; just think about how wonderful it will be to have homemade garlic bread ready at a moment’s notice! When you’re ready to enjoy it again, simply thaw overnight in the fridge and reheat as mentioned above. You’ll be greeted by that same enticing aroma wafting through your kitchen!
With these storage tips in mind, your Peperocini Garlic Bread can be enjoyed long after it’s made. A warm slice at any time truly feels like a comforting hug!
Peperoncini Garlic Bread

Peperoncini Garlic Bread is a delightful twist on the classic garlic bread that will elevate any meal. The combination of creamy, buttery garlic spread infused with zesty chopped peperoncini creates a flavor explosion that is both comforting and exciting. This easy-to-make recipe is perfect for family dinners, movie nights, or as an irresistible appetizer. With its golden, crispy edges and soft interior, every bite invites conversations and smiles around the table.
- Prep Time: 10 minutes
- Cook Time: 13 minutes
- Total Time: 23 minutes
- Yield: Serves 8
- Category: Side Dish
- Method: Baking
- Cuisine: Italian
Ingredients
- 1 loaf of Italian or French bread
- 6 tablespoons unsalted butter (or plant-based alternative), softened
- 3 cloves garlic, finely minced
- 1 heaping tablespoon freshly chopped parsley
- Salt and pepper to taste
- ¼ cup chopped peperoncini
Instructions
- Preheat your oven to 350°F (175°C).
- Slice the loaf of bread horizontally into two halves.
- In a mixing bowl, combine softened butter, minced garlic, parsley, salt, pepper, and chopped peperoncini until well-blended.
- Spread the garlic mixture generously onto each half of the bread.
- Place the prepared bread halves on a baking sheet and bake for 10-13 minutes or until golden brown.
- Allow to cool slightly before slicing into pieces and serving.
Nutrition
- Serving Size: 1 slice (40g)
- Calories: 170
- Sugar: 0g
- Sodium: 230mg
- Fat: 12g
- Saturated Fat: 7g
- Unsaturated Fat: 4g
- Trans Fat: 0g
- Carbohydrates: 15g
- Fiber: 1g
- Protein: 3g
- Cholesterol: 30mg