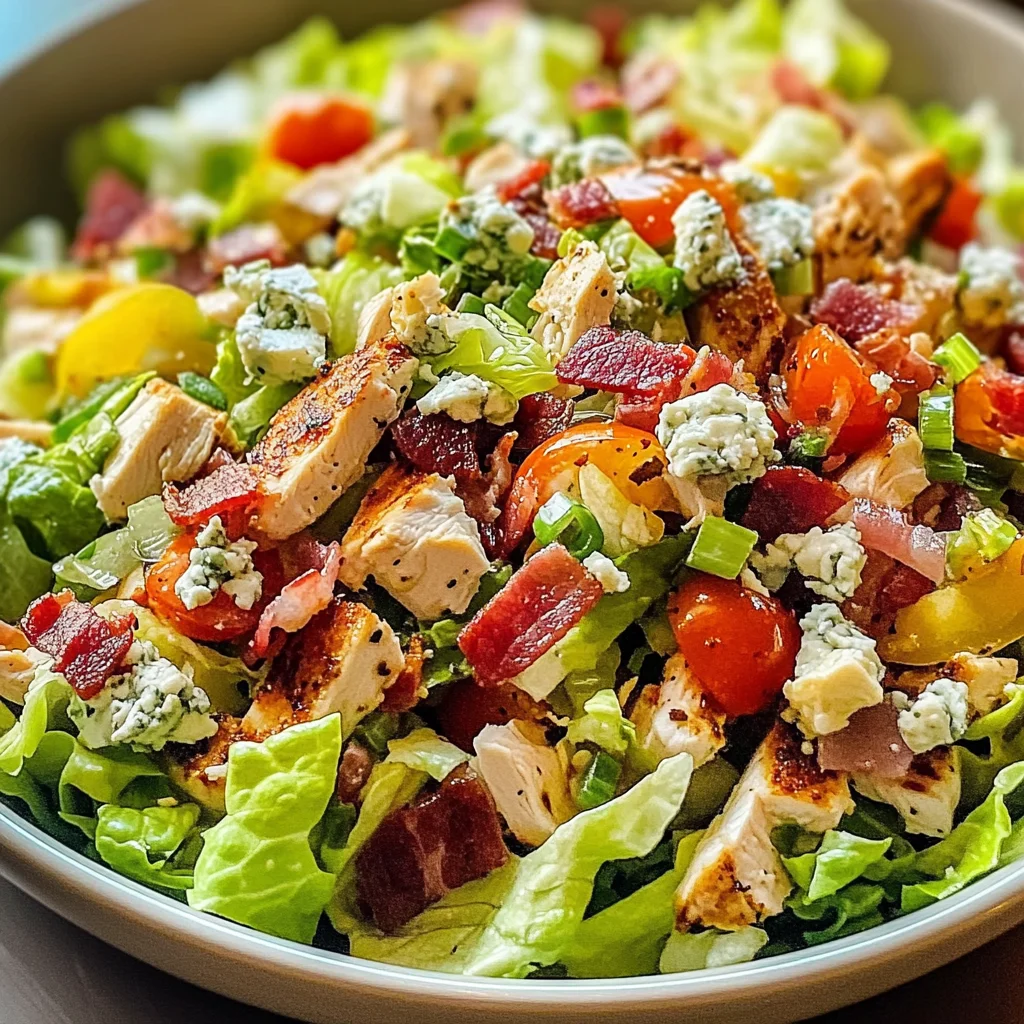
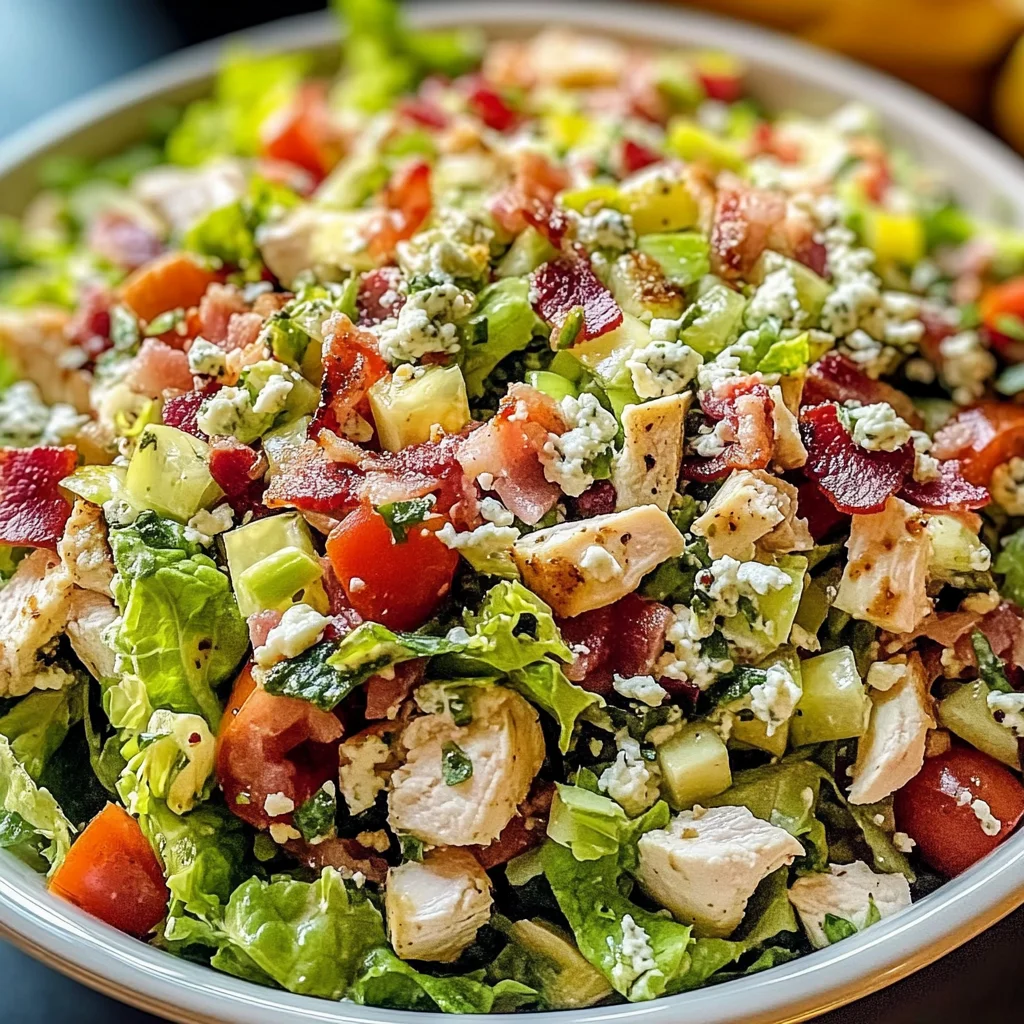
Copycat Portillo’s Chopped Salad Recipe
There’s something incredibly special about preparing a dish that not only nourishes the body but also warms the soul. The Copycat Portillo’s Chopped Salad is more than just a salad; it’s a vibrant celebration of textures, colors, and flavors that dance together in harmony. When I think of this salad, I’m reminded of sunny afternoons spent with friends, laughter echoing around the table as we dig into bowls brimming with fresh goodness. Each bite delivers a delightful crunch, bursts of juicy tomatoes, and the creamy tang of cheese—it’s utterly intoxicating. Whether you’re looking for a quick dinner idea or something to impress at your next gathering, this recipe embodies a perfect balance between comfort and freshness. Trust me, once you dive into this explosion of flavors, you’ll see why it deserves a spot in your recipe repertoire.
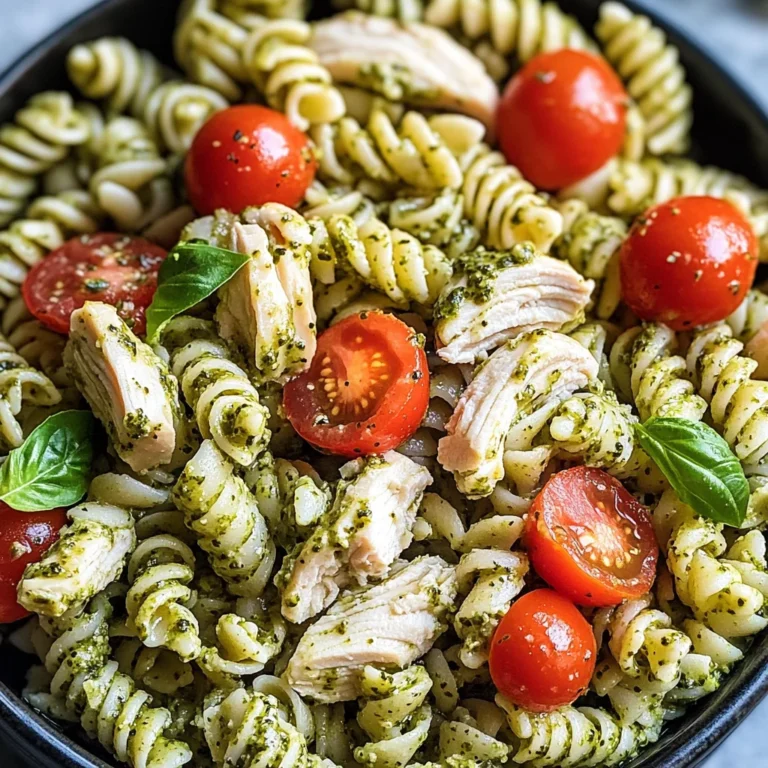
What makes this salad so captivating is its ability to be both hearty and refreshing at the same time. Think about it: you have tender chicken nestled among crisp greens, chewy pasta adding substance, and that tangy dressing pulling everything together like a warm hug. It’s versatile too! Great as a light lunch or as an accompaniment to grilled meats on a warm summer evening. And let’s not forget the satisfaction that comes from crafting something so delicious right in your own kitchen. This isn’t just food; it’s an experience that brings people together. So grab your chopping board and let’s embark on this culinary journey together!
Copycat Portillo’s Chopped Salad Recipe: A Symphony of Freshness
Welcome to my rendition of the beloved Portillo’s Chopped Salad—a masterpiece that captures all the elements we adore about this iconic dish! If you’ve ever found yourself craving those invigorating tastes but didn’t want to venture out, this recipe is here to save the day.
Ingredients:
As we dive into crafting our salad, let’s take a moment to appreciate each ingredient—these are the building blocks that will create our beautifully vibrant dish.
- 1 medium head of Romaine lettuce, chopped (about 6-8 cups). Romaine lettuce serves as the backbone of our salad with its crisp leaves and satisfying crunch. When choosing your romaine, look for heads that feel heavy for their size with firm leaves—this signifies freshness. The way it holds up against our dressing without wilting is absolutely paramount for maintaining texture throughout each bite.
- 1/2 small head of Iceberg lettuce, chopped (about 3-4 cups) OR 2 cups shredded red cabbage for color and crunch (or a mix). Iceberg lettuce adds that classic crunchiness which contrasts beautifully with the tender Romaine, while red cabbage introduces stunning color and additional texture. If you opt for cabbage, ensure it’s bright purple-red without any browning. Both varieties provide not just flavor but also visual appeal—after all, we eat with our eyes first!
- 1 cup dry Ditalini pasta (cooks to about 2 cups). This tiny pasta shape is perfect for catching bits of dressing and other ingredients as you eat. The key here is cooking it al dente—that slight firmness ensures it doesn’t become mushy in our salad mix. Rinse it under cold water post-cooking; this step stops further cooking and keeps our pasta from sticking together.
- 2 boneless, skinless chicken breasts (about 1 lb total), cooked and diced. Chicken adds protein to make this salad heartier and more satisfying. You can choose various cooking methods here: grilling gives it a smoky flavor; poaching keeps it moist; or pan-searing brings caramelized edges that elevate each bite’s taste profile. No matter how you cook it, make sure it’s seasoned simply yet effectively—just salt and pepper will do wonders!
- 8 slices thick-cut bacon, cooked until crispy and crumbled. Ah yes—the bacon! It contributes an irresistible salty crunch that harmonizes perfectly with the other ingredients’ freshness. Cooking it until crispy is non-negotiable; soggy bacon won’t provide that delightful texture contrast we’re after! If you want an alternative that’s still flavorful but meat-free, consider crispy chickpeas or sunflower seeds.
- 2-3 Roma tomatoes, seeded and diced (about 1 cup). Tomatoes bring juiciness along with their vibrant color—but remember to seed them! This prevents excess moisture from watering down our beautiful salad while allowing their sweet flavor to shine through without overpowering other elements.
- 3/4 cup crumbled Gorgonzola cheese (or blue cheese if preferred). The creamy richness of Gorgonzola adds depth; its tang complements all those fresh veggies beautifully! When shopping for cheese, opt for blocks rather than pre-crumbled versions—they tend to be fresher and have better flavor profiles.
- 4-5 green onions (scallions), thinly sliced (both white and green parts). These add an oniony brightness without overwhelming sharpness—a lovely contrast to richer ingredients like cheese and bacon! Use both parts for maximum flavor impact; don’t shy away from experimenting with quantities based on your preference.
- 1/4 cup finely diced red onion (optional), for an extra bite. Red onion offers another layer of flavor complexity while presenting a pop of color too! If raw onion’s pungency feels too strong for you or your guests’ palates, soaking them in cold water for ten minutes before adding can help temper their intensity.
- 1/2 cup good quality extra virgin olive oil. This liquid gold acts as the base for our dressing—it coats each ingredient lovingly while adding richness without being heavy-handed. Invest in high-quality olive oil when possible; it’ll enhance every aspect of our dish tremendously.
- 1/3 cup apple cider vinegar. The tanginess provides balance against creaminess from cheese while elevating flavors across all components—a touch more acidic will brighten everything up!
- 2 tablespoons water, used in conjunction with vinegar helps round out dressing consistency perfectly.
- Granulated sugar: 2 tablespoons (adjust to taste). Sugar tempers acidity beautifully—don’t skip out on tasting as everyone’s sweetness preference varies!
- 1 teaspoon Dijon mustard, which helps emulsify our dressing into a cohesive whole—a little goes a long way!
- 1–2 cloves garlic, minced or pressed—this aromatic addition infuses warmth into every bite!
- Dried oregano: 1 teaspoon & Dried basil: 1/2 teaspoon, both herbs impart essential Mediterranean vibes—with dried herbs lending concentrated flavors compared freshly chopped ones!
- Salt: 3/4 teaspoon (or to taste) & Freshly ground black pepper: 1/2 teaspoon (or to taste) are crucial seasoning agents ensuring flavors shine through harmoniously.
- Optional: A tiny pinch of red pepper flakes adds subtle heat if desired—you can adjust based on personal preference!
Equipment You’ll Need:
Before we jump into cooking mode, let’s gather some essential tools that’ll make whipping up this masterpiece smooth sailing! Having the right equipment on hand transforms kitchen time from stressful chaos into enjoyable creativity—a true partner in bringing your culinary vision alive.
- Large pot: A must-have for boiling pasta; choose one that’s spacious enough so noodles can move freely while cooking—this prevents them from sticking together!
- Colander: Essential post-pasta prep; allows easy draining without losing any precious pieces down the sinkhole! Look for one with sturdy handles so you can easily maneuver hot contents safely.
- Skillet: Depending on how you’re cooking chicken or bacon (and trust me—you’ll want crispy bacon!), having a reliable non-stick or cast iron skillet makes all difference when achieving those golden-brown finishes effortlessly!
- Salad spinner: While optional if you’re meticulous about washing greens by hand first before drying thoroughly using towels… I highly recommend investing in one—it saves time whilst ensuring dryness necessary prior tossing everything together later on!
Now that we’ve laid out all these wonderful ingredients along with tools required let’s dive into making our Copycat Portillo’s Chopped Salad Recipe—a delicious journey awaits us ahead!
Step 1: Preparing Your Pasta Perfectly
Let’s kick things off by bringing a large pot filled halfway with salted water to boil over high heat—the kind where bubbles start erupting like mini volcanoes! Once you reach this rolling boil stage—which typically takes about five minutes depending on stove power—carefully add in your ditalini pasta while stirring gently at first so none clump together immediately upon entry into liquid gold below them! Cook according package directions until al dente; usually around seven to nine minutes should do just fine depending brand chosen here—as overcooked results lead towards mushy textures instead crisp bites we’re aiming towards overall experience within finished dish itself afterward… Drain thoroughly through colander immediately after cooking then rinse under cold running water until cooled completely—you want stop any further cooking happening thereafter resulting in limp noodles ruining entire salad vibe altogether later down line!
Step 2: Cooking Chicken Like A Pro
Moving onto our protein component now: chicken breasts are wonderfully versatile yet require careful attention during preparation stages here too since they’ll serve foundational building block alongside other ingredients mixed within final presentation soon enough afterwards… Depending upon personal preference regarding method chosen—you could grill those beauties seasoned simply using salt + pepper combo alongside sprinkle garlic powder if desired beforehand then toss onto preheated outdoor grill reaching internal temperature around165°F after approximately twenty minutes per side flipping frequently during process ensuring evenly cooked results throughout entirety… Alternatively pan-searing involves heating tablespoon olive oil within skillet over medium-high heat & placing seasoned breasts directly inside there allowing around five-seven minutes per side until golden brown achieved externally before removing resting momentarily aside cooling slightly prior dicing up bite-sized pieces afterwards… Or perhaps poaching intrigues more? Simply place chicken inside saucepan filled broth covering entirely plus aromatics added such bay leaves & whole peppercorns simmering gently until done achieving similar outcomes—risk avoidance here means always check temperatures ensuring safe consumption levels too upon completion regardless route taken ultimately leading towards perfectly executed chicken outcome expected?
Step 3: Achieving Crispy Bacon Perfection
Now comes arguably my favorite part—the glorious bacon contribution! Start by laying slices neatly across cold skillet surface before turning heat onto medium setting gradually letting fat render down slowly leading towards glorious crispiness developing over eight-twelve minutes duration depending thickness chosen previously… Make sure flip often enough throughout process preventing burning whilst waiting patiently enjoying delightful aroma wafting through kitchen air surrounding us endlessly tempting taste buds longing gratification soon forthwith… Once reached desired state remove onto paper towel lined plate draining excess grease before crumble chopping smaller pieces afterward ready incorporation into final assembly next stage emerging shortly thereafter now following suit seamlessly onward…
Step 4: Prepping Our Colorful Vegetables
Onward we march toward assembling vibrant colors bursting forth amidst bounty gathered thus far already assembled nicely awaiting incorporation soon alongside luscious greens involved later onwards… First things first however let’s wash those gorgeous heads romaine iceberg/red cabbage thoroughly drying them expertly using trusty salad spinner if available otherwise patting dry using towels works too—ensuring no excess moisture remains behind critical maintaining ideal texture balance overall when tossed altogether later after mixing occurs eventually shortly thereafter now forthcoming amidst crafted masterpiece unfolding ahead enticingly inviting everyone join feast awaiting eagerly anticipated soon enough today coming alive… Next factor involves dicing tomatoes accurately avoiding unwanted watery mess left behind needing seeding properly eliminating seeds beforehand preventing unappealing consistency unfolding unexpectedly once final mix completed eventually later!
I hope you’re feeling excited because we’re well on our way toward creating something truly extraordinary together—the Copycat Portillo’s Chopped Salad Recipe awaits us delightfully ahead!
Step 5: The Magic of Dressing – Creating a Symphony of Flavors
Now comes the moment where we bring everything together with a truly extraordinary dressing that will elevate your Copycat Portillo’s Chopped Salad Recipe to celestial heights. In a small bowl or a jar with a tight-fitting lid, you’ll want to combine 1/2 cup of good quality extra virgin olive oil, 1/3 cup of apple cider vinegar, and 2 tablespoons of water. Next, add in 2 tablespoons of granulated sugar—this is absolutely paramount as it balances the acidity in the dressing, creating a delightful flavor profile that lingers on your palate. Follow this with 1 teaspoon of Dijon mustard, which not only adds a touch of tang but also acts as an emulsifier, helping the oil and vinegar blend beautifully, creating that luscious liquid gold we all crave. Toss in 1-2 cloves of minced garlic, along with 1 teaspoon of dried oregano, 1/2 teaspoon of dried basil, and 3/4 teaspoon of salt (or to taste) along with 1/2 teaspoon of freshly ground black pepper.
Whisk these ingredients vigorously or shake them up in your jar until everything is well combined and the sugar dissolves. This is where the magic happens—the flavors meld together, creating a dressing that’s both bright and comforting at the same time. Trust me on this: tasting and adjusting your seasoning is crucial here. You may find you want just a pinch more sugar for sweetness or maybe a splash more vinegar for tanginess—don’t be shy! You’re the chef, after all. And if you have time to spare, consider making this dressing ahead of time; it can sit in the refrigerator for up to a week! Just remember to bring it back to room temperature before serving and give it a good shake to re-emulsify those ingredients.
Step 6: The Grand Assembly – Building Your Salad Masterpiece
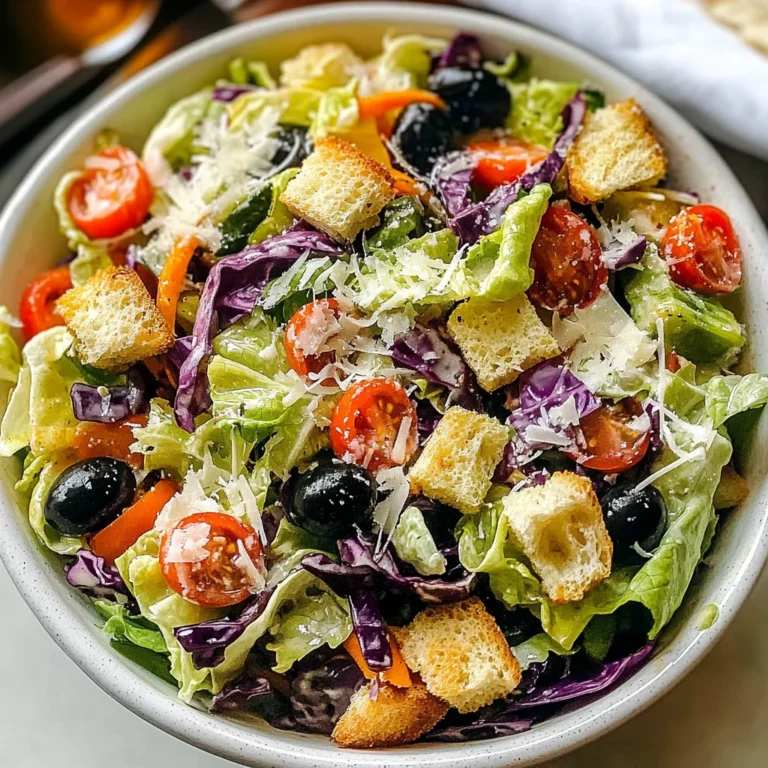
With all your components prepped, it’s time for the grand assembly! Grab yourself an impressively large salad bowl—trust me; you’ll need ample space to mix everything without creating chaos in your kitchen! Start by tossing in your chopped romaine lettuce (about 6-8 cups), followed by the chopped iceberg lettuce or shredded red cabbage (3-4 cups). The combination here is significant because each type contributes its unique texture and flavor—the crunchiness from iceberg or red cabbage contrasts beautifully with the tender romaine, giving every bite that delightful “crunch” we all love.
Next, introduce your cooled ditalini pasta, which should have transformed into perfectly al dente little morsels during its chilling process. This step is crucial; warm pasta can wilt those gorgeous greens faster than you can say “salad.” Then fold in your diced cooked chicken (about 1 lb total), crumbled bacon (8 slices worth), diced tomatoes (2-3 Roma tomatoes), sliced green onions (4-5), and if you’re feeling bold, add that finely diced red onion for an extra punchy kick. As you toss these ingredients together gently but thoroughly, take a moment to appreciate how breathtakingly colorful this salad has become—a true feast for both the eyes and the stomach!
Step 7: The Finishing Touch – Dressing Your Creation
Now we arrive at perhaps one of the most critical moments in crafting this Copycat Portillo’s Chopped Salad Recipe—the dressing application! Here’s where personal preference comes into play: some folks prefer their salads lightly dressed while others revel in every ingredient being drenched in flavor. If you’re leaning toward that restaurant-style approach, pour about two-thirds of your prepared dressing over the assembled salad and toss gently yet thoroughly. This is key—ensuring every morsel gets coated means every bite will burst with flavor! But be cautious; adding too much too quickly can lead to soggy greens, which simply won’t do.
If you anticipate leftovers or wish for guests to customize their own portions, I highly recommend serving the salad components beautifully arranged on individual plates with the dressing on the side. This not only keeps your vibrant greens looking fresh longer but also allows each person to control their flavor experience. With either method, aim for balance—your goal is to achieve that perfect harmony where none of the layers overpower one another but instead sing together like an orchestra playing its most beloved symphony.
Step 8: The Moment You’ve Been Waiting For – Serving Your Salad
Finally! After all that preparation and anticipation, it’s time to serve up this culinary masterpiece! Once tossed—or beautifully plated if you chose that route—it’s best enjoyed immediately while everything still cradles its ideal texture and freshness. Have some plates ready because I promise you; everyone will want a generous helping once they catch a glimpse of those vibrant colors mingling together enticingly!
As you scoop out servings onto plates, let yourself relish in this moment—you’ve created something truly special here! Each bite promises an explosion of flavors: crunchy greens dancing with creamy gorgonzola cheese against a backdrop of zesty dressing. Take note too; if any components are left behind after serving, store them separately in airtight containers—they’ll last for about two days in the refrigerator if kept from drowning in excess dressing. Just remember when serving leftovers: give them another gentle toss with fresh dressing right before indulging again—this ensures they remain happy and delicious!
Final Thoughts on Your Copycat Portillo’s Chopped Salad Recipe Adventure
And there you have it—a glorious journey through my beloved Copycat Portillo’s Chopped Salad Recipe! From selecting fresh ingredients bursting with life to crafting that unforgettable dressing that ties everything together so harmoniously; each step holds significance and personality. By taking your time throughout this process—from prepping veggies meticulously to tasting as you go—you’ll find yourself not just cooking but creating something profoundly satisfying!
So gather around your table filled with friends or family as they dig into bowls brimming with color and flavor—and don’t forget: share those stories behind why this recipe means so much to you! Cooking isn’t solely about nourishment; it’s about connection—sharing laughter over meals prepared with love creates memories far sweeter than any dessert could deliver. Enjoy every bit as much as I do—I can’t wait for you to take part in this flavorful adventure!
Storage and Enjoyment Tips for Your Copycat Portillo’s Chopped Salad Recipe
Now that you’ve crafted this delightful Copycat Portillo’s Chopped Salad, I can hardly contain my excitement for you to dig in and enjoy every vibrant bite! This salad is a celebration of fresh ingredients and bold flavors that come together like a warm hug on a plate. But let’s be real—if you find yourself with some leftovers (and trust me, it’s hard to resist going back for seconds), you’ll want to know how to preserve that freshness.
Storing Leftover Copycat Portillo’s Chopped Salad Recipe
To keep your leftover salad at its best, I recommend storing it in an airtight container. This will help maintain the crispness of the greens and prevent any unwanted moisture from seeping in. Ideally, you should keep it in the refrigerator where it will remain fresh for about 2-3 days. However, if you want to preserve that delightful crunch and flavor, here’s a pro tip: add a paper towel inside the container before sealing. It’ll absorb excess moisture and keep your salad from wilting too quickly. While the flavors meld beautifully over time, you might notice that the dressing can soften some of the more delicate ingredients; however, if you give everything a gentle toss before serving, it’ll be just as enjoyable! When you’re ready to indulge again, simply scoop out what you need, and if you’re feeling fancy, consider adding a sprinkle of fresh herbs or an extra drizzle of dressing to liven things up.
Freezing Chicken for Later
If you’re looking to prep ahead or simply want to save some time down the line, freezing cooked chicken can be a game changer! Simply place any diced chicken into an airtight freezer bag or container—don’t forget to label it with the date—and pop it in the freezer where it will stay good for up to 3 months. When you’re ready to use it, just transfer it from the freezer to your refrigerator a day ahead of time so it can thaw slowly. This method not only allows for effortless meal prep but also means you can whip up this incredible salad anytime cravings strike without starting from scratch! Trust me; having pre-cooked chicken on hand makes life so much easier when those midweek hunger pangs kick in.
All these tips ensure that your Copycat Portillo’s Chopped Salad stays just as vibrant and delicious as when you first made it. Now go ahead and savor every bite!
Copycat Portillo’s Chopped Salad

Dive into the vibrant world of the Copycat Portillo’s Chopped Salad, where fresh ingredients come together to create a symphony of textures and flavors. This colorful salad is a delightful mix of crisp vegetables, tender chicken, and a zesty dressing that will invigorate your meal. Perfect for lunch or as a side dish at dinner, this recipe is not just about nourishment; it’s about creating a memorable experience shared with friends and family. Each bite bursts with freshness, making it an ideal choice for any occasion—whether you’re hosting gatherings or simply looking for a quick yet satisfying meal.
- Prep Time: 20 minutes
- Cook Time: 10 minutes
- Total Time: 30 minutes
- Yield: Serves approximately 6 people 1x
- Category: Salad
- Method: Mixing
- Cuisine: American
Ingredients
- 1 medium head Romaine lettuce, chopped
- 1/2 small head Iceberg lettuce or 2 cups shredded red cabbage
- 1 cup dry Ditalini pasta
- 2 boneless, skinless chicken breasts, cooked and diced
- 2–3 Roma tomatoes, seeded and diced
- 3/4 cup crumbled Gorgonzola cheese
- 4–5 green onions, thinly sliced
- 1/2 cup extra virgin olive oil
- 1/3 cup apple cider vinegar
- 2 tablespoons granulated sugar
- Salt and pepper to taste
Instructions
- Cook the Pasta: Bring a large pot of salted water to boil. Add the Ditalini pasta and cook according to package instructions until al dente (about 7-9 minutes). Drain and rinse under cold water to stop cooking.
- Prepare Chicken: Cook the chicken by grilling, pan-searing, or poaching until fully cooked (165°F internal temperature). Dice into bite-sized pieces.
- Mix Vegetables: In a large mixing bowl, combine chopped Romaine lettuce, Iceberg lettuce or cabbage, diced tomatoes, sliced green onions, and cooked pasta.
- Add Cheese & Chicken: Fold in the diced chicken and crumbled Gorgonzola cheese gently.
- Make Dressing: In a small bowl or jar, whisk together the olive oil, apple cider vinegar, sugar, salt, and pepper until well combined.
- Toss Salad: Pour dressing over the salad mixture and toss well to combine all ingredients evenly.
- Serve Immediately: Enjoy your salad right away for optimal freshness!
Nutrition
- Serving Size: Approximately 1 cup (240g)
- Calories: 350
- Sugar: 3g
- Sodium: 450mg
- Fat: 24g
- Saturated Fat: 6g
- Unsaturated Fat: 17g
- Trans Fat: 0g
- Carbohydrates: 24g
- Fiber: 3g
- Protein: 15g
- Cholesterol: 45mg