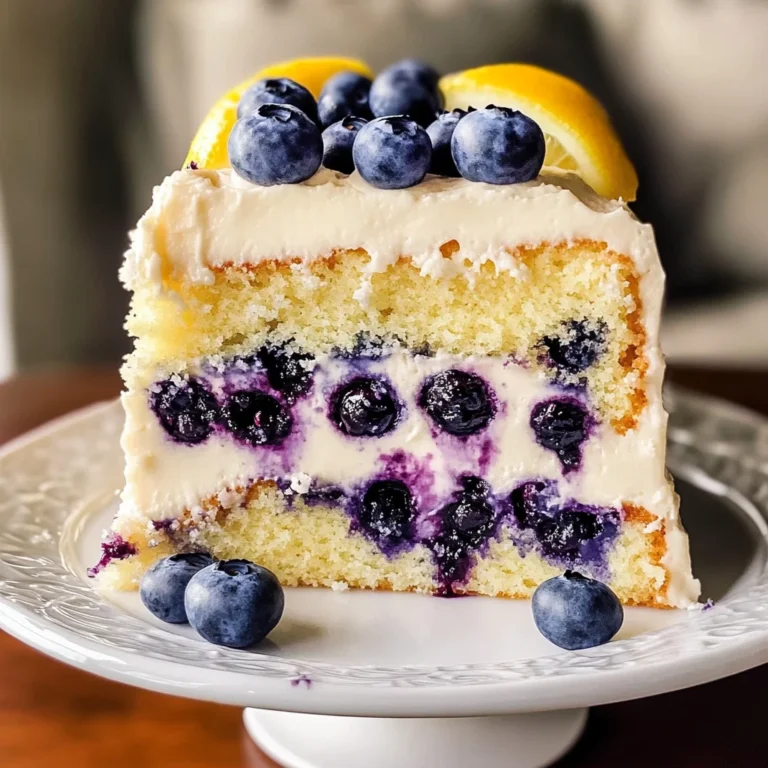
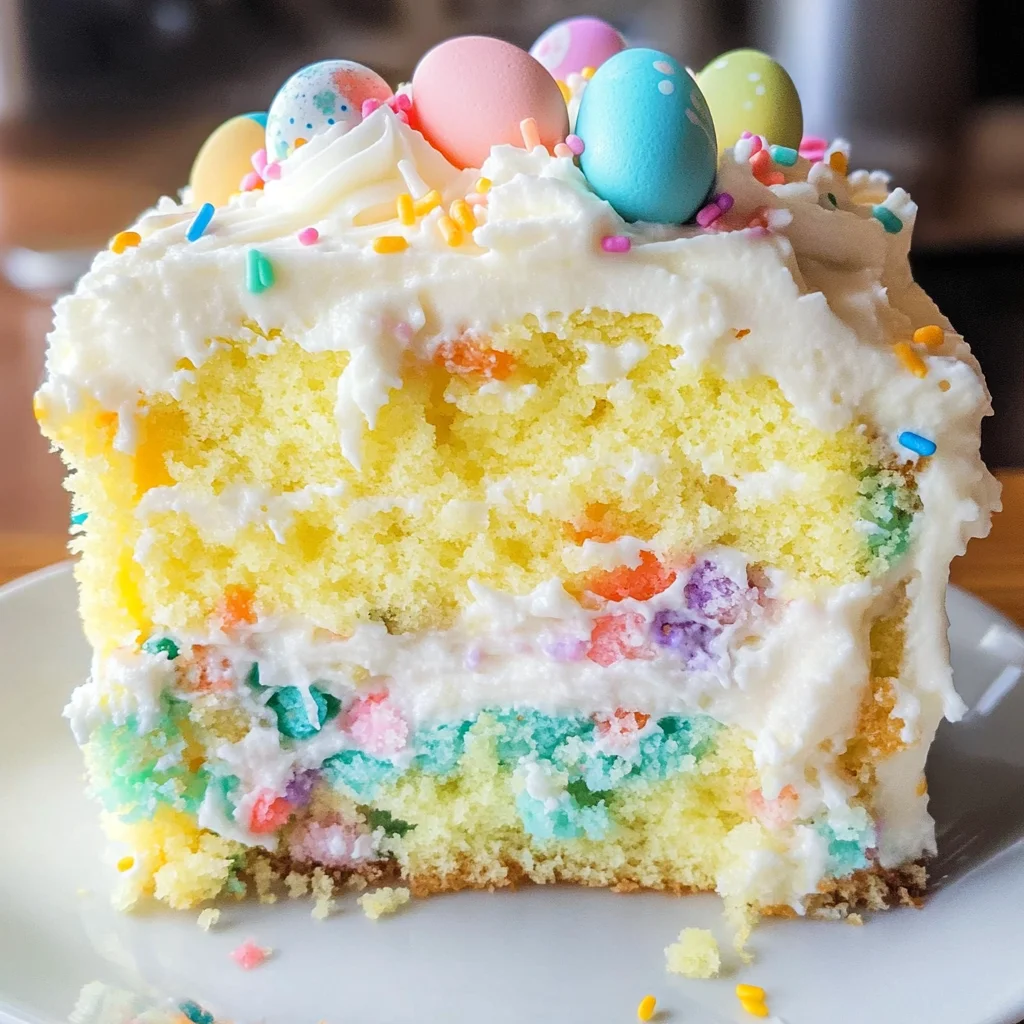
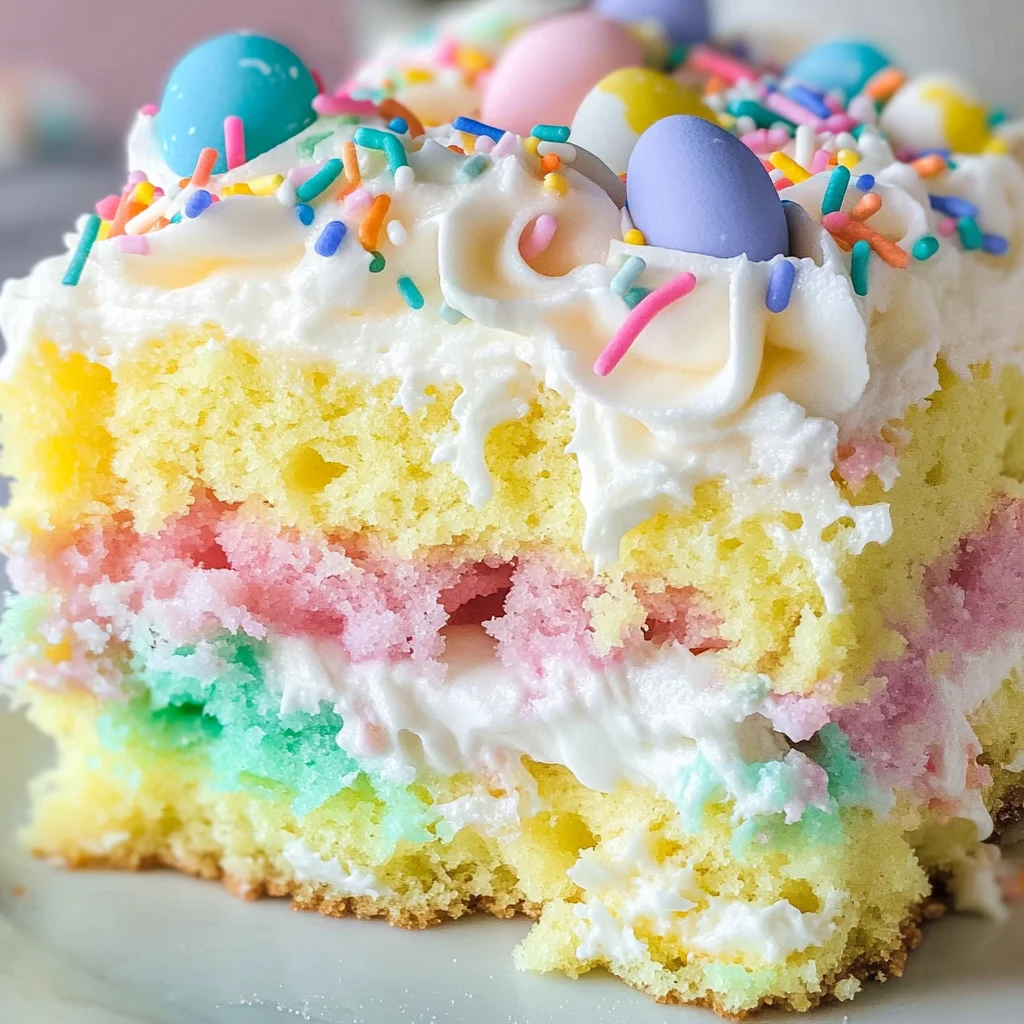
Easter Poke Cake
There’s something almost magical about the arrival of Easter, isn’t there? With its vibrant colors, the sweet scent of blooming flowers, and the promise of spring in the air, it feels like a celebration of renewal and joy. And what better way to embrace this season than with a delightful dessert that embodies all these feelings? The Easter Poke Cake does just that. This isn’t just a cake; it’s an experience that brings people together, evoking laughter and sweet memories that linger long after the last slice is gone. Imagine slicing into this colorful masterpiece, revealing layers of fluffy vanilla pudding nestled within moist cake, topped with creamy whipped goodness and playful sprinkles that dance across its surface. Each bite is a symphony of flavors and textures that will have you dreaming about it long after your lovely Easter gathering has ended.
As I think back to my own family gatherings during this time of year, I can recall the smiles on faces as we indulged in treats like this cake. It has a way of bridging generations, creating connections through shared experiences around the dinner table. The tradition of poke cakes may seem humble at first glance – a simple white cake infused with flavors and colors – but trust me when I say they hold a special place in many hearts. This particular recipe for Easter Poke Cake not only captures the essence of spring with its pastel hues but also invites creativity; after all, you can customize it with different flavors or toppings to make it uniquely yours. So gather your loved ones close and prepare to embark on this delicious journey together; I promise you won’t regret it!
Easter Poke Cake: A Colorful Delight for Your Spring Celebration
This Easter Poke Cake is more than just a dessert; it’s an invitation to celebrate life’s sweetest moments. Bursting with color and flavor, it’s perfect for those sunny spring days filled with laughter and love. Whether you’re hosting an Easter brunch or simply want to surprise your family after dinner, this easy-to-make cake will surely be the star of the show! You’ll find it’s simple enough for baking novices yet impressive enough to wow even the most seasoned bakers.
Ingredients:
Let’s roll up our sleeves and get ready for some delightful baking! Each ingredient in this Easter Poke Cake plays a significant role in crafting that perfect balance of flavor and texture we’re after.
- 15.25 ounces white cake mix. This convenient ingredient serves as the backbone of our cake, providing structure without overwhelming flavors. It’s designed to be light yet moist, which is exactly what we want for our poke cake. If you prefer homemade, feel free to substitute with your favorite from-scratch recipe focusing on basic pantry staples like flour and sugar—just ensure that you create enough volume for poking later!
- 3 egg whites. Using egg whites helps achieve that ethereal lift in our cake while keeping it tender—this step is crucial! They whip up beautifully when beaten properly, contributing to our airy texture. Be sure not to include any yolks here; they can weigh down your cake and change its delightful fluffiness.
- ½ cup vegetable oil. This liquid gold keeps our cake moist long after baking—no one likes a dry dessert! Vegetable oil has a neutral flavor which allows the other ingredients to shine through while maintaining that tender crumb texture we crave in every slice.
- ½ cup Greek yogurt. Not only does Greek yogurt add moisture (and some protein), but it also provides an irresistible tanginess that rounds out the sweetness beautifully. Plus, replacing some fat with yogurt gives us a slightly healthier option without sacrificing flavor or texture.
- ¾ cup whole milk. This ingredient enriches our batter further while helping everything blend smoothly together—the creaminess of whole milk adds richness that’s absolutely paramount in achieving a decadent mouthfeel.
- Pink, yellow, and blue gel food coloring. These vibrant hues are what make this cake visually stunning! Gel food coloring provides intense shades without adding too much liquid—a little goes a long way here! Feel free to play around with color combinations; pastel tones are perfect for capturing that euphoric spring vibe!
- 5.1 ounces instant vanilla pudding mix. Adding pudding mix is what makes this poke cake truly extraordinary! It thickens our filling as well as enhances flavor immensely with rich vanilla notes—if you’re feeling adventurous, try experimenting with different flavors!
- 2¾ cups whole milk (for pudding). We need this creamy addition to prepare our pudding filling perfectly—it creates that luscious layer inside our poke cake that everyone will love digging into!
- 2 cups heavy cream. To whip up fluffy clouds of frosting on top of our masterpiece, heavy cream is non-negotiable! The richness creates an utterly intoxicating topping that’s both elegant and indulgent.
- 3 tablespoons granulated sugar (for whipped cream). This minor addition balances out the natural sweetness from whipped cream while ensuring we achieve those soft peaks necessary for perfect frosting consistency.
- 1 cup sweetened shredded coconut. This delightful topping adds texture alongside an unmistakable tropical flair—it’s like taking a mini-vacation in every bite! If coconut isn’t your thing (or if allergies are at play), feel free to omit or substitute with crushed nuts for added crunch.
- Easter sprinkles and/or candy (optional topping). These whimsical decorations aren’t just pretty; they bring joy! Choose bright sprinkles or even mini eggs to add fun flair—after all, isn’t making memories part of what makes cooking so fulfilling?
Equipment You’ll Need:
Having the right tools at hand makes all the difference when creating something special in your kitchen! While these aren’t ingredients themselves, each piece contributes significantly toward achieving success—and trust me; you’ll want everything organized before starting your baking adventure!
- Mixing bowls – A set of various sizes is ideal here since you’ll be mixing multiple components ranging from batter preparation to whipping cream! Opt for glass or stainless steel—they’re durable options that won’t stain or absorb odors over time.
- Electric mixer – While mixing by hand can work if you’re feeling strong (and patient!), using an electric mixer saves time and effort while ensuring thorough blending—especially crucial when whipping egg whites or cream into fluffy perfection!
- 9×13-inch baking pan – A classic choice for poke cakes due to its ample space for even cooking; look for one made out of aluminum or glass—both distribute heat evenly so no part gets burnt while others remain undercooked.
- Rubber spatula – This tool is essential when folding ingredients gently—you want everything combined without deflating those precious air bubbles created earlier during whipping stages!
- Toothpick or skewer – Another handy tool used during baking: once your cake comes out from the oven (let it cool!), you’ll use either item here to make those signature pokes allowing filling later on!
Step 1: Whipping Up Our Cake Batter
To kick off our journey towards creating an unforgettable Easter Poke Cake, we first need to combine our dry ingredients thoughtfully before adding any wet ones—this process sets us up nicely for success! In a large mixing bowl, combine the white cake mix along with three egg whites (remember: no yolks!). Follow by drizzling in half a cup of vegetable oil alongside half a cup each of Greek yogurt and whole milk into this mixture—a beautiful combination that’s going to yield such moist results later on! Now comes one important detail: beat these ingredients together using your electric mixer until everything is blended fully—aiming for about two minutes on medium speed should do wonders here as you’ll start noticing some lovely bubbles forming within your batter—it means air has been incorporated beautifully!
Step 2: Adding Colorful Hues
Once you’ve achieved that smooth consistency indicative of perfectly combined batter textures (trust me—it should resemble something akin to creamy liquid sunshine!), let’s make things come alive visually by incorporating pink, yellow, and blue gel food coloring into separate bowls containing equal parts batter—you’ll want approximately one cup per color here! Add drops carefully until achieving desired shades—a little goes such a long way with gel food coloring so don’t rush this step! Afterward gently fold each hue back together into one larger bowl until swirls appear throughout—we want beautiful marbling rather than total mixing for visual appeal upon slicing later down road!
Step 3: Baking Time!
Now it’s time for magic—the transformation from batter into delectable dessert goodness occurs once we pour this colorful creation into greased 9×13-inch baking pan mentioned earlier! Use rubber spatula help spread evenly across surface ensuring each corner gets attention—it ensures all portions bake uniformly preventing any potential dryness issues post-baking session later on too! Preheat oven beforehand at 350°F (175°C) allowing warmth envelops kitchen inviting aromas waft through air while waiting patiently during baking process lasting approximately twenty-five minutes until toothpick inserted comes out clean—this visual cue guarantees nice rise along soft texture inside awaits us once cooled sufficiently afterwards!
Step 4: Making Our Vanilla Pudding Filling
While waiting patiently for our beautiful baked creation cooling down completely outside resting area let’s shift focus towards preparing indulgent vanilla pudding filling meant elevate taste experience beyond expectations—we’ll need another mixing bowl plus whisk handy here again if possible! Pour two-and-three-quarter cups whole milk alongside five-point-one ounces instant vanilla pudding mix straight inside giving gentle stir initially followed by vigorous whisking action afterward until mixture thickens enticingly resembling creamy custard-like consistency—this should take roughly two minutes max but don’t skip over any steps as doing so could lead unsatisfying end result instead… remember patience pays off beautifully when done right!
I hope you’re feeling excited about diving into making this scrumptious Easter Poke Cake because trust me—it’ll become part cherished tradition among family members who gather around table sharing laughter & stories alike while enjoying each slice together celebrating life itself…
Step 5: Create Your Colorful Cake Layers
Now that your batter is ready, it’s time to transform it into a vibrant masterpiece! Begin by preheating your oven to 350°F (175°C). This temperature is crucial as it ensures even baking throughout the cake, allowing it to rise beautifully. While the oven warms up, prepare three round cake pans by lightly greasing them with vegetable oil and then dusting with flour. This step might seem minor, but trust me, it’s absolutely paramount for ensuring that your cakes release effortlessly after baking.
Once your pans are prepped, divide the batter equally into three bowls. Here’s where the magic happens: add a few drops of pink gel food coloring to one bowl, blue to another, and yellow to the last. The amount you use will depend on how vibrant you want each layer to be—just remember, gel food coloring is incredibly potent! I recommend starting small; you can always add more if needed. Use a spatula or whisk to mix until the colors are fully incorporated, creating a stunning array of pastel hues that will make your Easter Poke Cake an absolute showstopper.
Next, pour each colored batter into its respective cake pan and gently spread it out with a spatula for even distribution. It’s important not to rush this step because an even layer means uniform cooking and gorgeous presentation later on. Bake in your preheated oven for about 25-30 minutes; you’ll know they’re done when a toothpick inserted into the center comes out clean or with just a few moist crumbs attached. Keep an eye on them as they bake; every oven behaves slightly differently! Once baked, allow them to cool in their pans for about 10 minutes before transferring them onto wire racks to cool completely. This cooling period is essential; it prevents condensation from forming on the surface of the cakes.
Step 6: Prepare the Luxurious Vanilla Pudding Filling
While your colorful layers are cooling down, let’s make that utterly intoxicating vanilla pudding filling that will bring our Easter Poke Cake to life! In a large mixing bowl, combine the instant vanilla pudding mix with 2¾ cups of whole milk. Whisk vigorously until everything is well combined—this should take about two minutes of enthusiastic mixing. The instant pudding mix will start thickening almost immediately due to its starch content reacting with the liquid—a process that creates that smooth texture we all adore.
Once you achieve that creamy consistency, set it aside for about five minutes so it can thicken further. Patience is key here; letting it sit allows all those flavors to meld together beautifully while ensuring a rich filling when we poke holes in our cake later on. Trust me on this—the slight wait makes all the difference between a good cake and a truly extraordinary one! After this resting period, give it another quick whisk just before you’re ready to pour it over your cooled layers.
Step 7: Assemble Your Layers with Love
Now comes one of my favorite parts—assembling our Easter Poke Cake! It’s like building a beautiful rainbow tower of flavor and joy! Take your first layer of cooled cake and place it upside down onto your serving platter (this gives you a perfectly flat surface for layering). Using the handle of a wooden spoon or any long tool you have handy, gently poke holes all over the surface of this layer—don’t be shy! You want enough holes so that when we pour in our luscious pudding filling later on, it seeps through and saturates every bite.
After you’ve poked enough holes (aim for around 20-30), ladle about one-third of your prepared vanilla pudding over the top. As you do this, watch how it travels down into those holes like liquid gold—it’s an utterly satisfying sight! Gently spread any excess pudding across the top using a spatula so every inch is coated in that creamy goodness. Then, repeat this process with your second layer: poke holes again and spread another third of your pudding filling before placing on the final cake layer.
This stacking technique not only adds depth but also builds anticipation for each slice—a little surprise awaits inside every piece! Don’t rush this assembly phase; taking care here will ensure a perfectly layered finish that looks as good as it tastes.
Step 8: Chill for Ultimate Flavor Infusion
With our layers stacked high and filled with creamy delight, it’s time for one final crucial step: chilling! Cover your assembled Easter Poke Cake loosely with plastic wrap or foil (make sure it’s not touching any part of the frosting) and pop it into the refrigerator for at least four hours—though overnight would be even better if you can wait that long! This chilling step isn’t just about keeping things cool; it’s where all those flavors meld together beautifully like old friends reuniting at a dinner party.
During this time, the pudding filling continues to soak into those vibrant layers while firming up slightly so every slice holds together nicely when cut. Plus, as flavors intensify from their cozy time together in the fridge, you’ll find each bite becomes profoundly satisfying—this is part of what makes an Easter Poke Cake truly special! So go ahead and revel in some anticipation; trust me when I say this waiting game is non-negotiable if you want maximum flavor impact!
Conclusion:
As we wrap up our delightful journey through crafting this spectacular Easter Poke Cake, I can hardly contain my excitement! From mixing vibrant colors into the batter to watching it rise into a cloud of sweetness topped with fluffy whipped cream and sprinkles—it’s an experience that fills my heart with joy and reminds me why I love baking so much. The combination of soft cake layers soaked with rich vanilla pudding creates an indulgent yet light dessert that captures the essence of springtime celebrations perfectly. Each bite is not just about taste; it’s about memories shared around the table, laughter echoing through kitchens filled with love.
This recipe is an absolute must-try not only because of its beguiling taste but also due to the pure joy it brings while making it. It’s incredibly accessible; even novice bakers will find themselves successful as they whip up this cheerful creation without any fuss or complicated techniques. Picture pulling this beauty from your oven—the aroma wafting through your home will have everyone rushing to see what magic you’ve conjured up. It’s perfect for Easter gatherings but versatile enough to shine at birthday parties or spring picnics; trust me when I say it will steal the show every single time!
As you serve this enchanting dessert, imagine pairing each slice with a dollop of fresh fruit compote or perhaps some tangy lemon curd to elevate those flavors even further—it’s like sunshine on your plate! For an afternoon pick-me-up, enjoy a piece alongside a cup of herbal tea or coffee; they complement each other beautifully! And if you’re feeling adventurous after mastering this classic version, consider infusing flavors like coconut or even citrus zest into your whipped cream topping for a refreshing twist. This recipe is wonderfully adaptable; each variation adds its own flair while enhancing that beloved base flavor we’ve created together today. So go ahead—try out these ideas and make them your own! I can’t wait to hear how yours turns out!
Easter Poke Cake

Easter Poke Cake is a delightful, colorful dessert that captures the essence of springtime celebrations. This cake features layers of moist vanilla cake infused with vibrant pastel hues, filled with creamy vanilla pudding, and topped with fluffy whipped cream. Each slice offers a sweet burst of flavor and texture that brings joy to any gathering. Perfect for Easter brunch or family get-togethers, this easy-to-make poke cake is sure to impress guests of all ages.
- Prep Time: 30 minutes
- Cook Time: 30 minutes
- Total Time: 1 hour
- Yield: Serves approximately 12 people 1x
- Category: Dessert
- Method: Baking
- Cuisine: American
Ingredients
- 15.25 ounces white cake mix
- 3 egg whites
- ½ cup vegetable oil
- ½ cup Greek yogurt
- ¾ cup whole milk
- Pink, yellow, and blue gel food coloring
- 5.1 ounces instant vanilla pudding mix
- 2¾ cups whole milk (for pudding)
- 2 cups heavy cream
- 3 tablespoons granulated sugar (for whipped cream)
- 1 cup sweetened shredded coconut (optional)
- Easter sprinkles (optional)
Instructions
- Preheat your oven to 350°F (175°C). Grease and flour a 9×13-inch baking pan.
- In a large mixing bowl, combine white cake mix, egg whites, vegetable oil, Greek yogurt, and whole milk. Mix for about two minutes until smooth.
- Divide the batter into three bowls and add pink, yellow, and blue gel food coloring to each bowl, gently mixing until you achieve desired colors.
- Pour each colored batter into the prepared baking pan evenly and bake for 25-30 minutes or until a toothpick comes out clean. Allow cooling.
- In another bowl, whisk together instant vanilla pudding mix and 2¾ cups whole milk until thickened—about two minutes.
- Once the cakes are cool, poke holes in the top layer using a wooden spoon handle and pour one-third of the pudding over it—repeat for each layer.
- Chill the assembled cake in the refrigerator for at least four hours or overnight.
- Whip heavy cream with sugar until soft peaks form; spread over the top of the chilled cake and add coconut and sprinkles if desired.
Nutrition
- Serving Size: 1 serving
- Calories: 250
- Sugar: 22g
- Sodium: 160mg
- Fat: 13g
- Saturated Fat: 7g
- Unsaturated Fat: 5g
- Trans Fat: 0g
- Carbohydrates: 31g
- Fiber: <1g
- Protein: 3g
- Cholesterol: 20mg