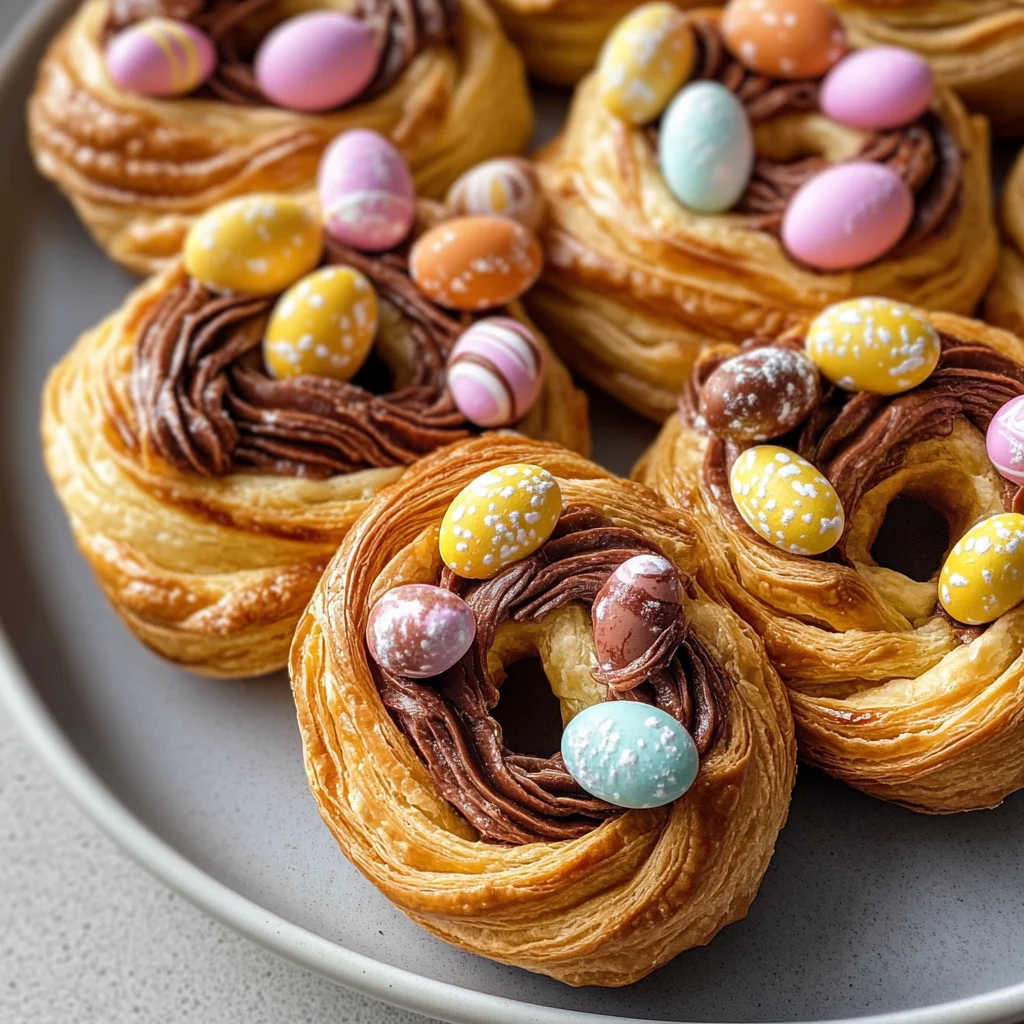
Puff Pastry Easter Nests
There’s something truly magical about the arrival of Easter, isn’t there? The air is filled with a sense of renewal, and everything seems to burst back to life. It’s a season that invites us to gather with loved ones, share traditions, and create joyful memories around the table. Today, I want to take you on a delightful journey with one of my absolute favorite Easter treats: Puff Pastry Easter Nests. These gorgeous little nests are not just desserts; they’re an experience that combines flaky pastry with rich chocolatey goodness and vibrant mini eggs that remind us of springtime. Each bite transports you to a world where indulgence meets creativity, making it impossible not to smile.
As you prepare to create these delectable nests, imagine the aroma wafting through your kitchen as they puff up in the oven. The golden-brown tops will beckon you closer, while the sweet scent of Nutella fills your senses. The beauty of this recipe lies in its simplicity—ready in under 30 minutes—and the opportunity it provides for you to engage in some light-hearted decorating fun! Trust me when I say that these Puff Pastry Easter Nests will become a cherished part of your holiday celebrations, just like they have in mine. So put on your apron and let’s dive into this sweet adventure together!
Puff Pastry Easter Nests: A Sweet Springtime Delight
These Puff Pastry Easter Nests are perfect for any gathering during this joyful season! Not only do they taste heavenly, but they also bring a playful element to your dessert table. Imagine friends and family marveling at how adorable and delicious they look—all while knowing you’ve whipped them up in mere minutes. It’s like having your cake and eating it too! You can decorate them however you please or simply enjoy their beautiful simplicity. Let’s gather our ingredients so we can get started on creating these enchanting treats!
Ingredients:
As we embark on this culinary journey together, every ingredient plays an essential role in crafting these delightful nests. Each component contributes not just flavor but texture and visual appeal as well.
- 1 Puff Pastry Sheet. This is the star of our show—the flaky embrace that holds all the deliciousness inside! When selecting your puff pastry, I recommend opting for high-quality brands found in the freezer section; look for those that boast butter as one of their main ingredients for an exceptionally rich flavor. Once thawed, it’s incredibly pliable, making it easy to roll out and shape into those charming nests we adore.
- 100 g Nutella (Around Half a Jar). Ah, Nutella! This velvety spread adds an irresistibly creamy chocolate flavor that is utterly intoxicating. Its luscious texture perfectly complements the airy puff pastry while providing a sweet contrast to the crunchy mini eggs we’ll add later. If you’re looking for alternatives due to dietary preferences or allergies, feel free to substitute with your favorite chocolate hazelnut spread or even a vegan chocolate spread—just know that each option will bring its unique charm to our nests!
- 1 Egg. An egg might seem like a simple addition, but it’s absolutely paramount here! Whisked together and brushed over our pastry before baking, it acts as glue and gives our nests that stunning golden-brown finish that is so visually appealing. Plus, it contributes some richness in flavor—not to mention it’s also key for achieving that beautiful sheen on top!
- 1 Pack Mini Eggs (80g). These vibrant little gems are what make our nests come alive! Their colorful shells add such whimsy and joy—perfectly embodying the spirit of Easter itself! Choose whichever mini eggs you fancy; milk chocolate or dark chocolate varieties work wonderfully here. Just imagine how much fun it’ll be when everyone gets to pick their favorite color from these charming confections!
- 12 tsp Chocolate Icing (Or Extra Nutella). While optional, this finishing touch elevates our pastries from good to extraordinary! A drizzle of chocolate icing or more Nutella adds an extra layer of indulgence that invites smiles all around—plus it helps those mini eggs stick beautifully atop each nest! If you’re feeling adventurous, consider making your own icing by melting down some chocolate—it’s easier than you’d think!

Equipment You’ll Need:
Before we dive into creating our delightful nests, let’s gather our tools! Having the right equipment makes all the difference in ensuring a smooth baking experience—plus it’s always more enjoyable when you’re well-prepared.
- Baking Tray – This trusty ally will hold all those beautiful nests as they bake in the oven! Make sure it’s lined with parchment paper or use non-stick spray; this ensures easy removal once they’re done without compromising their delicate structure.
- Parchment Paper – Speaking of which, using parchment paper is non-negotiable here—it prevents sticking and allows for even heat distribution which is crucial for achieving that perfect puffiness we’re aiming for.
- Sharp Knife or Pizza Cutter – You’ll need one of these handy tools for slicing through your puff pastry sheet with ease! A sharp knife will give you clean cuts while preventing any tearing or uneven edges—this precision matters when crafting beautiful strips.
- Whisk or Fork – To whisk your egg before brushing it over the pastry; this step will ensure an even coating that bakes up beautifully golden.
- Mixing Bowls – Although we won’t be mixing much here beyond whisking our egg, having a couple of bowls on hand will help keep things organized and tidy as we work through each step.
Now that we’ve gathered our ingredients and tools let’s get ready to create something truly special together!
Preparing the Puff Pastry Easter Nests
Step 1: Preheat Your Oven
First things first—let’s preheat our oven to 200°C (gas mark 6) because baking requires patience and preparation! Preheating ensures that once we place our nests inside, they start cooking immediately at the right temperature—which is crucial for achieving those beautifully puffy pastries we’re aiming for. While that’s happening, line your baking tray with parchment paper so it’s ready when it’s time to pop those beauties in!
Step 2: Spread On The Nutella
Unroll your puff pastry sheet onto a clean surface positioned horizontally (landscape). Imagine unfurling a canvas ready for creativity! Gently spread about half a jar of Nutella over one half of the pastry sheet while leaving the other half untouched—this creates a lovely base layer bursting with flavor that’s going to meld perfectly with everything else we add later on. Don’t rush this step; take care not to tear the pastry—it deserves gentle handling so we can achieve those fabulous layers later!
Step 3: Fold It Over
Once you’ve generously coated one side with Nutella, fold over the untouched half like closing a book—a delicate embrace if you will! Press down gently along the seam; this helps seal in all that wonderful goodness we’ve just introduced without losing any precious filling during baking. After sealing up your ‘book,’ grab a sharp knife or pizza cutter and slice this folded beauty into strips about 1.5 cm wide—a visual cue would be similar to cutting lasagna noodles but thinner!
Step 4: Twist And Shape
Now comes the fun part—twisting each strip into delightful shapes! Pinch two opposite ends of one strip together firmly then twist them away from each other three or four times—it’s like giving each strip its own little dance move! Not only does this create air pockets within which magic happens during baking (think lightness), but it’s also visually stunning when baked up golden brown and topped with mini eggs! Once twisted into spirals (and believe me—they’ll look adorable), place each nest carefully onto your prepared baking tray.
As we continue working through these steps together—I promise you’re doing wonderfully already—we’ll transform simple ingredients into something utterly extraordinary very soon! Let’s keep going…
Step 5: Twisting into a Magical Shape
Now, as we embark on the delightful task of twisting the pastry strips, let me just say how utterly enchanting this part is! Each twist not only adds a beautiful texture to your Puff Pastry Easter Nests but also creates layers that will puff up magnificently in the oven. Start by taking one of your cut strips and pinching together the two opposite ends—this small yet crucial step ensures that your nests hold their shape during baking. Trust me, you want to make sure these little guys don’t unravel in the oven! Then, here’s where the magic happens: twist the strip in opposite directions three to four times. This motion creates an airy, spiraled structure that allows for better puffing and a wonderfully flaky texture when baked.
Don’t rush this step; take your time to appreciate each twist and turn. It’s like giving each nest a little hug before they meet the heat! As you twist, you’ll feel the dough becoming softer and more pliable—this is a sign of great things to come. Once twisted, roll each strip into a delightful spiral shape and place it on your prepared baking tray lined with parchment paper. You’ll want to ensure they’re spaced out adequately; around an inch apart should do it. This spacing allows hot air to circulate freely around each nest, resulting in that gorgeous puffiness we all crave!
Step 6: The Golden Brush of Egg Wash
Ah, the egg wash! This simple yet transformative step is absolutely paramount for achieving that golden-brown color we all adore on our pastries. In a small bowl, whisk one egg until it’s smooth and frothy; this will create a lovely glaze that not only enhances the appearance of your Easter nests but also helps them develop an enticing sheen as they bake. Using a pastry brush or even your fingers (if you’re feeling adventurous), gently apply the egg wash over each twisted nest. Be careful not to douse them too heavily—just enough to coat will do wonders!
Why go through this extra effort? Well, an egg wash serves multiple purposes: it provides moisture during baking which helps achieve that perfect crust while simultaneously giving your pastries that professional finish you’d expect from a fancy bakery. As they bake, watch for those visual cues—after about 10 minutes in the oven, you should see them puffing up beautifully and turning a rich golden hue. If you see any overly dark spots forming too quickly, simply rotate your tray halfway through baking for even cooking. I promise you; taking this step seriously will elevate your Puff Pastry Easter Nests from ordinary to extraordinary.
Step 7: Baking to Perfection
Now comes one of my favorite parts—the baking! Preheat your oven to 200°C (that’s gas mark 6 or 180°C for fan ovens) because we want it nice and hot before introducing our precious nests into its warm embrace. Carefully slide your baking tray into the oven and set a timer for about 10-12 minutes; however, keep an eye on them after about 8 minutes so you catch them at just the right moment. What makes this part so exhilarating is watching those twists and spirals expand as they bake; it’s like witnessing little clouds rise up in delight!
During this time, while they’re puffing up into their final form, you might notice an irresistible aroma wafting through your kitchen—this is where patience pays off! You want them to achieve that perfect balance between crispy exterior and tender interior; ideally, they should be golden brown all over with no hint of sogginess underneath. To test for doneness without cracking any open prematurely (because who could resist peeking?), gently tap one with your finger—it should give off a hollow sound if it’s fully baked. If they need more time, simply return them to the oven while keeping an eye out on their color.
Step 8: Cooling Down Before Decorating
Once you’ve reached that glorious moment when you pull out your trays filled with perfectly puffed pastries, let me tell you: patience is key again! Yes, I know it’s tempting to dive right in with toppings galore—your taste buds are practically dancing at the thought—but allow these delectable nests some cooling time on the tray for at least five minutes before moving them onto a wire rack. Why? Cooling lets steam escape slowly from within while preserving their crispiness outside; rushing this step can lead to disappointingly soggy bottoms.
While they’re cooling down—a perfect time for you to tidy up or prepare your decorating station—take a moment to admire their beauty! They should be light as air with an inviting golden sheen that’s practically begging for adornment. Once they’re cool enough to handle (but still warm), transfer them carefully onto the wire rack where they’ll continue cooling completely before we embark on their final transformation into festive masterpieces!
Conclusion:
As we wrap up our delicious journey into the world of Puff Pastry Easter Nests, I can’t help but feel a wave of excitement for all the joy these little treats can bring! From the moment you roll out that flaky pastry to the exhilarating twist of those strips, every step feels like a celebration. What truly makes this recipe extraordinary is how simple it is yet so profoundly satisfying—the contrast between the golden-brown exterior and the rich Nutella within creates a symphony of flavors that dances on your palate. I hope this recipe has inspired you as much as it has enchanted me!
These Puff Pastry Easter Nests are not just desserts; they encapsulate moments of laughter and joy shared with family and friends during special occasions or simply as an afternoon treat. Imagine pulling these from the oven—the sweet scent enveloping your kitchen—as smiles break out all around! Their versatility means they can be dressed up for festive gatherings or enjoyed casually on a quiet evening while sipping tea. Each bite brings warmth and happiness that lingers long after!
For serving suggestions that will elevate your experience even further, imagine savoring one nest alongside a steaming cup of coffee or perhaps sharing bites with loved ones over brunch. And if you’re feeling adventurous, why not drizzle some extra melted chocolate over each nest or sprinkle crushed nuts for added texture? This recipe is wonderfully adaptable; try swapping out Nutella for other spreads like almond butter or fruit preserves—each variation adds its own unique twist that will delight your taste buds! So go ahead, dive into this culinary adventure; I can’t wait to hear how your creations turn out. Share your experiences with me; let’s connect over our love for baking!
Puff Pastry Easter Nests

Puff Pastry Easter Nests are a delightful treat that embodies the spirit of spring and festive gatherings! With their flaky pastry base, luscious Nutella filling, and colorful mini eggs on top, these nests are not only visually appealing but also incredibly easy to make. In under 30 minutes, you can whip up these sweet bites that will surely impress family and friends. Perfect as a centerpiece for your dessert table or as a fun baking project with kids, these nests allow for creativity in decoration and flavor. Whether enjoyed fresh from the oven or saved for later, they bring joy to any occasion.
- Prep Time: 15 minutes
- Cook Time: 12 minutes
- Total Time: 27 minutes
- Yield: Approximately 8 nests 1x
- Category: Dessert
- Method: Baking
- Cuisine: Spring/Sweet Treat
Ingredients
- 1 Puff Pastry Sheet
- 100 g Nutella (or chocolate spread)
- 1 Egg (for egg wash)
- 80 g Mini Eggs (chocolate candies)
- Optional: 12 tsp Chocolate Icing (or extra Nutella)
Instructions
- Preheat your oven to 200°C (gas mark 6) and line a baking tray with parchment paper.
- Unroll the puff pastry and spread Nutella over one half.
- Fold the pastry in half, seal the edges, and cut into strips.
- Twist each strip into spirals and place on the prepared tray.
- Brush with whisked egg for a golden finish.
- Bake for 10-12 minutes until golden brown.
- Cool slightly before decorating with additional Nutella or chocolate icing and topping with mini eggs.
Nutrition
- Serving Size: 1 nest (45g)
- Calories: 212
- Sugar: 10g
- Sodium: 115mg
- Fat: 13g
- Saturated Fat: 6g
- Unsaturated Fat: 7g
- Trans Fat: 0g
- Carbohydrates: 21g
- Fiber: 0g
- Protein: 3g
- Cholesterol: 19mg