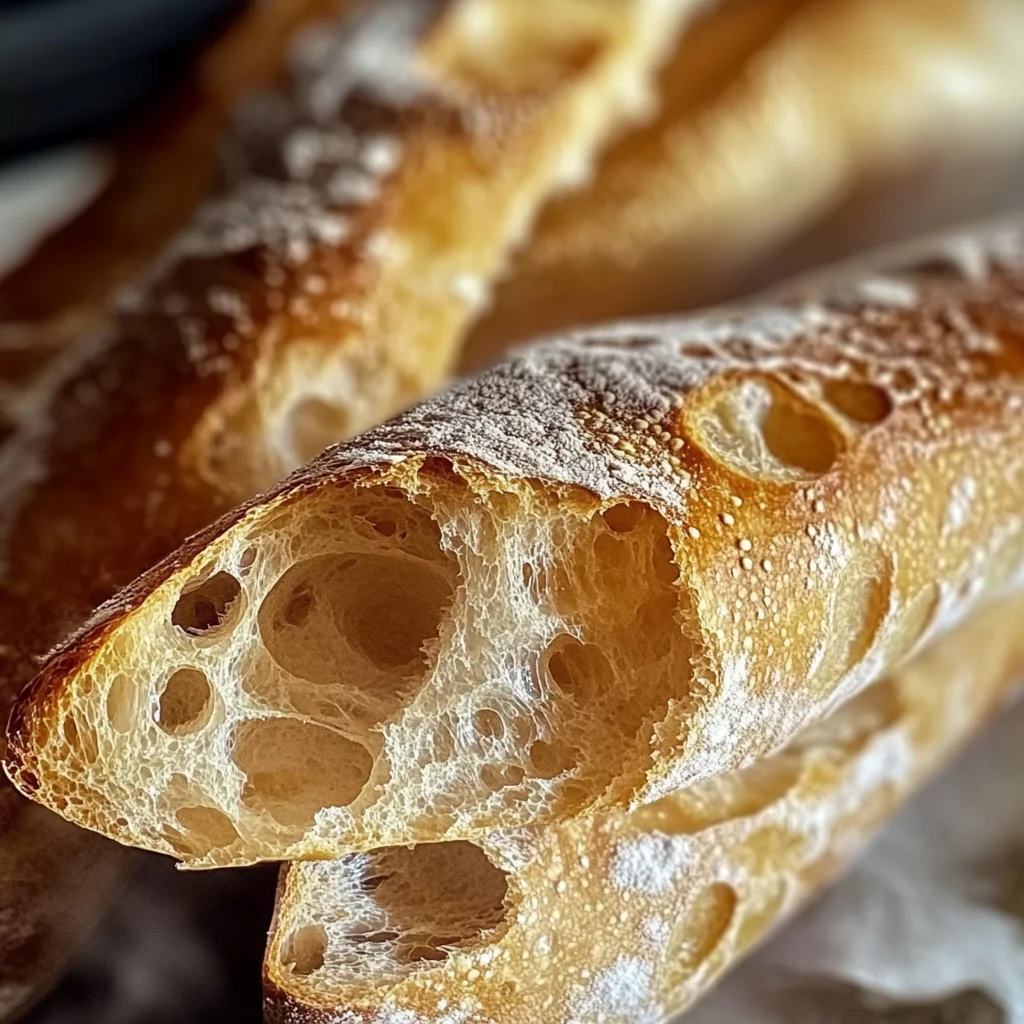
Crusty Mini Baguettes
There’s something utterly magical about the aroma of freshly baked bread wafting through your kitchen, isn’t there? The experience of crafting your own Crusty Mini Baguettes transcends mere cooking; it’s an enchanting ritual that connects us to our ancestors and the simple joys of life. When you knead that dough, you’re not just mixing ingredients; you’re creating a symphony of flavors and textures that will dance on your taste buds, filling your home with warmth and love. Imagine pulling those golden, crusty loaves from the oven, their exterior crackling as you tap them gently, revealing a soft interior that’s just waiting to be slathered with butter or dipped into a savory soup. This is more than food; it’s a heartfelt creation that invites shared laughter and cherished moments around the table.
What I love about these mini baguettes is how they balance tradition and innovation. They’re perfect for any occasion—be it a cozy family dinner or an elegant gathering with friends. Each bite offers a delightful crunch followed by a tender chew, making them an ideal companion for soups, salads, or simply enjoyed warm with a drizzle of olive oil. Plus, they allow for creativity in flavoring! You can sprinkle fresh herbs or even garlic powder into the dough to elevate them further. I promise you, once you’ve tasted these homemade delights, store-bought baguettes will never compare.
Crusty Mini Baguettes: A Warm Embrace of Flavor
Let’s embark on this delightful baking journey together! Even if you’re new to baking bread, I assure you that making Crusty Mini Baguettes is both rewarding and surprisingly straightforward. As we dive into this recipe, keep in mind that every step builds upon the last to create something truly extraordinary. So put on your apron, roll up those sleeves, and let’s get our hands into some dough!
Ingredients:
Every ingredient we use plays a pivotal role in crafting our beloved mini baguettes. Here’s what you’ll need:
- 2 1/4 cups all-purpose flour. This is the backbone of our baguettes! All-purpose flour strikes a perfect balance between structure and tenderness. If you want to take it up a notch for an extra chewy texture—ideal for those who love authentic French bread—consider using bread flour instead. Just remember that different flours absorb water differently; so if you switch flours, keep an eye on your dough’s consistency as you mix.
- 1 teaspoon salt. Salt isn’t just for seasoning; it strengthens gluten structure and enhances flavor, making each bite profoundly satisfying. It’s crucial to evenly distribute the salt throughout the flour before adding any liquid since direct contact with yeast can inhibit its growth if added late in the process.
- 1 teaspoon sugar. Sugar serves as food for our yeast and helps it activate during fermentation. It also contributes to browning the crust when baking—because who doesn’t love that glorious golden color? Too much sugar can lead to overly sweet bread though; we’re just looking for enough to assist with yeast activation.
- 1 packet active dry yeast (2 1/4 teaspoons). Yeast is our magical leavening agent! It transforms our dough from flat to fluffy by producing carbon dioxide during fermentation. Make sure your water is at about 110°F (43°C) when adding it; too hot will kill the yeast, while too cold won’t activate it properly.
- 3/4 cup warm water (about 110°F/43°C). Water is crucial for hydrating our flour and activating the yeast. Always check your water temperature before adding it! If you have a thermometer handy—it’s absolutely paramount—but if not, it should feel warm but not scalding when you dip your finger in.
- 1 tablespoon olive oil. Olive oil enriches our dough with flavor and adds tenderness to crumb structure. If you’re looking for a richer taste, feel free to replace it with melted butter—that will give your baguettes an utterly intoxicating richness that’s hard to resist!
- 1 egg (optional, for egg wash). An egg wash gives our mini baguettes that beautiful glossy finish after baking—an optional step but one that adds both beauty and flavor! However, if you’re keeping things egg-free or vegan-friendly, brushing them with milk or melted coconut oil works just as beautifully.
Now that we have gathered all these wonderful ingredients together let’s appreciate how they transform into something truly special!
Equipment You’ll Need:
Having the right tools makes all the difference in creating these delightful Crusty Mini Baguettes! While they may not be “ingredients,” they are essential partners in this culinary adventure.
- Mixing bowl – A large mixing bowl provides ample space for combining ingredients and kneading dough without making a mess everywhere else! Opt for glass or stainless steel—both are durable and easy to clean.
- Measuring cups and spoons – Precision matters in baking; having accurate measuring tools ensures consistent results every time! Invest in good-quality metal or glass sets—they’re sturdy and will last through many baking projects.
- Dough scraper – This handy tool helps you efficiently handle sticky dough without too much fuss! It’s perfect for scraping down bowls or cutting pieces of dough without losing precious bits.
- Baking sheet – A sturdy baking sheet allows even heat distribution while ensuring our baguettes bake perfectly golden brown without burning on the bottom.
- Parchment paper – Lining your baking sheet with parchment paper prevents sticking and makes cleanup so much easier! It’s like giving yourself permission to focus solely on enjoying the fruits of your labor rather than worrying about scrubbing burnt bits off pans later.
Now that we have everything assembled—from ingredients to equipment—we’re ready to dive into preparing these delicious mini baguettes!
Preparing the Crusty Mini Baguettes
Step 1: Activate Your Yeast
To kick things off beautifully, start by combining your warm water with sugar in a mixing bowl before gently sprinkling in the active dry yeast. Stir lightly until dissolved then let this mixture sit undisturbed for about 5 minutes until foamy bubbles form on top—a sure sign that our yeast is alive and eager to do its job! This process allows us to bloom our yeast—making sure it’s awake before we add it into our flour mixture—and trust me when I say this step is critical because if your yeast doesn’t activate properly…the whole batch could flop!
Step 2: Combine Dry Ingredients
While waiting anxiously (because who doesn’t love those first signs of life from yeast?), grab another mixing bowl where you will combine your all-purpose flour (or bread flour if you’ve opted), along with salt. Whisking them together evenly ensures every bit of flour gets seasoned nicely because nobody wants bland bread! Creating this uniform base sets us up well for success later on when we combine wet ingredients—the goal here is consistent flavor throughout each delightful bite!
Step 3: Form Your Dough
Once you’ve witnessed that foamy miracle from earlier (isn’t it thrilling?), pour this bubbly yeast mixture into your bowl containing dry ingredients alongside olive oil too. Using a wooden spoon or spatula—gently stir everything together until combined before switching gears into hand-kneading territory by bringing it all together into one cohesive ball of dough right within the bowl itself (don’t worry about being too tidy!). Knead lightly against sides when necessary but try not overwork—you want elasticity without becoming tough here—this usually takes around 5–7 minutes total so keep checking back intermittently!
Step 4: First Rise
After shaping everything nicely into one big ball (it should feel smooth under fingers!), place this beautiful mass back inside its mixing bowl which has been lightly greased beforehand (to prevent sticking). Cover snugly using plastic wrap or damp towel then set aside somewhere warm yet draft-free like near an oven preheating at low temp while still turning off heat once warmed up slightly: allow approximately 60–90 minutes rise time depending upon conditions present around home today—just wait patiently until roughly doubled size achieved—that moment brings such joy knowing progress towards deliciousness occurring right under nose!
With these initial steps completed successfully—you’re already well on track toward creating scrumptious Crusty Mini Baguettes destined for greatness! Stay tuned as we continue exploring more detailed instructions soon…
Step 5: Kneading the Dough to Perfection
Now that your yeast is bubbling with excitement—it’s like a tiny party in your bowl—let’s dive into kneading our dough. This step is crucial because kneading develops gluten, the protein that gives bread its structure and chewiness. You’ll want to transfer your shaggy mixture onto a clean, lightly floured surface and begin the beautiful art of kneading. With your palms, push the dough away from you, then fold it back over itself – it’s like giving the dough a loving hug! Repeat this action for about 8-10 minutes, or until the dough feels smooth and elastic, almost like a soft pillow.
As you knead, keep an eye out for texture changes; the dough will transition from sticky to silky as you work it. Trust me on this: if it feels too sticky, sprinkle just a bit more flour (but don’t overdo it!). What you’re looking for is that perfect balance where the dough springs back when you poke it gently with a finger. This step not only strengthens the gluten network but also helps incorporate air bubbles into the dough, which will create those delightful pockets when baked. It’s a wonderful sensory experience—you’ll feel the warmth of the dough under your hands and smell that enchanting aroma of yeast coming to life.
Step 6: The First Rise – Letting Magic Happen
Once you’ve kneaded your dough to perfection, it’s time for its first rise—a period I affectionately call the waiting game. Place your beautifully shaped ball of dough into a lightly oiled bowl and cover it with a damp kitchen towel or plastic wrap. This step is non-negotiable; we need to create a warm environment for our yeast to work its magic. Ideally, let it rise in a warm spot for about 1 to 1.5 hours or until it has doubled in size.
Why is this waiting period so vital? Well, during this time, fermentation occurs; the yeast consumes sugar and produces carbon dioxide gas and alcohol (which evaporates during baking). This process not only makes our dough rise but also develops flavor complexity—think of that subtle tang that elevates homemade bread above anything store-bought! So resist any urge to rush through this step; patience here rewards you with flavor and texture that’s profoundly satisfying. When it’s time, gently press down on the risen dough with your knuckles—it should deflate slightly like a happy sigh!
Step 7: Shaping Your Baguettes
Now comes one of my favorite parts: shaping those little beauties into mini baguettes! After letting your dough rise, turn it out onto a lightly floured surface once more and gently flatten it into a rectangle without squishing out all that glorious air we just created. Divide this lovely mass into six equal pieces—about 4 ounces each will do nicely—and shape them into logs approximately 10-12 inches long. It’s important to work carefully here; you want those air pockets intact because they’ll help us achieve that crusty exterior and tender interior we crave.
As you roll each piece, make sure you’re tucking in the edges and pinching them closed at both ends—this ensures our baguettes hold their shape while they bake. What makes these so special is not just their form but also how they feel in your hands; rolling them should be therapeutic! Once shaped, place them on a parchment-lined baking sheet—give them enough space apart so they can expand further during their second rise. Cover again with a towel or plastic wrap for about 30-45 minutes while they rest and puff up delightfully. This final touch is essential—it allows for further fermentation and results in an airy crumb structure once baked.
Step 8: The Second Rise – Building Anticipation
With our mini baguettes shaped and resting, we now enter what I call “the delicious anticipation phase.” While these beauties are rising again for about 30-45 minutes, preheat your oven to a steamy 425°F (220°C). Why steam? Great question! Creating steam in those first few minutes of baking helps develop that heavenly crust we all adore by keeping moisture around the loaves as they cook. For now though, breathe deeply and admire your handiwork—this is where all that love transforms into something extraordinary.
When you return to check on them after their second rise, look for puffy little logs that have grown significantly—this visual cue says we’re ready to bake! You might even notice some delightful cracks forming along their tops; this is completely normal and adds character to our crusty mini baguettes! For an added touch before baking, if you’d like an egg wash for shine (or plant-based milk/melted coconut oil if you’re skipping eggs), brush the tops gently using a pastry brush—it gives them such an inviting golden hue.
Conclusion:
As we wrap up this wonderful journey of crafting Crusty Mini Baguettes together, I hope you’re feeling as excited as I am! Baking these little gems is not just about following steps; it’s about connecting with the art of bread-making—a practice steeped in history and warmth that fills our homes with the most inviting aromas. The combination of simple ingredients transforms into something truly extraordinary: a symphony of flavors and textures where each bite delivers both comfort and joy. I promise you; there’s something profoundly satisfying about pulling these beautiful baguettes from the oven, their golden crust crackling under your fingertips.
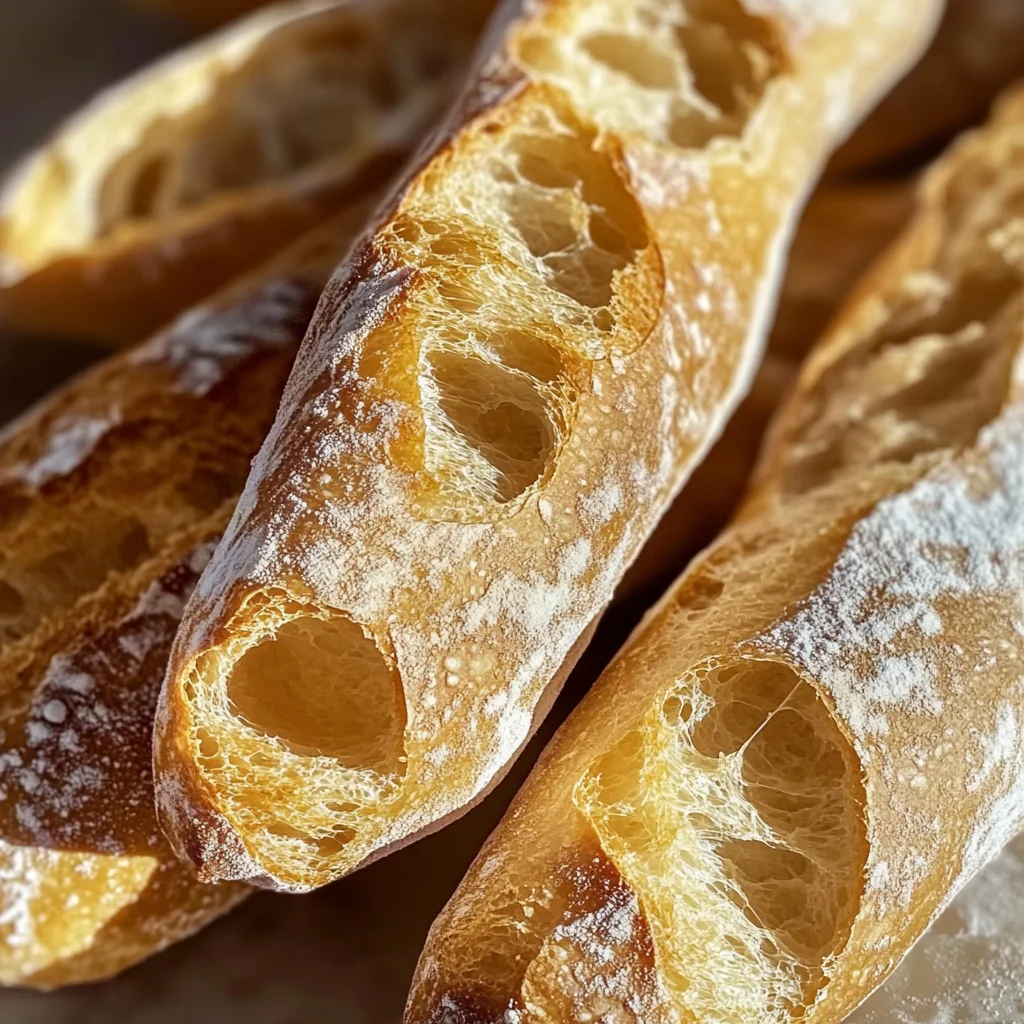
This recipe is genuinely a must-try—not only because they taste amazing but also due to the sheer joy of making them from scratch! Imagine gathering friends around your table as you pull those warm baguettes from the oven and place them on a rustic wooden board, still steaming. The aroma wafting through the air creates an atmosphere filled with anticipation—everyone eagerly waiting for their chance to tear off a piece and slather it with butter or dip it into rich olive oil infused with herbs. It’s perfect for family dinners, casual gatherings, or even quiet afternoons where you just need something comforting.
For serving suggestions, envision enjoying one of these mini baguettes alongside a creamy soup—like a velvety tomato basil or hearty minestrone—and feeling how each dip transforms every morsel into pure bliss. Or perhaps slice one open to make an elegant sandwich filled with roasted vegetables and hummus for lunch? And if you’re looking for something sweeter, imagine pairing them with fresh strawberries and whipped coconut cream for an afternoon pick-me-up—it’s all about creativity!
Feeling adventurous? This recipe is wonderfully adaptable! You might want to experiment by adding herbs like rosemary or thyme into your dough before shaping—what an aromatic twist that would be! Alternatively, try incorporating sun-dried tomatoes or olives into the mix for bursts of flavor throughout each bite. You could even sprinkle some grated cheese on top before baking if you’re feeling indulgent; trust me when I say it elevates these little beauties beyond ordinary bread! So go ahead: roll up your sleeves and dive into this delicious adventure! I can’t wait to hear all about your experiences—share photos or stories with me so we can celebrate our love for baking together!
Crusty Mini Baguettes

Dive into the delightful world of homemade baking with these Crusty Mini Baguettes. This easy-to-follow recipe transforms simple ingredients into golden, crusty loaves that evoke the warm, inviting atmosphere of a traditional bakery right in your kitchen. With a satisfying crunch on the outside and a soft, airy interior, these mini baguettes are perfect for any occasion—be it family dinners, elegant gatherings, or cozy evenings at home. Enjoy them fresh from the oven with butter, dip them into your favorite soup, or craft gourmet sandwiches filled with flavor. Once you taste these homemade treasures, store-bought bread will never be the same!
- Prep Time: 20 minutes
- Cook Time: 20 minutes
- Total Time: 40 minutes
- Yield: Makes approximately six mini baguettes 1x
- Category: Baking
- Method: Baking
- Cuisine: French
Ingredients
- 2 1/4 cups all-purpose flour (or bread flour)
- 1 teaspoon salt
- 1 teaspoon sugar
- 1 packet active dry yeast (2 1/4 teaspoons)
- 3/4 cup warm water (about 110°F)
- 1 tablespoon olive oil
- Optional: 1 egg (for egg wash)
Instructions
- Activate the yeast by combining warm water and sugar in a mixing bowl; sprinkle in yeast and let sit until foamy (about 5 minutes).
- In another bowl, whisk together flour and salt. Combine with the yeast mixture and olive oil until a dough forms.
- Knead the dough on a floured surface for about 8-10 minutes until smooth and elastic.
- Place the dough in a greased bowl; cover and let rise in a warm spot until doubled in size (60–90 minutes).
- Gently deflate the dough and divide it into six equal pieces; shape each piece into logs.
- Place shaped baguettes on a lined baking sheet; cover and let rise for another 30-45 minutes.
- Preheat your oven to 425°F. Brush tops with an egg wash if desired.
- Bake for 18-20 minutes until golden brown and hollow-sounding when tapped.
Nutrition
- Serving Size: 1 mini baguette (70g)
- Calories: 190
- Sugar: 0g
- Sodium: 350mg
- Fat: 3g
- Saturated Fat: 0g
- Unsaturated Fat: 2g
- Trans Fat: 0g
- Carbohydrates: 34g
- Fiber: 1g
- Protein: 6g
- Cholesterol: 0mg