Ultra Thick Bakery Style Chocolate Chip Cookies – Crispy Edges, Gooey Centers, and Loaded with Chocolate!
There’s something undeniably magical about baking cookies, isn’t there? It’s like a warm embrace that wraps you in nostalgia while creating something utterly divine to share with others—or maybe just to savor all by yourself. Today, I’m beyond excited to share with you my recipe for Ultra Thick Bakery Style Chocolate Chip Cookies – Crispy Edges, Gooey Centers, and Loaded with Chocolate! This isn’t just any cookie recipe; it’s a heartfelt journey into the realm of baking where each bite is a symphony of flavors, reminding us of the joy found in the simplest pleasures.
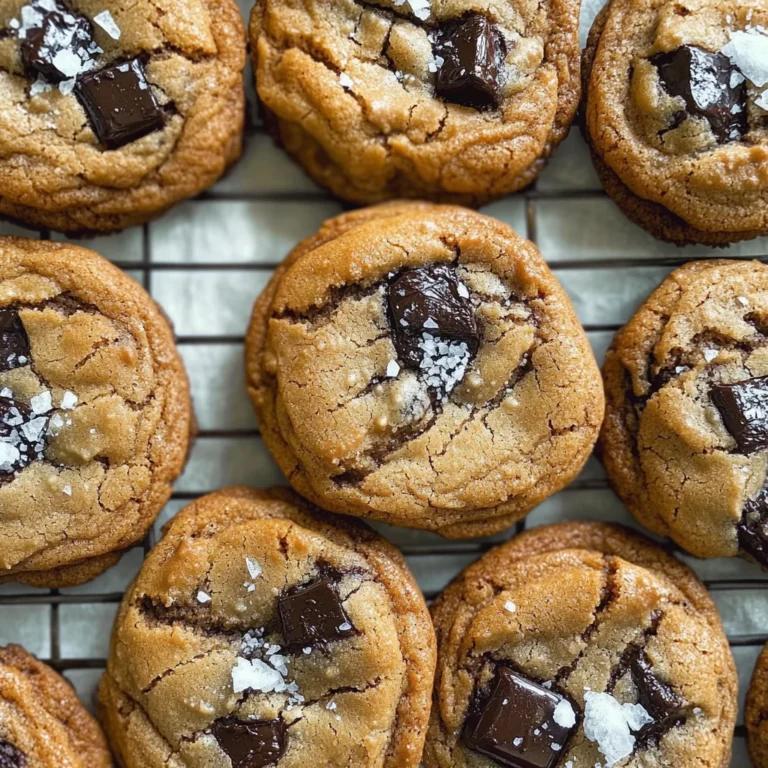
Imagine pulling a tray of these thick, golden-brown cookies from the oven, their edges perfectly crisp while the centers remain delightfully gooey. The air is filled with the intoxicating aroma of melted chocolate mingling with buttery goodness—it’s enough to make your heart race! Every time I bake these cookies, I’m reminded of cozy afternoons spent in the kitchen with my family, each moment steeped in laughter and love. They don’t just satisfy a sweet tooth; they create memories that linger long after the last crumb has been devoured. So let’s dive in together and embark on this delicious adventure!

Ultra Thick Bakery Style Chocolate Chip Cookies – Crispy Edges, Gooey Centers, and Loaded with Chocolate!: A Sweet Journey Awaits
These cookies are truly something special. They embody everything we crave from a good chocolate chip cookie: height, chewiness, and an abundance of gooey chocolate chips that seem to melt into each bite. With this recipe, you’re not just baking; you’re crafting little masterpieces that rival those coveted treats found behind glass cases at your favorite bakery. Trust me when I say once you make these Ultra Thick Bakery Style Chocolate Chip Cookies at home, you’ll never settle for anything less!
Ingredients:
Before we start mixing and measuring, let’s gather our ingredients together—think of it as assembling our cookie dream team! Each component plays a vital role in achieving that perfect texture and flavor we’re aiming for.
- 2 large eggs: Eggs are more than just binding agents here; they contribute moisture and richness to our dough. They also help achieve that lovely rise we’re looking for in our cookies. When you crack them open, make sure they’re at room temperature; this allows them to blend better into the batter and ensures an even distribution throughout.
- 2½ cups all-purpose flour: This is your structural foundation! Flour provides stability for our cookies while contributing to their chewy texture. For optimal results, I recommend using a spoon to lightly aerate your flour before scooping it into your measuring cup. This prevents packing too much flour into your measurement—a common mistake that can lead to dry cookies.
- 1 teaspoon baking soda: Ah, the magic leavening agent! Baking soda acts as a catalyst for spreading and rising during baking. It reacts with the acidity in our brown sugar (which we’ll get to shortly) to produce carbon dioxide bubbles—resulting in those beautifully thick cookies we adore.
- ½ teaspoon salt (or sea salt): Salt is absolutely paramount here—not only does it enhance flavors but it also balances out the sweetness of chocolate chips and sugars. If you’re using flaky sea salt for topping later on, opt for a finer grain here so it dissolves seamlessly into the dough.
- 1 cup granulated sugar: This sugar is essential for sweetness but also contributes to texture; it helps create those crisp edges we all crave. When selecting granulated sugar, aim for high-quality brands—it truly makes a difference when it comes to flavor.
- ½ cup packed light brown sugar: Brown sugar adds moisture thanks to its molasses content while infusing depth of flavor with subtle caramel notes. Be sure to pack it tightly into your measuring cup so you get every last bit of that sticky goodness!
- 1 teaspoon vanilla extract: Vanilla is like a warm hug in cookie form—it enhances every other flavor without being overpowering. Always choose pure vanilla extract over imitation if possible; it elevates your cookies from ordinary to extraordinary.
- 3 cups chocolate chips (mix of semisweet and dark): Here’s where we really kick things up a notch! Using both semisweet and dark chocolate creates layers of richness that make each bite sing with chocolatey joy. I recommend using high-quality chocolate chips since they melt beautifully and provide those delightful pools of chocolate throughout the cookie.
- 14 tablespoons unsalted butter (melted and slightly cooled): Butter is non-negotiable when it comes to achieving that rich flavor profile we desire! Melting it beforehand helps integrate it smoothly into our dough while promoting that chewy texture we’re after; just be sure it’s not hot—let it cool slightly so you don’t scramble those precious eggs when mixing!
- Optional for topping: Extra chocolate chips and flaky sea salt: These are finishing touches that elevate your cookies from homemade to bakery-level appeal! A sprinkle of flaky sea salt on top enhances sweetness while providing a delightful contrast in flavor.
Equipment You’ll Need:
Now that we’ve gathered our ingredients like old friends reuniting for an exciting adventure, let’s talk about the tools that will help us bring these beautiful cookies to life! Having the right equipment makes all the difference; think of them as essential partners supporting us on this journey.
- Mixing bowls: A sturdy set of mixing bowls is crucial for combining ingredients without making a mess. Look for ones made from glass or stainless steel—they’re easy to clean and won’t retain odors or stains from previous recipes.
- Electric mixer (stand or hand): While you can mix by hand if you’re feeling particularly adventurous (and are up for some arm workouts!), an electric mixer saves time and ensures everything gets blended evenly—especially important when creaming butter and sugars together!
- Measuring cups and spoons: Precision is key in baking! Invest in reliable measuring cups and spoons so you can accurately measure dry ingredients as well as liquids without second guessing yourself.
- Baking sheets: Choose heavy-duty baking sheets lined with parchment paper or silicone mats—they help prevent sticking while ensuring even baking across all your cookies.
- Cooling racks: After pulling your warm cookies from the oven, transferring them onto cooling racks allows air circulation around them so they maintain their signature texture instead of becoming soggy on one side.

Preparing the Ultra Thick Bakery Style Chocolate Chip Cookies – Crispy Edges, Gooey Centers, and Loaded with Chocolate!
Step 1: Creaming Butter & Sugars Together
To kick off our cookie-making process, let’s start by creaming together our melted butter along with both granulated sugar and packed brown sugar until they’re light and fluffy—a process known as creaming (fittingly!). This step is crucial because it incorporates air into the mixture which contributes directly to how fluffy our cookies become once baked. Begin by adding your melted butter into spacious mixing bowl followed by both sugars—grab your electric mixer now! Start on low speed then gradually increase until everything becomes smooth; keep beating until pale golden flecks start appearing throughout (around 2-3 minutes). Don’t rush this step—patience pays off here!
Step 2: Incorporating Eggs & Vanilla
Next up are our lovely eggs along with vanilla extract—the duo that binds everything together beautifully! Add both eggs one at a time while mixing gently between additions; this allows each egg’s protein structure time to interact properly within dough before moving onto next addition (this matters!). Once incorporated fully followed by pouring in vanilla extract—mix again until combined thoroughly so no streaks remain visible! The aroma wafting through your kitchen will have you counting down minutes until first batch bakes up perfectly golden!
Step 3: Combining Dry Ingredients
Time now for some science-y magic—it’s dry ingredient time! In another bowl combine all-purpose flour along with baking soda plus salt then whisk gently until well mixed together (this ensures even distribution). Gradually add flour mixture into wet batter bowl using spatula instead of mixer—it prevents overworking gluten strands forming tough cookie texture later on during baking process which nobody wants! Mix carefully until just combined; resist urge not over-mixing too much because lumps are totally okay at this stage!
Step 4: Folding In Those Heavenly Chocolate Chips
Here comes my favorite part—the grand finale where we fold in those delectable chocolate chips! Gently use spatula again folding chopped bittersweet morsels throughout batter ensuring they’re evenly distributed without breaking apart too much (we want big glorious chunks!). Take note—if dough feels too soft or sticky at this point don’t fret just yet—we’ll chill soon which will help firm up consistency before spooning onto sheet pans ready for oven action ahead!
This journey has only begun but trust me when I say these steps lay groundwork necessary bringing forth ultimate indulgent experience promised through each bite taken… Stay tuned because there’s more cookie magic waiting around next corner!
Step 5: The Art of Mixing – Creating Cookie Perfection
Now it’s time to bring all those luscious ingredients together in a beautiful dance of flavors. In a large mixing bowl, combine your granulated sugar, light brown sugar, and melted butter. I can almost hear the gentle whir of the mixer as you blend these together—this step is crucial because the sugars need to dissolve fully into the butter, creating that delightful caramel-like flavor that makes each cookie utterly intoxicating. Using an electric mixer on medium speed, mix for about 2-3 minutes until you achieve a pale, creamy consistency. The mixture should feel light and airy; trust me on this! This incorporation traps tiny air pockets in the batter, which will help your cookies rise beautifully.
Next, add in your eggs one at a time, letting them mix in completely before adding the second. This method ensures that each egg is evenly distributed throughout the batter, which is essential for achieving that perfect chewy texture we’re after. Don’t forget to add the vanilla extract here as well; this little splash of flavor is what makes your cookies sing with warmth and nostalgia. Mix everything together until just combined—overmixing at this stage can lead to tougher cookies, and we want soft, luscious bites filled with gooey chocolate goodness!
Step 6: The Dry Ingredients – Building Structure and Flavor
Now we shift our focus to the dry ingredients. In a separate bowl, whisk together your all-purpose flour, baking soda, and salt until thoroughly combined. This step might seem simple, but it plays an absolutely paramount role in ensuring our cookies maintain their thick shape while also rising perfectly in the oven. Baking soda acts as a leavening agent—when it interacts with moisture and heat during baking, it produces carbon dioxide bubbles that help our cookies puff up beautifully. The salt not only enhances flavor but also balances out the sweetness from our sugars.
Once your dry ingredients are ready, it’s time to gradually incorporate them into your wet mixture. I recommend using a spatula or wooden spoon for this part to gently fold in the flour mixture; this helps prevent overmixing while ensuring everything is well incorporated. You’ll want to mix just until you see no more streaks of flour—if you start seeing gluten development (which you can spot by a stretchy dough), you might end up with tough cookies instead of those gloriously thick ones we’re dreaming of! At this stage, allow yourself to savor that sweet anticipation as you prepare for the pièce de résistance—the chocolate chips!
Step 7: Chocolate Chips Galore – The Decadent Moment
Ahh… now comes one of my favorite parts—the chocolate chips! Gently fold in those glorious morsels of semisweet and dark chocolate into your dough. I always say that more is more when it comes to chocolate chips; I mean who can resist those gooey pockets melting into warm cookie dough? Aim for about three cups here; don’t skimp out! As you fold them in with care, imagine how they will transform into molten rivers when baked—a truly extraordinary experience.
This step isn’t just about adding chocolate; it’s about ensuring every bite has that decadent richness that makes these Ultra Thick Bakery Style Chocolate Chip Cookies so special. Take a moment to appreciate how thick and luxurious your dough has become—it should be slightly sticky yet manageable enough to scoop out without leaving too much residue on your hands. This texture is essential because it means you’re on track for cookies that will hold their shape while still being utterly gooey on the inside.
Step 8: The Chilling Phase – Patience Pays Off
Now comes a non-negotiable step: chilling your cookie dough! Trust me when I say this part is crucial for achieving those bakery-style textures we’re aiming for. Transfer your beautifully mixed dough into an airtight container or wrap it tightly with plastic wrap. Place it in the refrigerator for at least 30 minutes—though if you have more time (say overnight!), go ahead and let it chill longer! Chilling allows the fats in your butter to solidify again after melting; this means when they bake, they won’t spread too much but instead keep their delightful thickness.
Why chill? Well, beyond preventing spreading, this resting period helps deepen flavors as they meld together beautifully—think of it like letting a fine wine breathe before serving! You may notice that after chilling, your dough becomes firmer and easier to scoop out into cookie balls. If you’re short on time and feel tempted to skip this phase… please don’t! You’d miss out on those perfectly crispy edges contrasted with moist centers which are what we’re ultimately striving for.
Baking Your Perfect Ultra Thick Bakery Style Chocolate Chip Cookies – Crispy Edges, Gooey Centers, and Loaded with Chocolate!
Step 9: Scooping & Shaping – Forming Cookie Dreams
With your chilled dough ready for action, let’s move on to shaping these beauties! Preheat your oven to 350°F (about 175°C), ensuring it’s hot enough to create those golden edges we adore so much. While it’s heating up, line two baking sheets with parchment paper or silicone mats—this step prevents sticking and creates even browning underneath each cookie.
Using a large cookie scoop or two spoons (about three tablespoons worth), portion out mounds of dough onto the prepared baking sheets. Leave plenty of space between each mound—at least two inches apart—as they will spread ever so slightly during baking while keeping their thick profile intact. If you want them extra bakery-style fabulous (and who doesn’t?), gently press down on each mound just slightly before popping them into the oven; this helps initiate some spreading but keeps their height intact.
Step 10: The Baking Process – Watching Magic Happen
Bake these delicious mounds of joy in your preheated oven for about 12-15 minutes or until they turn a lovely golden brown around the edges but remain soft in the center—remember: underbaking here is key as they’ll continue cooking once removed from the oven due to residual heat! As they bake, take a moment to breathe in that intoxicating aroma wafting through your kitchen; trust me when I say there’s nothing quite like it.
Don’t rush this step—use those minutes wisely by preparing any toppings if desired! I love sprinkling some flaky sea salt over each cookie right when they come out of the oven; this little touch elevates them from ordinary treats into something downright extraordinary by enhancing sweetness and adding depth.
Step 11: Cooling & Enjoying – The Sweet Reward
Once baked to perfection (you’ll know because they’ll have slight cracks on top but look soft overall), remove them from the oven and allow them to cool on the baking sheets for about 5 minutes before transferring them onto wire racks. This cooling period allows them to set properly while still maintaining those gooey centers we’ve been dreaming about since we began!
As you watch them cool down—a joyful sight indeed—you’ll find yourself counting down until they’re ready for devouring! I encourage you not to skip straight ahead though; these cookies are best enjoyed warm when chocolate chips are still melty… pure bliss! And remember: sharing is caring… unless it’s these cookies—you might want to keep some for yourself!
Now gather friends or family around (or simply indulge solo) and take that first bite—it’s nothing short of magic! These Ultra Thick Bakery Style Chocolate Chip Cookies are not just treats; they’re moments worth cherishing—a symphony of flavors where every chewy bite sings joyously with rich chocolatey goodness wrapped within crispy edges.
And there you have it—the ultimate recipe guide crafted from heartwarming memories and cherished traditions sure to elevate any gathering or quiet night at home. Happy baking!
Storage and Enjoyment Tips for Your Ultra Thick Bakery Style Chocolate Chip Cookies – Crispy Edges, Gooey Centers, and Loaded with Chocolate!
Now that your kitchen is filled with the heavenly aroma of freshly baked Ultra Thick Bakery Style Chocolate Chip Cookies, it’s time to think about how to keep that magic alive! Trust me when I say nothing compares to the feeling of biting into a warm cookie right out of the oven, but sometimes life calls for a little planning ahead. So, whether you’re enjoying them straight away or saving some for later, I’ve got you covered on all things storage-related.
Storing Leftover Ultra Thick Bakery Style Chocolate Chip Cookies – Crispy Edges, Gooey Centers, and Loaded with Chocolate!
To preserve these glorious cookies in their prime condition, place them in an airtight container at room temperature. This will protect them from becoming too hard or losing their delectable gooeyness. Ideally, they’ll stay fresh for about five days—if they last that long! To keep them even softer, you can place a slice of bread in the container; this old trick works wonders by adding just the right amount of moisture. When you take a bite after a day or two, you’ll still experience that delightful contrast of crispy edges and gooey centers—it’s like tasting a little piece of joy each time. If you want to enjoy them warm again, simply pop them in the microwave for about 10-15 seconds; it’s as if they were just made!
Freezing Ultra Thick Bakery Style Chocolate Chip Cookies – Crispy Edges, Gooey Centers, and Loaded with Chocolate!
If you’re looking to save some for those days when you’re craving something sweet (and let’s be honest, who isn’t?), freezing these cookies is an absolute game changer! To freeze properly, allow them to cool completely before laying them flat in a single layer on a baking sheet. Once frozen solid—about an hour—you can transfer them to a freezer-safe bag or container. This way, they’ll keep well for up to three months without losing any of their scrumptious charm. When you’re ready for a treat, there’s no need to thaw; just bake them directly from frozen at 350°F (175°C) for about 12-15 minutes. The convenience factor here is incredible! You can have fresh-baked cookies ready anytime you desire—now that’s what I call sweet spontaneity.
Ultra Thick Bakery Style Chocolate Chip Cookies – Crispy Edges, Gooey Centers, and Loaded with Chocolate!
There’s a certain joy that comes from baking cookies, and our Ultra Thick Bakery Style Chocolate Chip Cookies encapsulate that magic perfectly. Imagine pulling a tray of these delicious cookies from the oven, with crispy edges and gooey centers bursting with rich chocolate. This cookie recipe isn’t just about satisfying your sweet tooth; it’s about creating cherished memories, whether you share them with loved ones or savor them all on your own. The blend of flavors and textures in each bite transports you to a cozy bakery, making these cookies a must-try for any home baker eager for homemade indulgence.
- Prep Time: 20 minutes
- Cook Time: 15 minutes
- Total Time: 35 minutes
- Yield: Approximately 24 servings 1x
- Category: Dessert
- Method: Baking
- Cuisine: American
Ingredients
- 2 large eggs
- 2½ cups all-purpose flour
- 1 teaspoon baking soda
- ½ teaspoon salt
- 1 cup granulated sugar
- ½ cup packed light brown sugar
- 1 teaspoon vanilla extract
- 3 cups chocolate chips (semisweet and dark)
- 14 tablespoons unsalted butter (melted and slightly cooled)
Instructions
- Preheat your oven to 350°F (175°C). Line two baking sheets with parchment paper.
- In a mixing bowl, cream together melted butter, granulated sugar, and brown sugar until light and fluffy.
- Add eggs one at a time and mix until fully incorporated. Stir in vanilla extract.
- In a separate bowl, whisk together flour, baking soda, and salt. Gradually fold this mixture into the wet ingredients until just combined.
- Gently fold in the chocolate chips until evenly distributed.
- Chill the dough in the refrigerator for at least 30 minutes.
- Scoop mounds of dough onto prepared baking sheets, spacing them apart.
- Bake for 12–15 minutes or until golden brown around the edges but still soft in the center.
- Allow to cool on the baking sheets for five minutes before transferring to wire racks to cool completely.
Nutrition
- Serving Size: 1 cookie (40g)
- Calories: 200
- Sugar: 12g
- Sodium: 105mg
- Fat: 10g
- Saturated Fat: 6g
- Unsaturated Fat: 4g
- Trans Fat: 0g
- Carbohydrates: 26g
- Fiber: 1g
- Protein: 2g
- Cholesterol: 30mg