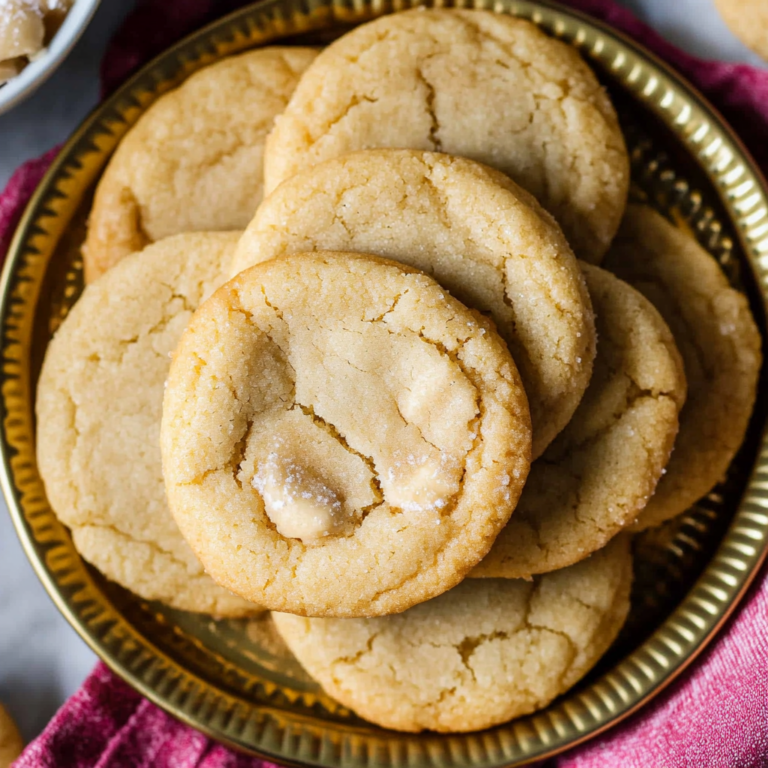
Maple Brown Sugar Cookies
There’s something profoundly comforting about the aroma of freshly baked cookies wafting through the house, don’t you think? It’s as if every warm note is a hug from the oven, wrapping you in a sweet embrace that whispers of home and hearth. When I think of my favorite cozy treats, these Maple Brown Sugar Cookies always come to mind. They embody so much more than just dessert; they are a celebration of simple pleasures, combining the rich, caramelly sweetness of brown sugar with the earthiness of pure maple syrup and a hint of cinnamon that dances on your palate. Each bite transports me to those crisp autumn afternoons where leaves crunch underfoot and laughter fills the air. Trust me when I say that these cookies are not only delicious; they’re an experience, a little piece of joy that you can share with friends and family or savor all on your own.
As we embark on this delightful culinary journey together, I want you to know that these cookies are perfect for any occasion—whether it’s a casual get-together or simply a quiet evening at home with a cup of tea. They have this magical ability to bring warmth into any space, reminding us that comfort can be found in the simplest things. The beauty of this recipe lies not only in how easy it is to make but also in how it highlights the natural flavors of its ingredients—each one plays an essential role in crafting these soft and chewy delights. Just imagine biting into one fresh out of the oven, still warm and gooey, with that silky maple glaze cascading over the top. It’s truly extraordinary!
Maple Brown Sugar Cookies: A Cozy Classic Reimagined
Now, let’s dive right into making these Maple Brown Sugar Cookies! They’re so simple yet incredibly satisfying—perfect for both novice bakers and seasoned pros alike. With a few pantry staples and some love, you’ll create something utterly intoxicating; I promise you won’t be able to eat just one!
Ingredients:
As we gather our ingredients for these delectable cookies, take a moment to appreciate each component’s role in creating something truly special. Each ingredient contributes not just flavor but texture and character, transforming simple dough into cookies that will fill your kitchen with warmth.
- 1 cup (2 sticks or 226g) unsalted butter, softened. This is crucial for creaming properly and creating that light, airy texture we’re aiming for in our Maple Brown Sugar Cookies. If your butter is too cold, it won’t cream effectively; if it’s melted, your cookies will spread too much during baking. Aim for butter that’s just soft enough to leave an imprint when pressed but still holds its shape—this balance is absolutely paramount! The quality of butter matters here; European-style butter with higher fat content will give you even richer results.
- 1 cup packed brown sugar. Brown sugar adds depth and richness to our cookies thanks to its molasses content. It not only sweetens but also gives moisture and chewiness to the final product. When measuring brown sugar, ensure you pack it firmly into your measuring cup; this helps incorporate more flavor into each cookie! You can also experiment with light vs. dark brown sugar depending on how deep you want those caramel notes to shine through.
- 1/4 cup pure maple syrup. Ah, liquid gold! Pure maple syrup brings an authentic sweetness that elevates these cookies beyond your average treat; it introduces subtle woodsy undertones that harmonize beautifully with the brown sugar. Opt for real maple syrup—it’s worth it! The imitation stuff just can’t hold a candle to its complex flavors.
- 1 large egg. Eggs play a critical role in binding our ingredients together while providing moisture and richness. Make sure your egg is at room temperature before adding it; this ensures better incorporation into the batter and contributes to a smoother cookie texture overall.
- 1 teaspoon vanilla extract. Vanilla enhances all those wonderful flavors we’ve got going on in our cookies—it’s like adding a secret weapon! Always choose real vanilla extract over imitation when possible; trust me on this—it makes a world of difference in terms of flavor depth.
- 2 1/2 cups all-purpose flour. Flour forms the structural backbone of our cookie dough, so using all-purpose flour strikes the perfect balance between tenderness and chewiness without being overly dense or crumbly. Be sure to measure accurately by spooning it gently into your measuring cup and leveling it off with a knife—the science behind baking often hinges on precise measurements!
- 1 teaspoon baking soda. This leavening agent is non-negotiable as it helps our cookies rise slightly while keeping them soft inside—think fluffy rather than cakey! Make sure it’s fresh; expired baking soda will leave you with flat cookies instead of delightful puffs.
- 1/2 teaspoon salt. Don’t skip this step! A pinch of salt enhances all those sweet flavors by balancing out the sweetness—it’s like magic! Salt wakes up each ingredient in your dough and makes everything taste better.
- 1/2 teaspoon ground cinnamon. Cinnamon adds warmth and spice that complements the maple syrup beautifully—it evokes memories of fall evenings by the fire wrapped up in cozy blankets sipping cider! Feel free to adjust based on personal preference; more spice means more warmth!
- 1 cup powdered sugar (for glazing). This sugary dust creates an irresistible glaze that’s easy to drizzle over our cooled cookies—a sweet finish that takes them from good to extraordinary!
- 2 tablespoons pure maple syrup (for glazing). Incorporating pure maple syrup into your glaze not only ties together our theme but also adds an extra layer of flavor while enhancing sweetness without being cloyingly sugary.
- 1-2 tablespoons milk (for consistency). Adding milk helps achieve just the right pourable consistency for your glaze—it should be thick enough to coat but thin enough to drizzle smoothly over your cookies.
- Optional: A sprinkle of cinnamon for garnish—a little finishing touch that not only looks beautiful but also adds another layer of aromatic appeal!
Equipment You’ll Need:
Before we get started mixing up this delightful dough, let’s talk about some essential equipment you’ll want at hand as we embark on this baking adventure together! Having the right tools makes everything smoother—and trust me when I say they’re essential partners in creating something wonderful.
- Mixing Bowls – A set of mixing bowls in various sizes allows you flexibility as you prepare different components like wet mixtures or dry ingredients separately before combining them later on—that way, everything blends seamlessly!
- Electric Mixer or Stand Mixer – This tool saves time (and energy!) while ensuring thorough mixing during creaming phases when blending butter with sugars—we want everything fluffy here for optimal cookie texture.
- Cookie Scoop or Tablespoon – Use either option generously when forming dough balls! A scoop ensures uniformity among cookie sizes so they bake evenly—a baker’s secret weapon!
- Parchment Paper or Silicone Baking Mats – These liners help prevent sticking while ensuring easy cleanup afterward—nobody likes scrubbing pans post-baking!
- Oven Mitts – Protect those precious hands from hot trays arriving outta-the-oven blissfully golden brown—but beware: they may tempt you into snacking prematurely!
Now that we’ve gathered our ingredients and tools like true culinary warriors ready for battle against blandness (or boredom!), let’s dive deeper into preparing these alluring Maple Brown Sugar Cookies together!
Step 1: Preparing Your Oven & Baking Sheets
First things first: preheat your oven to 350°F (175°C). This step creates an ideal environment for our cookies as they bake—they need consistent heat throughout their journey from doughy goodness toward golden perfection! While waiting patiently for those elements to settle down nicely together (around 10 minutes), line two baking sheets with parchment paper or silicone mats—this ensures nothing sticks during baking while providing ease during cleanup afterward.
Step 2: Creaming Butter & Sugars
In a large mixing bowl—or using your stand mixer if preferred—add your softened butter alongside packed brown sugar before turning on medium speed until lightened considerably (about 2–3 minutes). This process known as creaming incorporates air bubbles within fats which result in lighter textures once baked off later down the line—the resulting mixture should look fluffy rather than dense at completion! Next up? Add maple syrup followed by egg along with vanilla extract until everything melds beautifully together—keep mixing gently until uniformly smooth throughout; trust me—you’ll want every bite filled with joy!
Step 3: Mixing Dry Ingredients
Meanwhile—in another bowl—whisk together flour alongside baking soda plus salt plus ground cinnamon until fully combined before gradually introducing this dry blend into wet mixtures previously prepared above (don’t rush this step!). Mix slowly while remaining mindful not over-mixing here: gentle folding motions allow gluten development without toughening finished products—a perfect balance achieved leads us closer toward tender results we crave after all!
Step 4: Forming Cookie Dough Balls
Once everything comes together beautifully resembling cohesive dough consistency—time calls forth cookie scoops/tablespoons! Roll out portions roughly measuring around 1½ inches across placing them neatly spaced apart onto lined sheets leaving adequate room between each ball (roughly two inches apart recommended) allowing expansion room during baking processes ahead—we want lovely round shapes rather than blobs merging unceremoniously together mid-bake after all… then gently flatten down tops ever so slightly using palms against dough balls creating even surface area beforehand ensuring uniformity remains intact throughout cooking cycles thereafter too!
I hope you’re feeling excited about making these delicious Maple Brown Sugar Cookies because I certainly am! Stay tuned as we’ll continue exploring every delightful aspect from baking times through glazing techniques soon enough…
Step 5: Baking the Cookies to Perfection
Now comes one of the most exciting parts of the process—baking those beautifully crafted maple brown sugar cookies! With your oven preheated to a cozy 350°F (175°C), and your baking sheets lined with parchment paper or silicone mats, it’s time to showcase that dough you’ve lovingly prepared. Carefully place your cookie balls on the baking sheets, ensuring there’s about 2 inches of space between each one; this allows them to spread just perfectly without merging into one another. As you gently flatten each ball with your palm, you’re not only helping them achieve that ideal shape but also ensuring they bake evenly. Trust me, this simple act helps create a delightful texture that is both soft and chewy—a glorious combination that will make your taste buds sing!
Once they’re all set in their designated spots, slide the baking sheets into the oven and set a timer for 8-10 minutes. Keep an eye on those cookies, because watching them transform from dough to golden delights is truly magical. As they bake, the edges will start to turn a lovely golden brown while the centers will look slightly puffed up but still soft—a perfect sign they’re nearly ready! Remember, every oven is unique; you may need to adjust the time slightly based on how your oven behaves. The key here is to avoid overbaking—those few extra minutes can turn your tender cookies into something much less appealing. So, when you notice those edges are golden and the centers appear set but still soft, pull them out of the oven and allow them to cool on the sheets for a couple of minutes before transferring them to a wire rack. This cooling period is crucial as it allows them to firm up just enough for easy handling without losing that divine softness we crave.
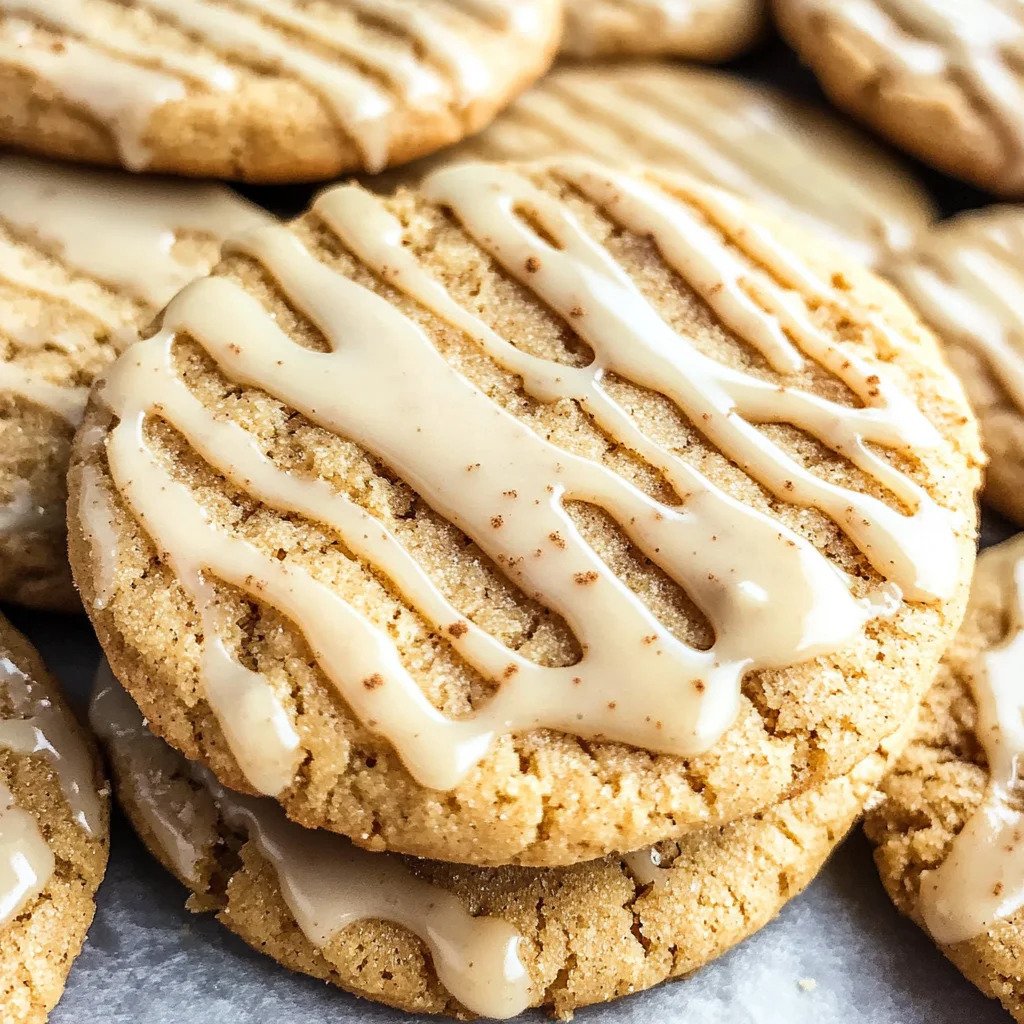
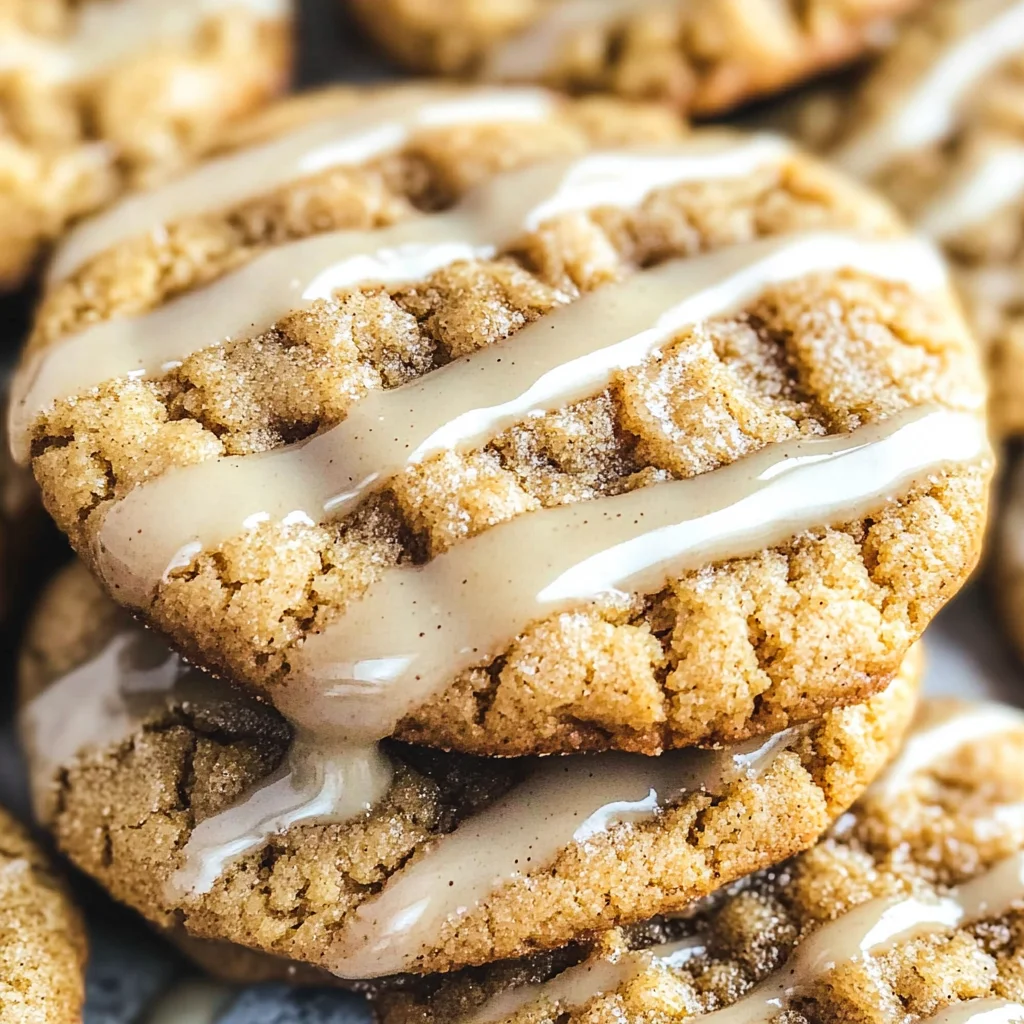
Step 6: Crafting the Irresistible Maple Glaze
While your cookies are cooling, let’s dive into creating that luscious maple glaze that will elevate these treats from delightful to utterly extraordinary! Start by gathering a small bowl and whisk together 1 cup of powdered sugar with 2 tablespoons of pure maple syrup. I can already hear you wondering why we’re using powdered sugar instead of granulated sugar—it’s all about texture! Powdered sugar dissolves seamlessly into a smooth glaze without any graininess, which ensures that each drizzle will be silky and luxurious. Now, add just enough milk—1 to 2 tablespoons—to achieve that perfect pourable consistency. You want it thick enough to stay put when drizzled but thin enough to glide gracefully over your cookies like liquid gold.
As you whisk away, take a moment to appreciate how simple ingredients can transform into something so decadent. This glaze not only adds sweetness but also enhances the maple flavor already present in those cookies. You’ll want it glossy and smooth, so if it feels too thick, don’t hesitate to add a little more milk until it reaches that beautiful consistency. Once your cookies have cooled slightly on the wire rack—just long enough so they won’t melt away this delightful topping—grab that whisked glaze and prepare for some fun! Drizzling this heavenly mixture over your cookies is almost therapeutic; it’s where creativity meets deliciousness. Use a spoon or even a fork for an artsy touch—there’s really no wrong way! Allow this glaze to set for just a few minutes before proceeding; trust me when I say it’s worth the wait!
Step 7: The Finishing Touch
Ah, we’ve arrived at what I like to call “the pièce de résistance”—the final flourish that transforms our maple brown sugar cookies into irresistible works of art! After allowing that gorgeous glaze some time to set (a mere few minutes feels longer when you’re eager), now’s the moment for an optional yet highly encouraged sprinkle of cinnamon. Just imagine: as you dust this warm spice over your glazed cookies, you’re not only adding visual appeal but also enhancing those familiar fall flavors that evoke feelings of comfort and nostalgia. Cinnamon pairs so beautifully with maple—it’s like they were meant to be together!
As we finish up this step, remember how important presentation can be in making food feel special. The aroma wafting through your kitchen right now is intoxicating; it’s almost magical how these simple ingredients can come together in such harmony. And let’s not forget the joy of sharing these treats with others! Picture friends or family gathering around with warm cups of tea or coffee in hand while indulging in these decadent delights—it truly creates moments worth savoring. So take pride in those little details; whether it’s arranging them on a platter or packing them up for loved ones, these are more than just cookies—they’re tokens of care and comfort.
Step 8: Enjoying Your Maple Brown Sugar Cookies
With everything set—the sweet glaze glistening under soft lighting and perhaps a sprinkle of cinnamon catching glances—it’s finally time for the best part: enjoying those maple brown sugar cookies! But before diving into this delightful experience, let me share my heartfelt advice: take a moment to appreciate all your hard work! Savoring food isn’t just about eating; it’s about recognizing what went into creating each bite—from selecting quality ingredients to mixing love into every step.
As you take that first bite, allow yourself to be enveloped in flavors—the deep richness from brown sugar harmonizing with warm notes from cinnamon and pure maple syrup will create what feels like an embrace in cookie form! Each cookie should yield a soft chewiness complemented by a delicate crunch at the edges—a true textural delight! I promise you’ll find yourself reaching back for seconds (and maybe thirds!), relishing every mouthful as if it were crafted just for you.
So there you have it—your very own batch of homemade maple brown sugar cookies ready to bring warmth and sweetness into any day or gathering. Whether enjoyed fresh out of the oven or shared among friends during cozy evenings together, these cookies encapsulate love in every crumb. So go ahead—dunk one in your coffee or tea as you revel in this wonderful creation because nothing beats homemade comfort food made with passion!
Storage and Enjoyment Tips for Your Maple Brown Sugar Cookies
With your warm, fragrant batch of maple brown sugar cookies cooling on the rack, it’s time to indulge in their soft, chewy goodness! But what happens if you find yourself with a few leftover cookies (though I seriously doubt that will be the case)? Fear not! These delightful treats can be stored and enjoyed later without losing any of their charm. Let’s dive into the best ways to keep them fresh and irresistible.
Storing Leftover Maple Brown Sugar Cookies
To ensure your maple brown sugar cookies remain just as delicious as the moment they came out of the oven, it’s essential to store them properly. I recommend placing them in an airtight container—this is crucial because it locks in moisture and keeps those cookies soft and chewy. If you have a few slices of bread lying around, toss one in with your cookies; it works wonders by helping to maintain their texture. Stored this way, they will stay fresh for up to a week at room temperature. As for taste, even after a few days, you’ll find that these cookies retain their rich flavor profile, thanks to the maple syrup and brown sugar that only deepen over time. When you’re ready for a sweet treat, simply enjoy them as they are or give them a quick 5-10 second zap in the microwave for that freshly baked warmth. Trust me; it’s like wrapping yourself in a cozy blanket on a chilly autumn day!
Freezing Maple Brown Sugar Cookies for Later
If you want to prolong the joy of these cookies even further, freezing is an excellent option! To do so effectively, let your cookies cool completely before placing them in a single layer on a baking sheet lined with parchment paper. Pop that sheet into the freezer until the cookies are solid—this prevents them from sticking together when stored long-term. Once frozen, transfer them to an airtight freezer bag or container where they’ll happily live for up to three months. When you’re ready to enjoy one (or more!), simply take them out and let them thaw at room temperature; you can also reheat them directly from frozen for about 15-20 seconds in the microwave or bake at 350°F (175°C) for 5 minutes. The convenience factor here is phenomenal—you get to indulge in homemade goodness anytime you desire!
Maple Brown Sugar Cookies
Enjoy soft and chewy Maple Brown Sugar Cookies drizzled with sweet glaze—perfect for any occasion! Try this delightful recipe today!
- Prep Time: 15 minutes
- Cook Time: 10 minutes
- Total Time: 25 minutes
- Yield: About 24 cookies 1x
- Category: Dessert
- Method: Baking
- Cuisine: American
Ingredients
- 1 cup unsalted butter, softened
- 1 cup packed brown sugar
- 1/4 cup pure maple syrup
- 1 large egg
- 1 teaspoon vanilla extract
- 2 1/2 cups all-purpose flour
- 1 teaspoon baking soda
- 1/2 teaspoon salt
- 1/2 teaspoon ground cinnamon
- 1 cup powdered sugar (for glazing)
- 2 tablespoons pure maple syrup (for glazing)
- 1–2 tablespoons milk (for consistency)
Instructions
- Preheat oven to 350°F (175°C) and line baking sheets with parchment paper.
- In a large bowl, cream together softened butter and brown sugar until fluffy. Add maple syrup, egg, and vanilla; mix until smooth.
- In another bowl, whisk together flour, baking soda, salt, and cinnamon. Gradually add to the wet mixture until just combined.
- Scoop dough into balls (about 1½ inches each) and place on prepared baking sheets, flattening slightly for even baking.
- Bake for 8-10 minutes or until edges are golden but centers are still soft. Allow cooling on sheets for a few minutes before transferring to wire racks.
- For the glaze, whisk powdered sugar with maple syrup and milk to achieve drizzle consistency. Drizzle over cooled cookies.
Nutrition
- Serving Size: 1 cookie (30g)
- Calories: 150
- Sugar: 10g
- Sodium: 85mg
- Fat: 7g
- Saturated Fat: 4g
- Unsaturated Fat: 3g
- Trans Fat: 0g
- Carbohydrates: 21g
- Fiber: <1g
- Protein: <1g
- Cholesterol: 20mg