Artisan Bread Recipe
There’s something truly magical about the smell of freshly baked bread wafting through your home. It’s more than just a delightful aroma; it evokes warm memories of family gatherings, shared laughter over a meal, and peaceful moments spent in the kitchen. This artisan bread recipe is not just a method—it’s a heartfelt invitation to slow down and immerse yourself in the simple yet profound joy of baking. With just three humble ingredients, you can create an extraordinary loaf that boasts a crispy crust and a tender, airy crumb. I promise you, once you master this no-knead technique, your kitchen will become your favorite sanctuary.
As you embark on this culinary journey, picture yourself standing at the counter, flour dusting your hands like a gentle reminder of the creativity ahead. The process is so forgiving yet so rewarding; it’s perfect for beginners and seasoned bakers alike. The magic lies in letting time work its wonders as you nurture the dough, allowing it to rise and develop flavors that are nothing short of heavenly. This artisan bread recipe transcends mere sustenance; it’s an experience filled with anticipation and satisfaction that connects us to our roots and invites innovation into our kitchens.
Artisan Bread Recipe: A Journey to Crusty Perfection
This artisan bread recipe is my go-to when I’m craving something homemade but want to keep things simple. With minimal effort required, this no-knead wonder yields a rustic loaf that is perfect for sandwiches or served alongside soup. Trust me when I say that there’s nothing quite like tearing into a warm piece of bread fresh from the oven, savoring its comforting texture and flavor with each bite. Embrace this opportunity to create something beautiful and nourishing as we dive into the heart of baking!
Ingredients:
As we gather our ingredients, remember that each one plays an integral role in bringing our artisan bread to life. Let’s take a moment to appreciate what we need for this incredible loaf.
- 3 cups (395 grams) all-purpose flour or bread flour. Flour is the foundation of our artisan bread; it provides structure and texture to our loaf. All-purpose flour is versatile and works beautifully here, but if you want an even chewier texture with more gluten strength, opt for bread flour instead. When selecting flour, look for quality brands that are unbleached for a more natural flavor profile. You might wonder why we choose unbleached—it’s because bleached flour can affect the dough’s fermentation process and overall flavor development negatively.
- ½ tablespoon kosher salt. Salt is absolutely paramount in this recipe—not just for flavoring but also for controlling yeast activity during fermentation. It enhances the natural flavors in your bread while ensuring it rises nicely without becoming overly dense. Kosher salt is ideal due to its larger grain size which makes it easy to dissolve evenly throughout the dough without clumping together or overpowering other ingredients.
- ¼ ounce instant or active dry yeast packet (or 2 ¼ teaspoons). Yeast is our magical leavening agent; it transforms mere dough into something alive! Instant yeast allows us to skip proofing—saving time while still achieving excellent results—while active dry yeast requires activation with warm water first. Both types will work beautifully here! When choosing yeast, ensure it’s fresh; expired yeast can lead to disappointing outcomes where your dough doesn’t rise as expected.
- 1 ½ cups warm water (105°F). Water acts as the lifeblood of our dough; it hydrates the flour, helping it develop gluten which gives our bread structure and chewiness. The warmth of the water is crucial—it should feel comfortably warm against your wrist but not hot enough to burn or kill our yeast friends! This gentle warmth encourages yeast activation while ensuring proper fermentation occurs.
Equipment You’ll Need:
With our ingredients ready, let’s gather some essential tools that will make this baking adventure smoother and more enjoyable. Having the right equipment isn’t just about convenience; it’s about creating an environment where deliciousness can thrive!
- Large mixing bowl – This bowl serves as your canvas where all those wonderful ingredients come together in harmony! A sturdy glass or stainless steel bowl works well because they retain heat during rising—helpful for maximizing flavor development.
- Wooden spoon or spatula – Your trusty wooden spoon or spatula is perfect for mixing up your dough without overworking it—a non-negotiable when aiming for that light, airy crumb we all crave!
- Parchment paper – While not strictly necessary, parchment paper makes transferring your loaf hassle-free and prevents sticking when baking on stones or skillets. Plus, who doesn’t love less mess?
- Baking stone/pizza stone/Dutch oven/iron skillet – One of these will be crucial for achieving that gorgeous crust! A preheated baking stone helps create steam while promoting even baking; alternatively, using a Dutch oven traps moisture around your loaf during baking resulting in an equally impressive crusty exterior.
- Kitchen towel/plastic wrap – Covering your dough while rising keeps it cozy and prevents drying out—a small step that’s absolutely vital for achieving optimal results!
Now that we have everything ready to go let’s dive into crafting our masterpiece!
Step 1: Mixing It All Together
First things first! Grab that large mixing bowl and combine your dry ingredients—flour, salt, and yeast—in one harmonious act. Gently whisk them together until well mixed; this step ensures even distribution across all components which contributes greatly to a consistent rise throughout your loaf later on! Then comes the magic moment: pour in your warm water slowly while stirring with either a wooden spoon or spatula until everything comes together into one cohesive mass of sticky dough. Don’t be alarmed by its stickiness—that’s normal! The hydration level here is crucial because it allows gluten formation which leads us toward that lovely chewy texture we desire.
Step 2: Letting Go
Once mixed adequately (we’re talking about no dry spots here!), cover up your bowl tightly with either plastic wrap or a kitchen towel—the goal being to trap warmth inside as well as prevent any pesky drafts from interfering with fermentation! Here comes perhaps my favorite part: let it rise at room temperature anywhere between two hours up to ten hours—or even overnight if you can bear waiting! This extended time allows flavors to develop deeply while creating air pockets within—the very thing responsible for both texture and taste! Try not rushing this step—the longer rise leads us closer toward bakery-quality results that’ll impress everyone who has the pleasure of tasting them!
Step 3: Shaping Your Loaf
After patiently waiting through fermentation (I know—it feels like forever!), it’s finally time to get hands-on! Lightly dust your work surface with flour before gently turning out that glorious risen dough onto said surface using wet hands (trust me on this!). This helps avoid sticking while keeping things neat too! Now comes shaping: fold edges toward center repeatedly until forming either one round loaf or divide into two smaller loaves if you’re feeling generous! Tuck under ends carefully so they hold shape without deflating too much—that fluffy interior deserves protection!
Step 4: Resting Before Baking
Once shaped perfectly (I believe in you!), place each shaped loaf onto parchment paper dusted lightly with flour ensuring they have enough room around them since they’ll puff up again before entering their final abode—the oven! Now score those top surfaces with either one long cut down center or multiple slashes across depending upon how artistic you feel today; scoring creates beautiful patterns while allowing steam release during baking too—which translates directly into better texture overall later on! Cover again lightly with towel/plastic wrap allowing them another twenty-thirty minutes rest time—think of this as their final beauty sleep before taking center stage on dinner tables everywhere!
Stay tuned as we continue weaving through each step towards creating this sensational artisan bread recipe together—it’s only going to get better from here!
Step 5: Shaping the Dough – Crafting Your Artisan Loaf
Now that your dough has had its moment to rise, you’re embarking on an exciting phase—shaping the dough! This is where the magic begins to happen, transforming your sticky mixture into a beautiful round loaf or two. Start by wetting your hands; this simple act prevents the dough from sticking to your fingers and allows for a seamless handling experience. Gently turn the risen dough out onto a lightly floured surface. When you touch it, be prepared for that lovely, soft texture which is both sticky and pliable—a true sign of successful fermentation.
With the dough now resting before you, use a gentle folding technique to shape it. This method is crucial because it helps build structure within the loaf by creating tension on the surface of the dough, which is essential for a good rise during baking. Begin by folding each edge toward the center as if you are tucking it into bed—this nurturing movement enhances both the aesthetic and texture of your bread. If you’re feeling adventurous, consider dividing your dough into two smaller loaves at this stage! It’s like giving birth to twin creations that will bring joy in every slice. Once shaped, place your formed loaf on a piece of parchment paper. Remember, patience is key here; give it time to relax and rise again before heading into the oven.
Step 6: Resting – The Power of Patience
After shaping your dough comes another crucial step: resting! Allowing your loaf to rest for 20 to 30 minutes might feel like an eternity, but I promise you—it’s absolutely paramount for achieving that perfect crust and airy crumb we all crave. During this time, you can almost hear the yeast continuing its work as it produces carbon dioxide, creating those delightful little air pockets that will make each bite light and fluffy.
While you wait, let’s talk about scoring—an art form in itself! You’ll want to score 1 to 4 lines across the top of your loaf with a sharp bread knife or a lame (a specialized bread tool). Why do we do this? Scoring allows for controlled expansion during baking; without these cuts, your beautiful artisan bread may split unevenly or burst in unpredictable ways—definitely not what we’re aiming for! It’s okay if you’re not an artist yet; just let loose and score with love! The marks will fill with golden crust as they bake, adding visual allure that will make everyone stop in their tracks when they see it.
Step 7: Preheating – The Art of Creating Steam
Let’s prepare our oven for an extraordinary baking experience! Preheat your oven to a sizzling 450°F (232°C) while simultaneously placing a baking stone, pizza stone, Dutch oven, or iron skillet inside. This essential step is where science meets culinary art—the high temperature creates an environment akin to a professional bakery’s hearth. But here’s where things get interesting: steam is crucial for achieving that signature crusty exterior!
Trust me on this one; adding moisture during baking creates a crispy outer layer while keeping the interior tender and moist. Just before you slide your dough into that hot abyss, toss in one cup of hot water or five ice cubes directly onto the oven floor (be careful not to burn yourself!). This sudden burst of steam will envelop your loaf during those first few minutes of baking—creating an utterly intoxicating aroma that fills every corner of your kitchen. Imagine how wonderful it feels knowing that every element—from temperature to steam—is working harmoniously together to create something extraordinary.
Step 8: Baking – The Transformation Begins
Now comes perhaps the most exhilarating part—the actual baking process! Slide your beautifully shaped dough along with its parchment paper onto the preheated surface in your oven. As soon as it hits that hot stone or skillet, you’ll hear an immediate sizzle—a glorious sound signaling that transformation is underway. Set a timer for 25 to 30 minutes and let yourself be swept away by the aroma wafting through your home; it’s nothing short of magical!
During this time, keep an eye on it but resist any urge to open the oven door prematurely; doing so can disrupt that precious steam we’ve created! When you peek through the window after about 20 minutes, look for a beautifully golden-brown crust developing on top—this is what you’ve been waiting for! To test doneness, gently tap on the bottom of your loaf; if it sounds hollow like a drumbeat echoing back at you—that’s when you know it’s ready. Each moment spent in the oven transforms mere ingredients into something profoundly satisfying—a true testament to patience and passion.
Final Touches – Cooling Your Masterpiece
Step 9: Cooling – The Most Important Wait
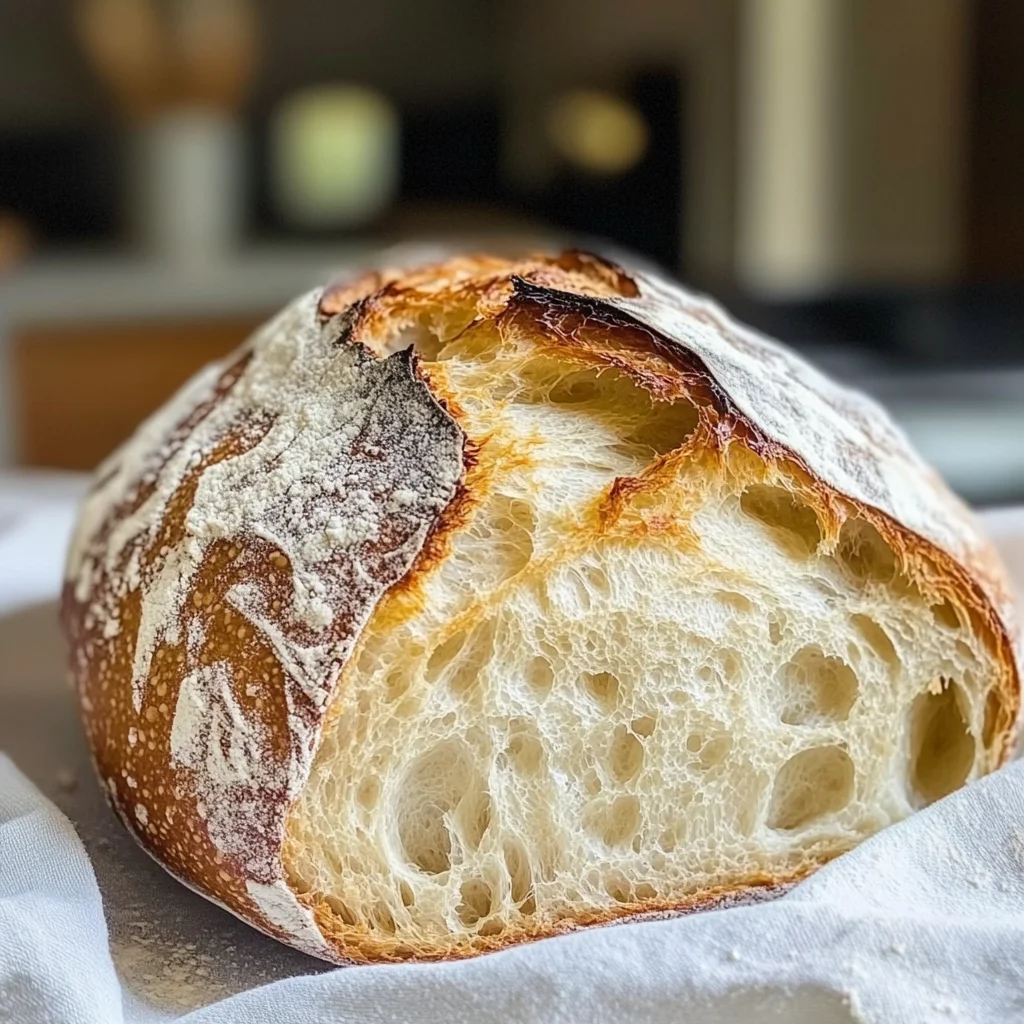
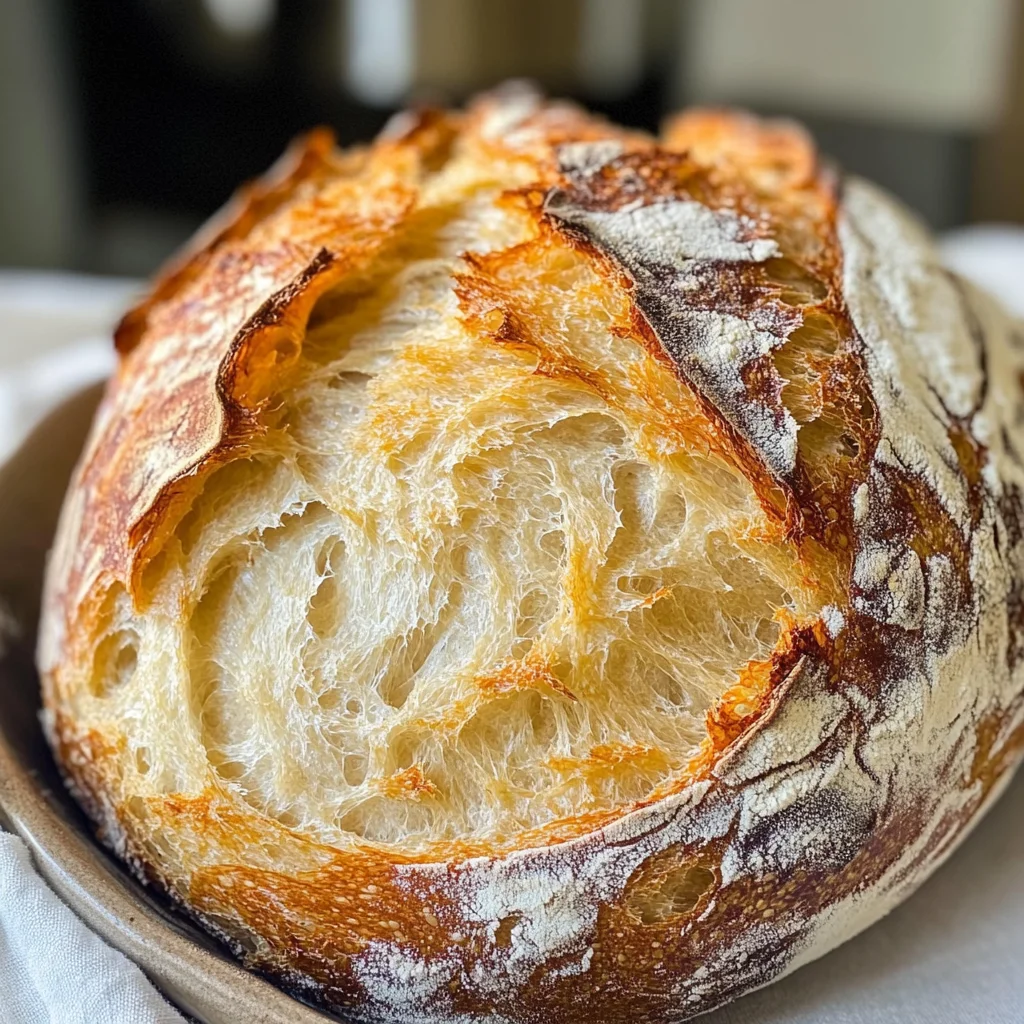
Ahh… you’ve done it! Your artisan bread has emerged from the oven looking like a work of art—golden brown with an inviting crust begging you to take just one slice. But before rushing into slicing off pieces (and trust me, I get it!), it’s absolutely non-negotiable that we allow our masterpiece to cool down completely on a wire rack for at least 30 minutes. This waiting period allows steam trapped inside each loaf to escape properly while also letting carryover cooking finish its job without risking sogginess.
As those cooling moments pass by, take in how incredible this journey has been—from simple ingredients transforming through love and patience into something truly extraordinary. As tempting as it may be to dive right in with butter or olive oil (both excellent choices!), giving this bread time ensures every bite maintains its delightful texture and flavor profile—each slice bursting with potential!
When finally ready to serve or savor alone with just a sprinkle of salt or dip into hearty soups or salads—your homemade artisan bread becomes more than just food; it’s comfort wrapped in warmth and nostalgia shared among family and friends alike. So go ahead—and relish every moment spent creating this no-knead artisan bread recipe because trust me—you’ve earned it!
Storage and Enjoyment Tips for Your Artisan Bread Recipe
Now that your beautiful, golden artisan bread is baked to perfection and filling your kitchen with its intoxicating aroma, it’s time to think about storage so you can enjoy every last crumb! Trust me, the moment you taste this bread fresh out of the oven, you’ll want to ensure it stays delicious for days to come. The key to preserving that delightful crust and tender crumb lies in how you store it after it cools. I promise you’ll want to savor this bread long after the first slice!
Storing Leftover Artisan Bread Recipe
To keep your leftover artisan bread fresh and delightful, opt for a paper bag rather than plastic. A paper bag allows the bread to breathe while still protecting it from becoming stale too quickly. If stored properly at room temperature, your loaf will maintain its wonderful texture for up to three days. For longer freshness, consider slicing the bread and wrapping individual slices tightly in plastic wrap or aluminum foil before placing them in a zip-top bag. This method helps prevent freezer burn and keeps each slice moist and ready for enjoying later on! When you’re ready to indulge again, just pop a slice in the toaster or warm it gently in the oven until it’s heated through—imagine that satisfying crunch as you bite into it! Even after storage, the flavors remain robust and inviting, making every bite a profoundly satisfying experience.
Freezing Artisan Bread for Later
If you find yourself with more artisan bread than you can consume within a few days (which can happen when something this delectable is around!), freezing is an excellent option. To freeze your bread effectively, make sure it’s completely cooled first; then wrap it tightly in plastic wrap or aluminum foil before placing it in a freezer-safe bag. This way, you can enjoy your homemade creation up to three months later while preserving its lovely texture and flavor! When you’re ready to use it, simply remove the desired amount from the freezer and let it thaw at room temperature. You can also reheat directly from frozen if you’re feeling impatient; just give it a little extra time in the oven for that crusty finish we all adore. The convenience of having fresh artisan bread available at any moment is truly extraordinary—and trust me, there’s nothing quite like pulling out a slice of homemade goodness on a chilly evening!
Artisan Bread Recipe

Bake an easy Artisan Bread Recipe with just three ingredients! Create crusty loaves full of flavor—perfect for sharing or enjoying solo today!
- Prep Time: 15 minutes
- Cook Time: 30 minutes
- Total Time: 45 minutes
- Yield: Approximately 12 servings 1x
- Category: Bread
- Method: Baking
- Cuisine: Homemade
Ingredients
- 3 cups all-purpose flour or bread flour
- ½ tablespoon kosher salt
- ¼ ounce instant or active dry yeast (2 ¼ teaspoons)
- 1 ½ cups warm water (105°F)
Instructions
- In a large mixing bowl, combine flour, salt, and yeast. Whisk gently to ensure even distribution.
- Gradually pour in warm water while stirring with a wooden spoon until a sticky dough forms.
- Cover the bowl with plastic wrap or a kitchen towel and let it rise at room temperature for 2 to 10 hours.
- Lightly flour your work surface and turn out the risen dough using wet hands. Fold edges toward the center to shape.
- Place the shaped loaf on parchment paper and cover again for an additional 20-30 minutes of resting time.
- Preheat your oven to 450°F (232°C) with a baking stone or Dutch oven inside to create steam.
- Score the top of the loaf with a sharp knife and carefully place it in the oven.
- Bake for 25-30 minutes until golden brown; it should sound hollow when tapped on the bottom.
- Remove from the oven and cool completely on a wire rack before slicing.
Nutrition
- Serving Size: 1 slice (50g)
- Calories: 130
- Sugar: 0g
- Sodium: 160mg
- Fat: 0.5g
- Saturated Fat: 0g
- Unsaturated Fat: 0g
- Trans Fat: 0g
- Carbohydrates: 27g
- Fiber: 1g
- Protein: 4g
- Cholesterol: 0mg