Meltingly Tender apple vinegar Braised Beef (Stovetop, Oven, Slow Cooker, Instant Pot)
There’s something undeniably magical about cooking with love and intention, especially as the leaves start to turn and the air becomes crisp. This Meltingly Tender apple vinegar Braised Beef is not just a recipe; it’s a warm embrace on a chilly evening, a dish that beckons you home after a long day. Picture this: the aroma of beef slowly braising in a rich mixture of aromatic vegetables, fresh herbs, and tangy apple vinegar fills your kitchen, wrapping you in a cocoon of comfort. The transformation of humble ingredients into something profoundly satisfying is an experience that transcends mere sustenance; it’s nourishment for the soul.
What makes this dish truly special is how it balances tradition with innovation. I’ve always been captivated by the idea of taking classic recipes and giving them a personal twist. In this case, we’re opting for budget-friendly beef chuck roast instead of pricier short ribs. The beauty lies in the way the chuck roast, with its rich marbling, breaks down into succulent shreds that melt in your mouth after hours of gentle simmering. This isn’t just dinner; it’s an invitation to gather around the table with loved ones, sharing stories and laughter while savoring every comforting bite. Trust me when I say this dish will become a cherished favorite in your home!
Meltingly Tender apple vinegar Braised Beef (Stovetop, Oven, Slow Cooker, Instant Pot): A Cozy Comfort Food Classic
This recipe has become one of my go-to meals for family gatherings or cozy nights in. It’s simple yet elegant, making it perfect for both everyday dinners and special occasions alike.
Ingredients:
Let’s embark on this culinary adventure together! Each ingredient plays a vital role in crafting this delicious braised beef masterpiece.
- 2-3 tablespoons olive oil: This isn’t just any oil; it’s liquid gold! Olive oil adds richness and depth to our dish while helping to brown the beef beautifully during searing. Look for high-quality extra virgin olive oil for optimal flavor—it’ll make all the difference in those subtle notes you’ll taste later on. If you’re out of olive oil, avocado oil or canola oil can work as alternatives, but trust me when I say nothing beats that fruity essence of olive oil.
- 3-3 ½ pounds beef chuck roast, trimmed of excess fat: Chuck roast is truly a gem! Its marbled fat ensures that as it cooks low and slow, it breaks down into tender shreds that are beyond delicious. When selecting your roast at the butcher or grocery store, look for one with good marbling—those little streaks of fat throughout will keep the meat juicy and flavorful. It’s essential to trim any large pieces of fat before cooking to prevent your finished dish from becoming greasy.
- 3 large carrots, peeled as desired & diced into chunky 1-inch pieces: Carrots add sweetness and earthiness to our braise while providing texture against the tender meat. Don’t worry too much about how perfectly you chop them—rustic chunks will hold up beautifully during cooking and contribute wonderfully to both flavor and presentation.
- 2 stalks celery, finely sliced: Celery is often overlooked but brings an essential layer of flavor thanks to its natural saltiness and crunch. It complements the sweetness of carrots wonderfully while infusing our braising liquid with depth as it cooks down.
- 1 large yellow onion, peeled & diced into 1-inch pieces: Onions are key players in flavor development! They caramelize beautifully during cooking and provide that comforting base note that makes every bite feel like home. Aim for larger chunks so they don’t completely dissolve into the sauce but rather lend their sweetness over time.
- 8 cloves garlic, finely chopped or grated: Ahh, garlic—the ultimate aromatics enhancer! Not only does it bring warmth and richness to our dish, but it also adds an intoxicating aroma as it mingles with other ingredients while cooking. Fresh garlic is best here; if you absolutely have to use pre-minced for convenience, opt for one without preservatives.
- 2 cups dry apple vinegar (see Recipe Notes below): Apple vinegar lends its delightful tanginess to balance out the richness of the beef and vegetables. It helps tenderize the meat while adding layers of flavor that brighten each bite. For best results, choose unfiltered apple cider vinegar—it’s more robust than regular distilled vinegar.
- 2 cups beef stock: Good quality beef stock contributes vital umami flavors to our braise while keeping everything moist during cooking. Homemade stock is ideal if you have it on hand; otherwise, look for low-sodium options at your local market to avoid overwhelming saltiness—balance is key!
- 2 tablespoons tomato paste: This concentrated form of tomato packs an umami punch! It deepens color and enhances overall flavor profile significantly without overpowering other ingredients—think of it as a secret weapon enhancing our dish’s allure!
- 2 tablespoons Worcestershire sauce: Often considered a pantry staple for good reason—it adds complex savory notes that really elevate our braised beef experience! Just like with stock choices earlier—opt for vegetarian versions if desired since some may contain animal-derived products.
- 1 tablespoon Dijon mustard: This sharp condiment not only adds zing but also helps emulsify fats within sauces making them silky smooth—trust me when I say this step elevates everything happening here!
- 2 bay leaves: These aromatic leaves are essential; they infuse slow-cooked dishes with their unique herbal fragrance over time—and allow their subtle complexity to bloom beautifully throughout each mouthful we crave after hours spent waiting patiently!
- 3-4 sprigs fresh rosemary: Rosemary brings warmth reminiscent of sunny gardens filled with herbs bursting forth! Its pine-like aroma complements meats perfectly by adding another layer without dominating other flavors present here too strongly—the balance achieved through thoughtful additions works wonders!
- 10-12 sprigs fresh thyme: Another fragrant herb worth including—thyme’s earthy qualities pair exquisitely alongside rosemary while also lending freshness throughout longer cook times where these two herbs truly shine!
- optional: flour slurry (2 tablespoons all-purpose flour whisked with ½ cup beef stock): If you’re looking to thicken your sauce at any point post-braising then using this slurry offers great control over final consistency! Keep in mind though—you can skip entirely if preferred but know it’ll yield slightly thinner results overall which some may prefer anyway!
Equipment You’ll Need:
Before we dive into cooking up this delightful meal together, let’s ensure you have all your essential tools ready at hand! Having the right equipment not only enhances your experience but also helps achieve consistent results each time you prepare this wonderful dish.
- Large heavy-bottomed pot or Dutch oven (at least 5-quart capacity): This piece is non-negotiable when braising meat effectively—you need something sturdy enough to withstand high heat without scorching ingredients while providing even distribution across its surface area! The weight also traps moisture effectively ensuring ideal conditions throughout lengthy cook times—a must-have if aiming for meltingly tender outcomes!
- Wooden spoon or spatula: A wooden spoon isn’t just nostalgic—it serves multiple purposes from stirring sauces gracefully without scratching pots to scraping up those delightful browned bits left behind after searing meat which are crucial flavor components later incorporated back into our final product!
- Meat thermometer (optional but recommended): While not strictly necessary since we’re relying heavily on visual cues during long braises—it never hurts having one handy should concerns arise regarding doneness levels especially if different cuts sometimes vary widely based purely upon thicknesses involved!
By gathering all these trusty allies together before starting out—you’ll set yourself up perfectly so nothing distracts from enjoying each moment spent creating such blissful food experiences ahead!
Preparing the Meltingly Tender apple vinegar Braised Beef (Stovetop)
Step 1: Allowing Time for Temperatures to Align
About 30 minutes to an hour before you’d like to begin cooking (and trust me when I say don’t rush this step!), pull your beautiful chuck roast from refrigeration so it can come up closer toward room temperature naturally—the goal being even heating throughout once placed within hot surroundings later on during searing phase ahead! Just before diving into action though—take a paper towel gently patting down all sides until dry enough ensuring perfect caramelization occurs once heat hits surface area directly—a crucial aspect ensuring flavor develops fully here as well! Next comes seasoning generously using kosher salt alongside black pepper—a guideline I follow religiously states roughly one teaspoon per pound applied liberally across surfaces evenly distributing seasoning effects down deep through layers preparing us well ahead prior ultimately achieving complex taste profiles desired afterward too!
Step 2: Searing That Beautiful Chuck Roast
In goes olive oil inside your chosen pot over medium-high flame until shimmering starts appearing like magic unfolding before eyes signifying readiness awaits exciting moments ahead—we want this hot enough not only sear effectively producing rich browning outside layer yet also ensuring juicy interior remains intact maintaining moisture levels necessary throughout long duration we’ll be working through next hours spent nurturing its transformation toward tenderness desired outcome eventually arriving upon finally plating up masterpieces worthy shared amongst friends gathered around dinner tables everywhere celebrating joyfully togetherness created via every bite enjoyed across plates filled generously overflowing goodness crafted here today indeed! Carefully place seasoned roast directly within waiting pan allowing edges crisp upon contact while developing gorgeous crust forms outside around edges taking roughly four-five minutes aside till deeply browned—we mustn’t forget those skinnier edges either contributing equally important flavors too so turning frequently achieves best results overall ensuring maximum satisfaction derived once served lastingly cherished moments created sharing meals made lovingly prepared together lovingly shared among others nearby afterward—all worth effort put forth leading us toward success achieved through patience shown along way towards final plate appearance generously garnished holding treasures waiting inside awaiting discovery soon thereafter…
Step 3: Sautéing Aromatic Vegetables
Once seared magnificently golden brown finish arrived at happily removing roast onto plate setting aside safely—I highly recommend now adding carrots celery onions garlic combination directly back into same pot utilized earlier immediately following roast removal letting aromas burst forth captivating senses welcoming scents wafting upward inviting people closer toward kitchen area surrounding creating homey vibes instantly felt by everyone present eagerly awaiting feast soon approaching nearby too! Season these veggies lightly sprinkling half teaspoon kosher salt pepper again stirring mixture briefly letting cook warming fragrant scents fill air around us growing ever stronger reminder deliciousness forthcoming shortly thereafter awaiting patiently ourselves alongside family friends alike gathered nearby appreciating company surrounding cherished times shared together inevitably coming next once feast completed served among loved ones gathered cheerfully reminiscing fond memories recalling past events discussed over joyful conversations unfolding organically throughout evening festivities celebrated heartily around tables brimming bountiful offerings prepared thoughtfully ahead earlier beforehand culminating beautifully tonight turned joyous occasion embraced warmly forever held dear within hearts sharing laughter bonds formed stronger bonded tightly forevermore cherished familial ties woven intricately detailing life’s journey experienced together moving forward onward carrying reflections kept alive forever etched fondly remembering moments experienced alongside beloved souls surrounding shared bonds built lasting friendships blossoming brightly amidst chaos world outside remaining grounded rooted deep connections established firmly presented lovingly crafted dishes enjoyed thoroughly taken delight indulging flavors savored relishing whole-heartedly each morsel until gone leaving satisfaction lingering long afterward…
Step 4: Deglazing With Apple Vinegar
Now comes perhaps my favorite part where everything transforms dramatically once again—the deglazing process begins right after sautéing veggies stirring steadily bringing forth full appreciation vibrant colors aromas emanating from depths bubbling contentedly away beneath surface gently coaxed forward coaxed forth releasing hidden treasures locked tightly away trapped depths previously concealed richness revealed fully exposed unveiled shining bright radiance captured despite intensity simmering bubbling away patiently waiting arrival ever-elusive moment about savoring success achieved thus far carefully pouring luscious apple vinegar dancing across top scraping bottom diligently releasing stuck bits fond memories formed earlier seamlessly melded back reintegrated whole creating harmony amongst flavors blending merging effortlessly forming symphony notes played harmonious orchestrations gradually unfurling revealing depths depths explored discovering joys found nestled safely within balancing act performed masterfully lifting spirits inviting excitement anticipating what’s soon arrive next arriving eventually unveiling perfection achieved laid bare openly embraced lovingly savored deeply felt recurring motif flourishing readily evident continually repeated time again discovering hidden gems tucked neatly awaiting exploration uncommented treasures crafted carefully laid foundations built strong linking past present future generations continue passing traditions onward carried forth remembering origins shared simultaneously connecting lives spanning spaces bridging gaps forging pathways illuminated light shining brightly guiding travelers safely journeys undertaken stepping boldly forward confidently embracing whatever comes next knowing surety exists because love infused every element constructed foundation shared lovingly nurtured continuously growing evolving changing adapting life experiences forging lasting memories remembered warmly held dear eternally treasured hearts living continuing onward journeys experienced side-by-side…
Stay tuned as we continue uncovering steps leading towards ultimate creation unfolding before us transforming ordinary raw materials extraordinary culinary delights designed share mutual respect honoring efforts taken cultivating relationships nourished through acts kindness served graciously demonstrated passion inspiring awe wonderment delight expressed heartfelt endeavors undertaken solely purpose bringing joy table setting stage grand transformations witnessed unfold miraculously wondrous ways surprises gifted bestowed upon all involved actively participating journey commenced founded upon love respect shared between individuals seeking create lasting impressions begun first step taken journey begun launched forward toward brighter horizons held promise hope anticipation awaiting fulfillment dreams realized lived fully embraced wholeheartedly…
Step 5: The Art of Thicken and Elevate
Once your braised beef has reached that divine state of tenderness—where a gentle twist of a fork can pull it apart like soft butter—it’s time for the next crucial step. Carefully transfer the roast to a plate or cutting board, giving it a moment to rest while we work on intensifying those luscious flavors left in the pot. Now, this is where you can really elevate your dish! You’ll want to remove and discard the bay leaves and any spent herbs; they’ve given their all, and now it’s time for them to go. Next, you may find a layer of melted fat floating atop the braising liquid. Trust me on this: skimming off excess fat is absolutely paramount for achieving that silky texture in your final sauce without it being overly greasy.
What follows is an optional yet delightful step—thickening the braising liquid. This liquid is like liquid gold; it’s rich and packed with flavor from all those aromatic veggies and herbs! To thicken it up, return the pot to medium heat and let it bubble gently. Whisk together your flour slurry—two tablespoons of all-purpose flour mixed with half a cup of beef stock—until smooth, then stir it into the bubbling liquid. As you do this, watch as the sauce transforms before your eyes, thickening into a gravy-like consistency that clings to your meat and vegetables beautifully. Allow this to simmer for about three to four minutes, stirring occasionally until it’s reached your desired thickness. Season with additional kosher salt and black pepper if needed; this step is where you can really personalize the flavor profile to your liking!
Step 6: Shred and Serve with Love
Now comes one of my favorite moments in cooking—the shredding! With the beef chuck roast resting comfortably on your cutting board, take two forks (or whatever tools suit your fancy) and shred that glorious meat into large chunks or bite-sized pieces. I promise you, this will be satisfying beyond measure as you feel the tender fibers break apart so effortlessly. The goal here is not just appearance but also ensuring that each piece captures that luscious sauce you’ve created.
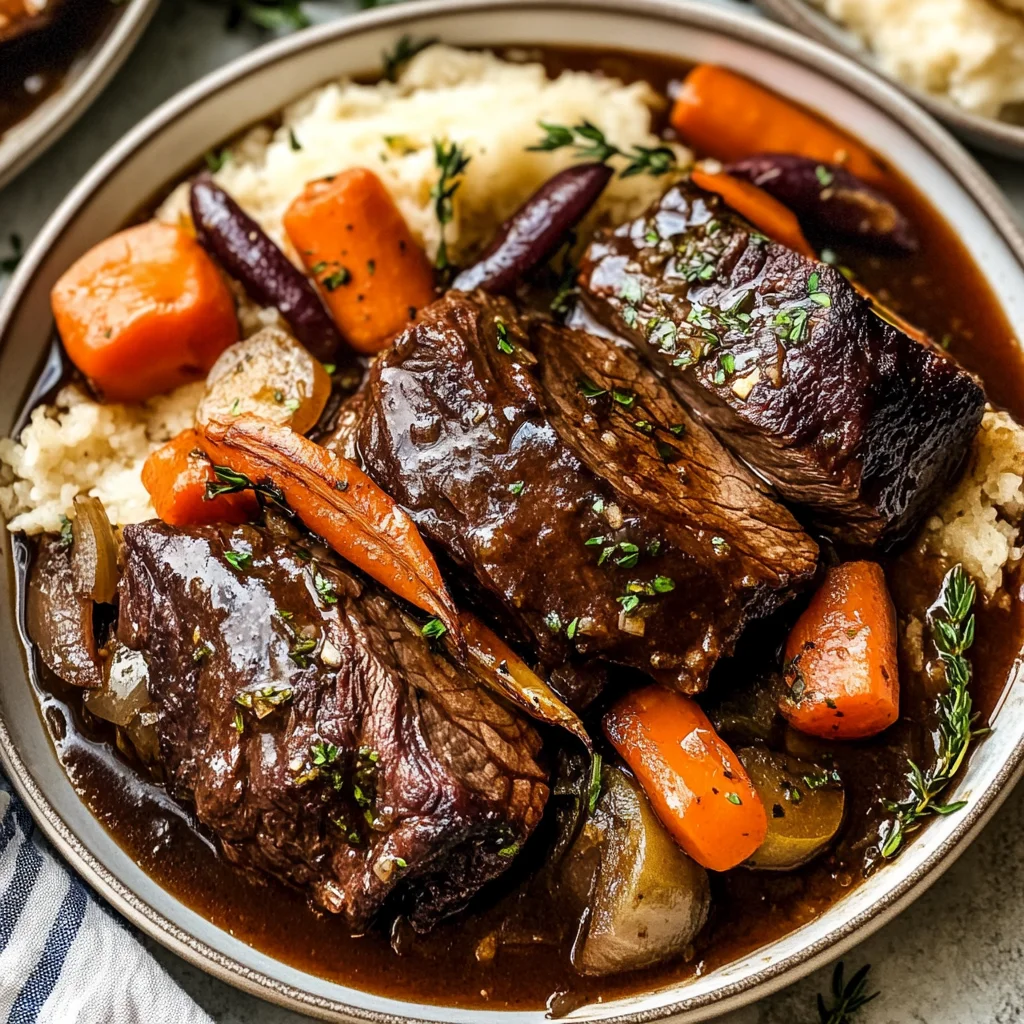
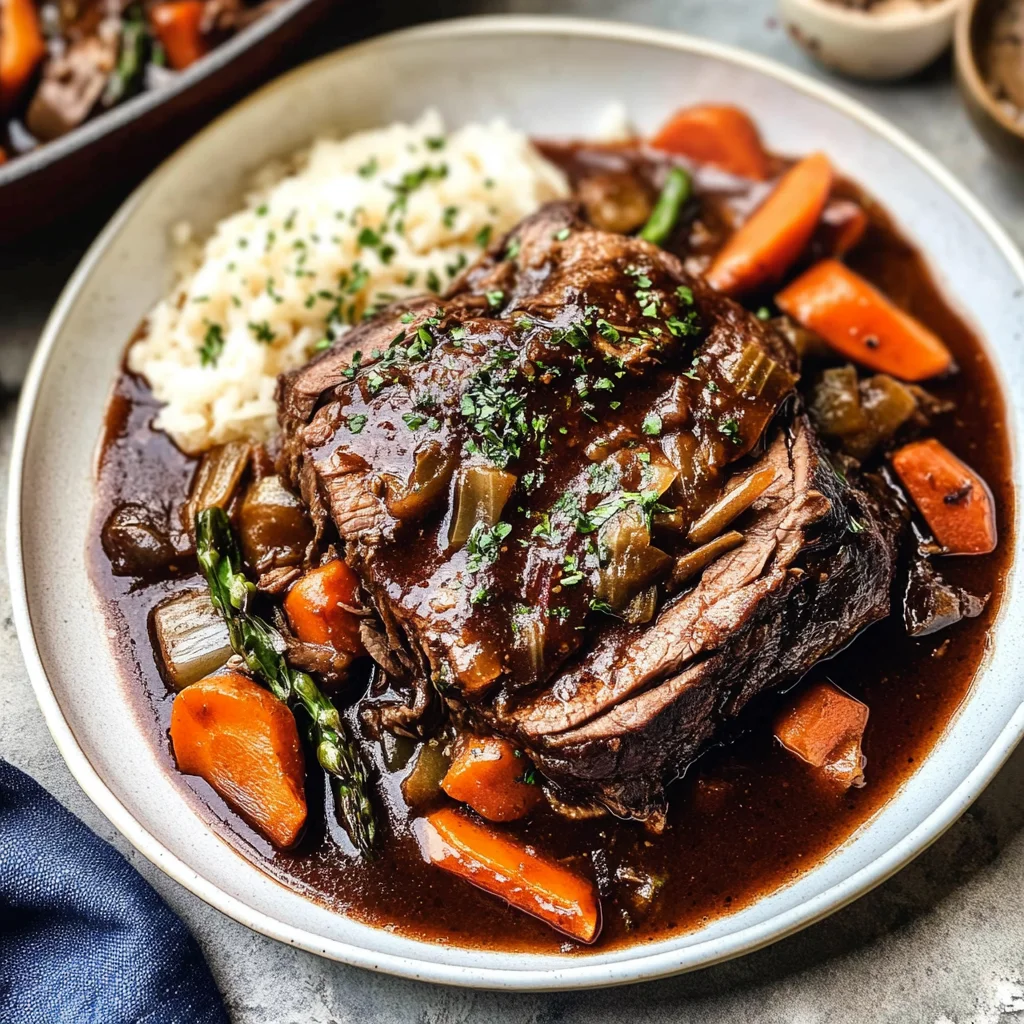
Once shredded, it’s time to serve! I always recommend placing this meltingly tender apple vinegar braised beef atop a warm bed of creamy mashed potatoes or fluffy polenta. There’s something about that combination—a spoonful of soft potatoes layered under rich beef—that feels like a hug from within! Drizzle generously with your thickened apple vinegar sauce over everything; don’t hold back! This sauce will bring everything together in a symphony of flavors—sweetness from the apples mingling with savory undertones from herbs and spices, creating an utterly intoxicating experience for your taste buds. Trust me when I say there’s no such thing as too much sauce here!
Step 7: The Perfect Pairings
As you revel in serving this delightful meal, consider what might complement these flavors beautifully on your table. A crisp green salad dressed lightly with lemon vinaigrette can provide a refreshing contrast to the richness of the braised beef. Or perhaps some roasted Brussels sprouts seasoned simply with olive oil, salt, and pepper? They add a lovely earthy quality that balances well against the sweetness of our dish.
Don’t forget about bread either! A fresh crusty loaf or soft dinner rolls would be perfect for soaking up any remaining sauce left on your plate—not a drop should go uneaten! And if you’re feeling adventurous, why not whip up some garlicky sautéed greens? They could lend brightness and color alongside our hearty main event!
Step 8: The Waiting Game – Why Resting Matters
Before digging in, I urge you not to rush this part—letting everything rest for at least 10-15 minutes before serving allows those incredible flavors to settle even further into every crevice of the meat. This patience is essential; resting redistributes juices throughout the meat which results in an incredibly moist bite every single time you enjoy it later on! During this time, cover everything loosely with foil to keep it warm while also allowing some steam to escape so that nothing gets soggy.
You may notice how during this brief pause, aromas waft through your kitchen—an utterly enchanting experience reminding you why cooking can be such an intimate affair. This moment not only enhances flavor but also builds anticipation among everyone gathered around your table—a true celebration of food shared among friends or family.
Final Touches – Time to Dig In!
Now we arrive at one of the most gratifying moments—the moment when plates are filled and faces light up as they take their first bites! Remember how we talked about those warm mashed potatoes? As each spoonful lands softly onto plates topped with vibrant veggies and drizzled sauce, you’re creating an experience worth cherishing!
Don’t hesitate to share stories around the table about what makes this dish special for each person; after all, food has an incredible way of bringing people together like nothing else can. Whether it’s laughter echoing in harmony or heartwarming memories being shared over tender bites drenched in flavor—it’s these moments that make cooking worthwhile.
So there you have it—a complete journey through crafting Meltingly Tender apple vinegar Braised Beef (Stovetop, Oven, Slow Cooker, Instant Pot). I hope you’ll find as much joy in making—and sharing—this dish as I have over countless dinners at home with loved ones. Enjoy every savory bite! 🍽️
Storage and Enjoyment Tips for Your Meltingly Tender apple vinegar Braised Beef (Stovetop, Oven, Slow Cooker, Instant Pot)
Now that you’ve savored the incredible experience of making your Meltingly Tender apple vinegar Braised Beef, it’s time to think about how to preserve those delightful flavors for future enjoyment! This dish is not only a feast for the senses when fresh but also holds up beautifully after a little time in your fridge or freezer. Trust me, the magic doesn’t just stop once it’s on your plate; it continues to give long after the first meal is over.
Storing Leftover Meltingly Tender apple vinegar Braised Beef (Stovetop, Oven, Slow Cooker, Instant Pot)
To store your leftover braised beef, I recommend using an airtight container—this is crucial for keeping all those beautiful flavors locked in. Simply transfer any remaining beef and sauce into the container and place it in the refrigerator. It will keep beautifully for about 3-4 days. If you want to maintain its quality even longer, consider placing a slice of bread in with the beef; this little trick helps absorb excess moisture and keeps your meat from becoming too soggy. When you’re ready to enjoy it again, just pop it in the microwave or reheat gently on the stovetop until warmed through. The flavors will have melded even more during storage, creating an even richer taste experience that will truly make your taste buds sing!
Freezing Meltingly Tender apple vinegar Braised Beef for Later
If you want to savor this dish beyond its fridge lifespan, freezing is an excellent option! Just ensure that you allow the beef and sauce to cool completely before transferring them into freezer-safe bags or containers. Make sure you remove as much air as possible before sealing them tight—this will help prevent freezer burn and keep your meal tasting fresh. Your Meltingly Tender apple vinegar Braised Beef can be stored in the freezer for up to three months. When you’re ready for a comforting dinner without any fuss, simply thaw it overnight in the refrigerator and reheat slowly on the stove or in the microwave. Having this delicious meal waiting for you on a busy weeknight is like having a warm hug after a long day!
Meltingly Tender apple vinegar Braised Beef
Meltingly Tender apple vinegar Braised Beef is the ultimate comfort food that transforms simple ingredients into a heartwarming masterpiece. As the chill of autumn settles in, this dish becomes a cozy staple perfect for family gatherings or intimate dinners. The beef chuck roast simmers to perfection in a rich blend of fresh vegetables and tangy apple vinegar, creating a flavorful experience that envelops you in warmth. Whether prepared on the stovetop, in the oven, a slow cooker, or an Instant Pot, this recipe delivers melt-in-your-mouth tenderness every time. Serve it over creamy mashed potatoes or alongside roasted vegetables for a delightful meal that brings everyone together around the table.
- Prep Time: 30 minutes
- Cook Time: 3 hours
- Total Time: 3 hours 30 minutes
- Yield: Serves 6
- Category: Main
- Method: Braising
- Cuisine: American
Ingredients
- 2–3 tablespoons olive oil
- 3–3 ½ pounds beef chuck roast, trimmed of excess fat
- 3 large carrots, peeled and diced into chunky 1-inch pieces
- 2 stalks celery, finely sliced
- 1 large yellow onion, peeled and diced into 1-inch pieces
- 8 cloves garlic, finely chopped or grated
- 2 cups dry apple vinegar
- 2 cups beef stock
- 2 tablespoons tomato paste
- 1 tablespoon Dijon mustard
- 2 bay leaves
- 3–4 sprigs fresh rosemary
- 10–12 sprigs fresh thyme
- optional: 2 tablespoons all-purpose flour whisked with ½ cup beef stock for thickening
Instructions
- Allow the beef chuck roast to come to room temperature. Season generously with salt and pepper.
- Heat olive oil in a large pot over medium-high heat. Sear the roast on all sides until browned, then remove from pot.
- Add carrots, celery, onion, and garlic to the pot; sauté until softened.
- Deglaze with apple vinegar, scraping up any browned bits from the bottom of the pot.
- Return the roast to the pot along with beef stock, tomato paste, and herbs. Bring to a simmer.
- Cover and cook on low heat for 3 hours (or use your preferred method: oven at 325°F for 3 hours, slow cooker on low for 6 hours, or Instant Pot for 60 minutes).
- Once tender, shred the beef and serve with the sauce over mashed potatoes or as desired.
Nutrition
- Serving Size: 1 cup (240g)
- Calories: 350
- Sugar: 5g
- Sodium: 420mg
- Fat: 15g
- Saturated Fat: 5g
- Unsaturated Fat: 9g
- Trans Fat: 0g
- Carbohydrates: 23g
- Fiber: 3g
- Protein: 32g
- Cholesterol: 100mg