Grandma’s Easy Chicken Gyro Bowls
There’s something profoundly magical about recipes that connect us to our roots, isn’t there? They’re not just about cooking; they’re about weaving together memories, love, and tradition. My Grandma’s Easy Chicken Gyro Bowls do just that—they transport me back to her kitchen, where the air was thick with the aroma of marinated chicken sizzling to perfection and the laughter of family filling every nook and cranny. Each bite is a delightful symphony of juicy chicken, creamy tzatziki, and fresh vegetables, creating a comforting embrace that feels like home. Trust me when I say that this recipe is more than just a meal; it’s an experience filled with warmth and nostalgia.
Imagine gathering around the table with loved ones, each person customizing their bowl with bright and vibrant toppings—the colors practically dance off the plate! The juicy chicken, infused with the fragrant notes of garlic and herbs, pairs so beautifully with the coolness of tzatziki that you might find yourself lost in the flavors. These Chicken Gyro Bowls remind us of summer days spent outdoors, sharing stories and laughter under the sun. With just 30 minutes from start to finish, it’s more than easy; it’s a loving tribute to those cherished moments we hold dear.
Grandma’s Easy Chicken Gyro Bowls: A Heartwarming Taste of Tradition
Welcome to the comforting world of my Grandma’s Easy Chicken Gyro Bowls! This recipe is like a warm hug on a plate—a delightful mix of juicy chicken thighs marinated in aromatic spices and served over fluffy rice with a generous dollop of homemade tzatziki. It’s quick enough for a weekday dinner but special enough for gatherings with friends or family. Get ready; we’re about to embark on a culinary journey that will fill your kitchen with enticing aromas and your heart with joy!
Ingredients:
As we dive into this delightful recipe, let’s talk about each ingredient that plays its part in crafting these unforgettable Chicken Gyro Bowls. Every element matters—each one brings something unique to the table!
- 1.5 lbs boneless, skinless chicken thighs. Oh, these are truly the star of our show! Chicken thighs are often overlooked in favor of breasts, but believe me when I say they stay juicier and more flavorful during cooking—just like Grandma always insisted! Their slightly higher fat content means they won’t dry out as easily if you accidentally leave them on the heat for too long. Look for thighs that are plump and fresh; they should have a nice pink hue. If you’re in a pinch, you can use chicken breasts instead—but be sure to marinate them longer since they tend to be leaner.
- 3 tablespoons olive oil. This liquid gold is crucial for our marinade! A good-quality olive oil not only adds depth but also helps tenderize the chicken while imparting rich flavor as it cooks. When selecting olive oil, choose extra virgin for its robust taste—it makes all the difference! If you’re out of olive oil, avocado oil works wonderfully as a substitute due to its high smoke point.
- 2 tablespoons fresh lemon juice. The brightness of lemon juice elevates this dish by balancing flavors beautifully. It cuts through richness and enhances all those lovely spices we’ve added to our marinade. Freshly squeezed juice is essential here—bottled varieties can sometimes taste flat or overly sweet. If lemons aren’t available, lime juice can work as an excellent alternative!
- 3 cloves garlic (minced finely). Ahh, garlic—the magical ingredient that turns ordinary dishes into extraordinary experiences! Minced finely ensures it releases its bold flavor effectively throughout your marinade without overpowering other ingredients. If you’re feeling adventurous or want an even deeper flavor profile, try roasting your garlic first for a sweet nuttiness.
- 1 tablespoon dried oregano. Oregano is one of those herbs that transports you straight to Mediterranean shores! Its earthy notes provide warmth and depth to our dish while complementing the lemon beautifully. Always check for freshness; older herbs can lose their potency quickly. If you have fresh oregano on hand—lucky you! You can substitute about three times more fresh herbs than dried.
- 1 teaspoon dried thyme. Thyme adds an aromatic quality that rounds out our marinade perfectly—the ideal partner for oregano in this dish! It carries subtle floral hints that deepen the overall flavor profile without hogging the spotlight. Just like oregano, ensure your thyme is fresh by testing its aroma; if it smells faint or stale, it’s time to restock!
- 1 teaspoon salt & 1/2 teaspoon black pepper. These two seasoning powerhouses are essential for enhancing all flavors in our bowls—not too much salt but enough to bring everything together harmoniously! Salt serves as a flavor enhancer while black pepper adds just a hint of heat without overwhelming your palate.
- 1/2 teaspoon paprika. This beautiful spice not only contributes color but also provides a subtle smokiness that makes every bite utterly intoxicating! Look for sweet paprika here rather than hot unless you want an unexpected kick!
- 1 cup Greek yogurt (full-fat). Greek yogurt is key for our creamy tzatziki sauce—it gives us that luscious mouthfeel we crave while being tangy enough to balance out richer elements like feta cheese later on in our bowls! Full-fat yogurt yields the best texture; low-fat options can sometimes be watery or lack creaminess.
- 1 large cucumber (grated and thoroughly drained) & 2 cloves garlic (minced) & 2 tablespoons fresh lemon juice & 1 tablespoon olive oil & 1 tablespoon fresh dill (finely chopped) & to taste salt: Here we create our heavenly tzatziki sauce! Each ingredient plays an important role: cucumber brings refreshing crispness but must be grated and drained well—nobody wants watery tzatziki! That’s where Grandma’s trick comes in: squeeze out excess moisture using a clean tea towel or cheesecloth before mixing with yogurt so we achieve perfect consistency every time.
- 2 cups cooked rice (fluffy long-grain): Rice serves as our lovely base—a neutral canvas absorbing all those incredible flavors from above while adding satisfying texture beneath your toppings! Long-grain rice keeps things light without clumping together too much—think fluffy clouds instead!
- 1 large cucumber (diced) & 2 large tomatoes (diced) & 1/2 red onion (thinly sliced): These vibrant veggies offer freshness alongside color contrasts in each bowl—perfect components for layering texture atop rice while bringing bright flavors reminiscent of summer gardens!
- 1/2 cup crumbled feta cheese: Ahh…feta cheese—the salty briny delight that’ll elevate everything else on your plate by adding complexity through creaminess contrasted against crunchy veggies below…just imagine biting into it alongside juicy chicken!
- 1/4 cup Kalamata olives: A touch of Mediterranean flair comes through these rich olives—they pack an intense punch full-bodied flavor wise yet add beautiful visual appeal when scattered across bowls!
- Fresh parsley (for garnish): Finally—we finish things off with bright green parsley sprinkled atop everything—an aromatic final touch signaling completion while inviting guests over visually!
Equipment You’ll Need:
Now that we’ve gathered all these wonderful ingredients let’s talk about what tools will help us bring this dish together seamlessly! Having the right equipment makes cooking feel less daunting and more enjoyable—it transforms each step into a joyful experience rather than just another task on your list.
- Medium bowl – Essential for mixing marinades effortlessly while allowing enough space for tossing ingredients thoroughly without risking spills everywhere else on your countertop!
- Large skillet – A critical component where magic happens—this sturdy pan will sear our marinated chicken flawlessly until golden brown crusts develop alongside juicy interiors…trust me; you’ll hear delightful sizzling sounds resonating throughout kitchen air once it’s time!
- Grater or food processor – Either option helps achieve finely grated cucumbers needed for tzatziki sauce—you want them small enough so they blend seamlessly into yogurt mixture instead creating unwanted chunks disrupting creamy flow when drizzling later on top bowls!
- Tea towel or cheesecloth – For draining excess moisture from cucumbers after grating; this step ensures optimal consistency during tzatziki mixing thus making sure every spoonful stays thick yet smooth rather than watery messes served up at dinner tables everywhere…
Step 1: The Marinade Magic
I always start here because it’s where the love really begins—in creating layers upon layers of flavor through careful marinating techniques passed down from generations past until today! In a medium bowl, whisk together olive oil, lemon juice (freshly squeezed!), minced garlic cloves along with dried oregano & thyme plus salt/pepper/paprika until everything blends harmoniously together like old friends catching up after years apart… Once mixed well enough so no individual ingredient stands out too strongly—it’s time to add those luscious boneless skinless chicken thighs into this divine concoction ensuring they’re completely coated by swirling around gently within marinade before letting sit undisturbed soaking up all goodness inside fridge covered lightly at least fifteen minutes prior grilling away later…
Step 2: Crafting Creamy Tzatziki
While my chicken marvelously marinates away let’s shift focus towards crafting tzatziki sauce—the creamy counterpart bringing balance between richness found within meats juxtaposed against refreshing crunch offered up via diced veggies atop next steps down line… First thing first though—we need grated cucumbers prepared properly so they don’t release unwanted water during mixing process later resulting in watery disasters ruining otherwise perfect textures achieved otherwise… So grab clean tea towel wrap grated pieces tightly squeezing out any excess moisture then set aside momentarily once done prepping further ingredients like Greek yogurt added into separate bowl followed closely behind by drained cucumber bits along minced garlic remaining lemon juice drizzle measure plus dollop extra virgin olive oil finally finishing touch being freshly chopped dill generously sprinkled throughout before seasoning lightly pinch salt stirring everything together until silky smooth leaving no lumps hiding beneath surface waiting patiently chilling inside fridge until ready serve alongside warm bowls awaiting delicious toppings soon follow suit!
Step 3: Sizzling Chicken Time
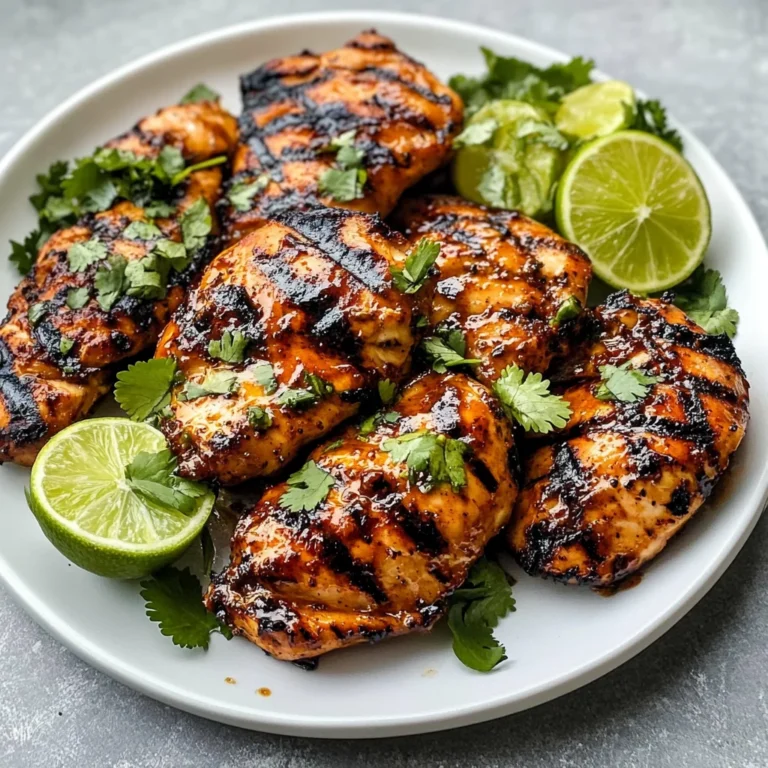
Now comes one most exciting parts—searing marinated chicken thighs till golden brown crust forms outside locking juicy flavors inside while filling room full intoxicating scents wafting through air enticing everyone nearby come closer wanting see what’s happening next… Heat large skillet over medium-high flame letting it warm adequately beforehand so chick thighs sizzle nicely upon contact forming perfect char marks without sticking problem arising later down line… Once hot enough place each thigh carefully onto pan avoiding overcrowding risking steaming instead crispy textures developing simultaneously flipping once halfway through cooking time approximately six-seven minutes per side until internal temperature reaches safe levels around165°F followed resting period post-cooking five minutes prior slicing against grain yielding tender pieces ready place atop warm fluffy rice nestled underneath awaiting vibrant toppings burst forth colors enhance visual appeal dining experience overall making everyone eager dig right into feast laid spread ahead them tonight…
Step 4: Assembling Your Masterpiece
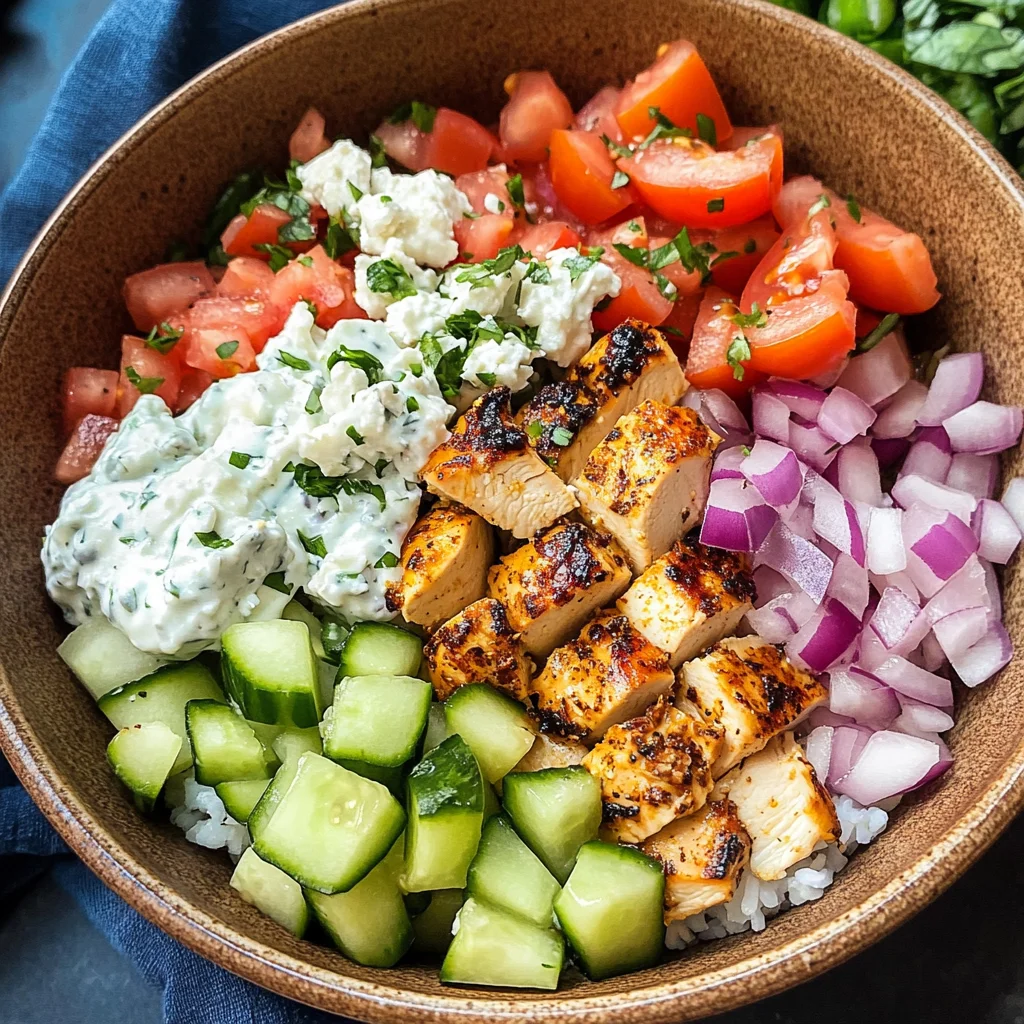
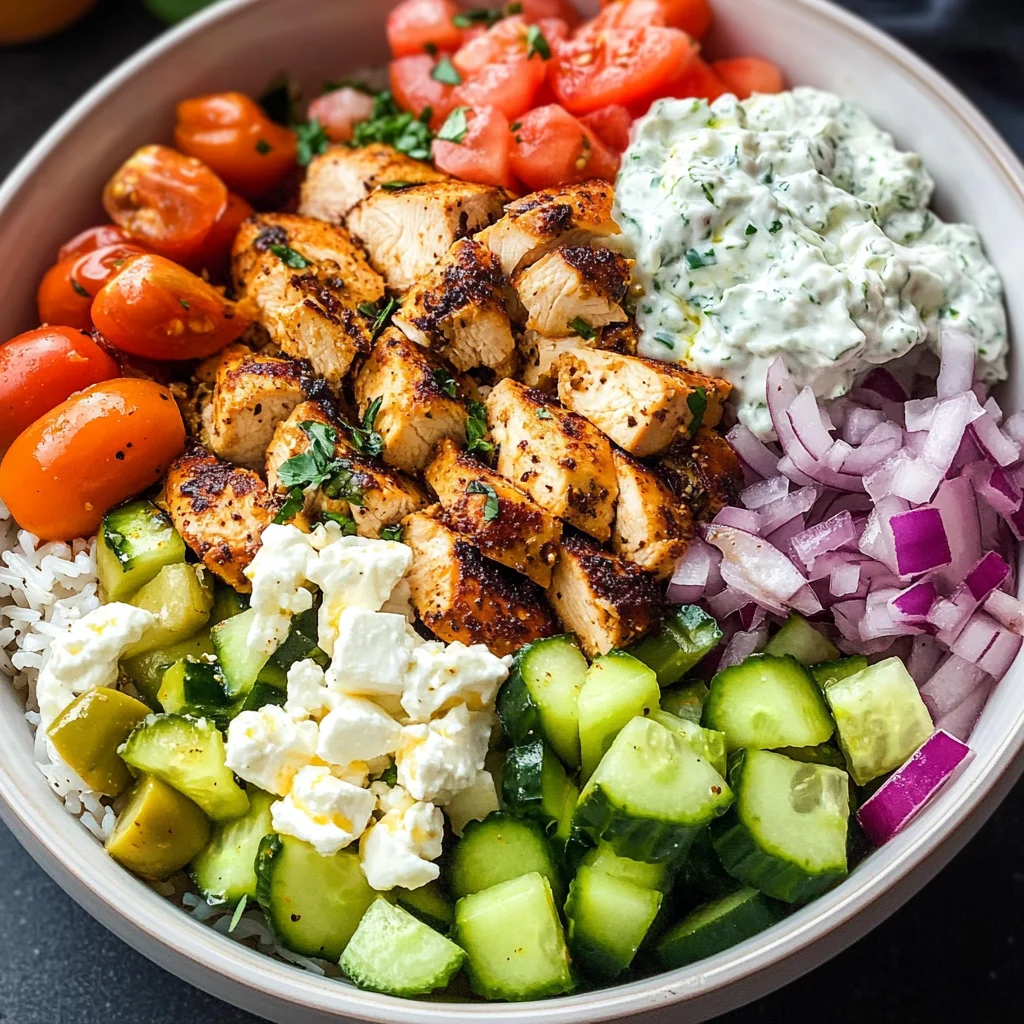
This part is truly where fun factor elevates high beyond expectations as everyone gets involved customizing their own unique creations tailored precisely according preferences personal tastes enjoyed best way possible… Start dividing warm cooked rice evenly among four bowls providing hearty base layer supporting upcoming selections chosen freely by diners themselves starting off sliced grilled chicken arranged neatly center stage then allowing guests sprinkle diced cucumbers tomatoes deep red hues contrasting against sharp white crumbles feta cheese tossed along side dark kalamata olives showcasing stunning array colors inviting anticipation toward imminent indulgence lying ahead waiting eagerly devour soon thereafter once generous dollops homemade tzatziki crowned atop everything garnished final flourish parsley sprigs scattered artfully around edges completing picture-perfect presentation enhancing both flavors visual aesthetics alike leaving lasting impressions behind satisfied smiles faces surrounding table tonight…
And there you have it—Grandma’s Easy Chicken Gyro Bowls brought right into your own kitchen filled not only deliciousness but also heartfelt connection reminding us cherish family traditions passed down lovingly over years gone by weaving stories shared moments spent together enjoying simple pleasures amidst chaos modern life often brings forth daily… So gather loved ones close whip up batch tonight relish every bite savoring happiness wrapped up snugly within comforting embrace these glorious bowls served hot fresh straight off stove top ready share joy found within delicious meals created home kitchens everywhere across world today still thriving strong amidst changing times ahead… Enjoy every moment—I promise you won’t regret diving headfirst into adventure awaiting delicious discoveries waiting explore upon plates served proudly tonight!
Step 5: Sizzling the Chicken to Perfection
Once your chicken has marinated and soaked up that magical blend of flavors, it’s time to fire up the skillet! Heat a large skillet over medium-high heat until it’s hot enough that you can feel the warmth radiating from it. This step is absolutely crucial because a hot pan will help achieve that beautiful golden crust on your chicken, which not only adds texture but also locks in all those juicy flavors. You’ll want to carefully lay the marinated chicken thighs into the skillet, giving them space to breathe—crowding the pan can lead to steaming rather than searing, and we definitely want that crisp exterior!
Now here’s where patience comes into play—don’t touch those thighs for about 6-7 minutes! Trust me, this waiting game is essential. The natural sugars in the marinade will caramelize beautifully, creating that enticing golden color while sealing in moisture. You’ll know it’s time to flip them when they release easily from the pan and have developed a nice crust. Once you’ve flipped them over, give them another 6-7 minutes on this side too. To ensure they’re cooked through, use a meat thermometer; you’re aiming for an internal temperature of 165°F (75°C). After cooking, let the chicken rest for about 5 minutes before slicing—this allows the juices to redistribute throughout the meat, keeping each bite juicy and tender.
Step 6: Assembling Your Flavorful Bowls
Now comes one of my favorite parts—the assembly! Grab four beautiful bowls and start with a generous scoop of that fluffy long-grain rice you cooked earlier. I’ve always found that rice acts as a comforting base for all those vibrant toppings we’re about to add. It’s like a blank canvas waiting for colors and textures to come alive! Use about half a cup per bowl, ensuring it’s warm so it will meld beautifully with all the other components.
Next, slice your rested chicken thighs against the grain into delightful pieces—aim for around half an inch thick so they’re easy to eat but still substantial enough to showcase their juiciness. Gently place the slices atop your rice, allowing each piece to shine as if inviting everyone to dive in. The visual contrast of warm chicken against the white rice is stunning and makes your heart flutter with anticipation! Now let’s talk toppings: gather your diced cucumber, tomatoes, thinly sliced red onion, crumbled feta cheese, and Kalamata olives. Each ingredient brings its own unique flavor and texture—a symphony of freshness that truly elevates this dish.
Step 7: Drizzling on Grandma’s Tzatziki
Oh! The pièce de résistance—the tzatziki sauce! This creamy concoction is where all those flavors meet in perfect harmony. Remember that tzatziki we prepared earlier? Now it’s time to bring it out of hiding from the fridge! Give it a good stir before using; you want everything well-combined so every dollop delivers that refreshing burst of flavor.
Generously spoon your homemade tzatziki over each bowl of chicken and rice; don’t be shy here—this creamy goodness is what ties everything together! Picture it: tangy yogurt mingling with fresh herbs and cool cucumber creates an utterly intoxicating experience for your taste buds. Not only does it enhance every bite, but it also brings moisture that complements the savory elements perfectly. And just like Grandma always said, “A little extra tzatziki never hurt anyone!” So go ahead and pile it on!
Step 8: Garnishing for That Extra Touch
We’re almost there; just one more step before enjoying this culinary masterpiece! Finish off each bowl with a sprinkle of freshly chopped parsley for both color and fresh flavor—it adds a lovely pop against all those warm tones. If you’d like, toss on some additional crumbled feta or olives for extra richness; these little touches can elevate your bowls from great to truly extraordinary.
Take a moment here—stand back and admire your creation! The vibrant colors are simply irresistible—the greens from cucumbers and parsley pop against the rich hues of chicken and earthy olives. However beautiful they look though, I promise you—they taste even better! Serve these bowls immediately while everything is still warm; gather around with family or friends because this meal is meant to be shared and savored together. Don’t forget to take photos before digging in—you’ll want memories of this incredible feast!
Final Touches
As you sit down with those you love most around this table filled with Grandma’s Easy Chicken Gyro Bowls, allow yourself to relish in not just the delicious food but also in memories shared over meals past. With every bite bursting with flavor—from succulent chicken coated in fragrant herbs to refreshing tzatziki cooling off each mouthful—you’ll find comfort reminiscent of home-cooked love.
So there you have it—a recipe steeped in tradition yet so easy to whip up any night of the week! I hope this dish becomes as cherished in your home as it has been in mine through generations. Happy cooking!
Storage and Enjoyment Tips for Your Grandma’s Easy Chicken Gyro Bowls
Now that you’ve created a masterpiece of flavor with Grandma’s Easy Chicken Gyro Bowls, it’s time to dig in and enjoy! But what if you have leftovers? Fear not, my friend; these bowls are just as delightful the next day. Let’s dive into how to store them properly so that every bite continues to taste like a warm hug from your grandma.
Storing Leftover Grandma’s Easy Chicken Gyro Bowls
To keep your delicious chicken gyro bowls fresh, I recommend storing them in airtight containers. Glass containers work wonderfully because they don’t retain odors and are easy to reheat. Make sure to separate any toppings—like diced cucumbers and tomatoes—from the rice and chicken before sealing them up; this keeps everything crisp and vibrant. If stored properly in the fridge, these bowls will stay good for about 3-4 days. Here’s a little pro tip: placing a slice of bread in your container can help absorb excess moisture, ensuring your chicken remains juicy while keeping veggies crunchy. Believe me, it makes a difference! When it’s time to enjoy these again, simply reheat the chicken in a skillet for a few minutes until warmed through, or pop it in the microwave if you’re in a hurry. The flavors meld beautifully overnight, making each bite even more satisfying than the last.
Freezing Components for Later
If you want to take meal prep to another level, consider freezing some components of this recipe for later enjoyment! The marinated chicken is perfect for freezing; simply place it in freezer-safe bags or containers before cooking. It can last up to 3 months frozen without losing its deliciousness. When you’re ready to use it, just thaw it overnight in the fridge before cooking. This approach means you can whip up an incredible dinner with minimal effort on those busy weeknights when time is tight but flavor is non-negotiable! Imagine pulling out perfectly seasoned chicken straight from your freezer—it’s a game-changer that adds convenience without compromising on taste.
Dinner
Grandma’s Easy Chicken Gyro Bowls

Experience the joy of Grandma’s Easy Chicken Gyro Bowls—a flavorful recipe perfect for family dinners! Create yours today!
- Prep Time: 15 minutes
- Cook Time: 15 minutes
- Total Time: 30 minutes
- Yield: Serves 4
- Category: Main
- Method: Skillet
- Cuisine: Mediterranean
Ingredients
- 1.5 lbs boneless, skinless chicken thighs
- 3 tablespoons olive oil
- 2 tablespoons fresh lemon juice
- 3 cloves garlic (minced)
- 1 tablespoon dried oregano
- 1 teaspoon salt
- 1 cup Greek yogurt (full-fat)
- 1 large cucumber (grated and drained)
- 2 cups cooked rice (fluffy long-grain)
- Diced cucumbers for toppings
- Diced tomatoes for toppings
- Thinly sliced red onion for toppings
- Crumbled feta cheese for garnish
- Kalamata olives for garnish
Instructions
- In a medium bowl, whisk together olive oil, lemon juice, minced garlic, oregano, salt, and pepper.
- Add chicken thighs to the marinade and coat thoroughly. Let sit for at least 15 minutes.
- While the chicken marinates, make tzatziki by mixing Greek yogurt, grated cucumber (squeezed to remove excess moisture), minced garlic, lemon juice, olive oil, dill, and salt in a separate bowl. Chill until ready to use.
- Heat a large skillet over medium-high heat. Add marinated chicken thighs and cook for approximately 6-7 minutes per side until golden brown and cooked through (internal temperature should reach 165°F). Let rest before slicing.
- Assemble bowls by placing a serving of rice at the bottom, topped with sliced chicken, diced vegetables, feta cheese, olives, and generous dollops of tzatziki.
Nutrition
- Serving Size: 1 bowl (approximately 400g)
- Calories: 590
- Sugar: 6g
- Sodium: 880mg
- Fat: 34g
- Saturated Fat: 9g
- Unsaturated Fat: 25g
- Trans Fat: 0g
- Carbohydrates: 36g
- Fiber: 3g
- Protein: 39g
- Cholesterol: 130mg