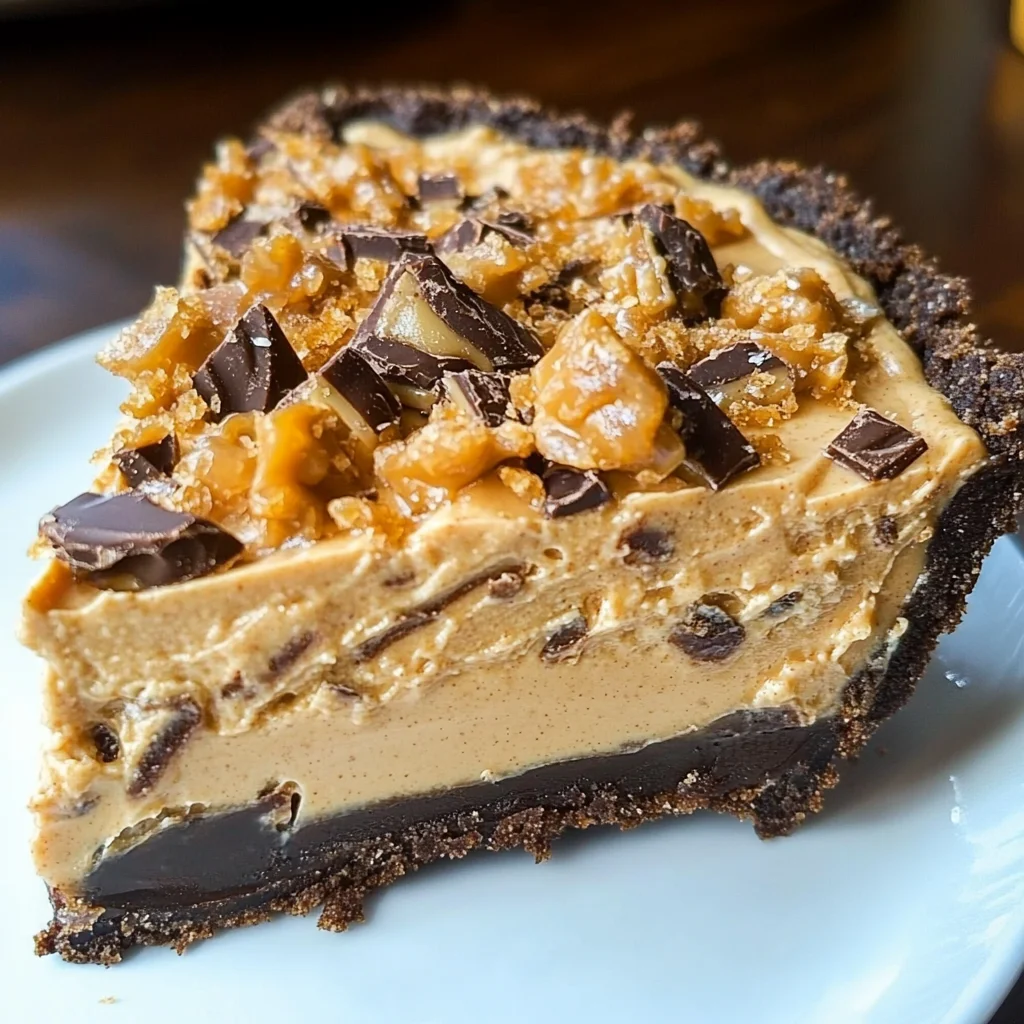
Butterfinger Pie
If you’re looking for a dessert that makes everyone smile, look no further than this Butterfinger Pie. It’s a delightful, no-bake treat that’s perfect for any occasion, whether it’s a busy weeknight or a family gathering. The creamy peanut butter and sweet Butterfinger candy come together to create a pie that is both rich and refreshing, making it a crowd-pleaser time and time again.
What I love about this recipe is how easy it is to whip up. You can spend just 15 minutes preparing it, then let the fridge do the rest of the work. Plus, it’s one of those desserts that feels indulgent without being overly complicated. Trust me, once you serve this Butterfinger Pie, your friends and family will be asking for seconds!
Why You’ll Love This Recipe
- Super simple preparation: No baking required! Just mix, fold, and chill.
- Family-friendly flavor: Everyone loves the combination of peanut butter and chocolate!
- Make-ahead convenience: Prepare it a day in advance for stress-free entertaining.
- Versatile dessert: Perfect for potlucks, parties, or simply treating yourself at home.

Ingredients You’ll Need
You’ll find that the ingredients for this Butterfinger Pie are simple and wholesome. They come together beautifully to create a dessert that feels special yet is incredibly easy to make. Here’s what you need:
For the Filling
- 1 (8-ounce) package cream cheese (room temperature)
- 1/2 cup creamy peanut butter
- 2 teaspoons vanilla extract
- 1 1/2 cups powdered sugar
- 1 (12.5-ounce) bag fun-sized butterfinger bars (crushed; reserve 2 bars to sprinkle on top)
- 1 (8-ounce) container Cool Whip (thawed)
For the Crust
- 1 store-bought oreo or chocolate graham cracker crust
Variations
One of the best things about Butterfinger Pie is its flexibility! You can easily customize it based on what you have on hand or your personal taste preferences.
- Add some crunch: Include chopped nuts like peanuts or pecans for an extra layer of texture.
- Switch up the toppings: Use whipped cream or even chocolate sauce for drizzling on top.
- Go for different candies: Substitute Butterfingers with other candy bars like Snickers or Milky Way for a fun twist.
- Make it healthier: Try using Greek yogurt instead of cream cheese for a lighter version.
How to Make Butterfinger Pie
Step 1: Mix the Base
Start by placing your room temperature cream cheese and peanut butter in a large mixing bowl. Adding vanilla extract enhances the flavor beautifully. Beat them together with an electric mixer until smooth. This step is crucial because it ensures there are no lumps in your filling!
Step 2: Sweeten Up
Next, beat in the powdered sugar until everything is well combined and smooth. This adds just the right amount of sweetness that balances out the creaminess of the cheese and peanut butter.
Step 3: Fold in the Fun
Gently fold in the crushed Butterfinger bars into your mixture. This brings in that signature crunch and flavor we love!
Step 4: Add Cool Whip
Now it’s time to fold in the Cool Whip delicately until fully incorporated. This will give your pie its light and fluffy texture—absolutely essential for that dreamy mouthfeel.
Step 5: Assemble Your Pie
Spread your creamy filling evenly into the prepared crust. Don’t forget to sprinkle those reserved crushed Butterfinger bars on top; they add a lovely finishing touch!
Step 6: Chill Out
Refrigerate your Butterfinger Pie for at least 4 hours before serving. This step allows all those flavors to meld together while setting up nicely so every slice holds its shape.
And there you have it! A deliciously easy dessert that’s sure to become a favorite at your table. Enjoy every creamy bite!
Pro Tips for Making Butterfinger Pie
Making Butterfinger Pie is a breeze, but these tips will help you achieve the absolute best results!
- Use room temperature cream cheese: This helps to create a smoother filling, making it easier to blend with the other ingredients and ensuring a creamy texture throughout your pie.
- Crush Butterfinger bars properly: Use a rolling pin or food processor to crush the bars into small pieces. This ensures that every slice of pie has just the right amount of crunchy goodness!
- Chill longer for better flavor: Although you can serve this pie after 4 hours in the refrigerator, letting it chill overnight allows the flavors to meld beautifully and enhances the overall taste.
- Experiment with toppings: Feel free to get creative! You can add whipped cream, chocolate syrup, or even crushed peanuts on top for an extra layer of flavor and texture.
- Make it ahead of time: This pie is perfect for meal prep! You can make it a day in advance for parties or family gatherings, saving you time for last-minute preparations.
How to Serve Butterfinger Pie
Serving Butterfinger Pie is all about presentation and creating a delightful experience for your guests. Here are some great ideas!
Garnishes
- Whipped cream: A dollop of whipped cream on top not only adds a creamy texture but also makes the pie look irresistible.
- Chocolate syrup drizzle: A light drizzle of chocolate syrup can enhance the chocolate flavor in the Butterfinger bars and add an elegant touch.
- Chopped nuts: Sprinkling chopped peanuts or pecans on top adds crunch and pairs wonderfully with the pie’s rich flavors.
Side Dishes
- Fresh fruit salad: A refreshing mix of seasonal fruits balances out the sweetness of the pie and provides a burst of color on your dessert table.
- Vanilla ice cream: Classic vanilla ice cream complements the creamy peanut butter filling perfectly. The coldness contrasts nicely with the rich flavors.
- Chocolate covered strawberries: These sweet treats provide a decadent contrast and add a gourmet touch to your dessert spread.
- Coffee or tea: Offering coffee or tea alongside your Butterfinger Pie creates a cozy atmosphere and complements the dessert’s richness beautifully.
With these serving suggestions, your Butterfinger Pie will be an unforgettable treat that everyone will enjoy!
Make Ahead and Storage
This Butterfinger Pie is not only a delightful treat but also a fantastic option for meal prep. You can easily make it ahead of time to save yourself some effort when you’re ready to serve dessert.
Storing Leftovers
- Cover the pie with plastic wrap or store it in an airtight container.
- Keep it in the refrigerator, where it will stay fresh for up to 3 days.
- Always check for freshness before serving leftovers, as the texture may change slightly over time.
Freezing
- If you want to extend its shelf life, you can freeze Butterfinger Pie.
- Wrap the pie tightly in plastic wrap and then place it in a freezer-safe container.
- It can be frozen for up to 2 months. When ready to enjoy, thaw it overnight in the refrigerator before serving.
Reheating
- This recipe is served chilled, so there’s no need for reheating.
- Simply remove from the fridge before serving and let it sit at room temperature for about 10 minutes for optimal texture.
FAQs
Here are some common questions about Butterfinger Pie that can help you along your baking journey!
Can I use other candies instead of Butterfingers in this Butterfinger Pie?
Absolutely! While Butterfingers give this pie its signature flavor, feel free to experiment with your favorite candy bars or even chocolate-covered treats for a unique twist.
How long does Butterfinger Pie last in the fridge?
Your delicious Butterfinger Pie will remain fresh in the refrigerator for about 3 days when stored properly. Just remember to cover it well!
Is Butterfinger Pie suitable for parties?
Yes! This easy, no-bake dessert is perfect for parties and gatherings. Its creamy texture and delightful flavor are sure to impress your guests.
What can I serve with Butterfinger Pie?
Serve this indulgent pie with a dollop of whipped cream or alongside fresh fruit like strawberries or bananas for a refreshing contrast!
Final Thoughts
I hope you find joy in making this easy and satisfying Butterfinger Pie! It’s truly a special dessert that brings smiles all around. Whether it’s a family gathering or just a sweet treat for yourself, this pie is sure to delight. Enjoy every creamy bite and don’t forget to share the love by inviting friends over to try it too!
Butterfinger Pie
Indulge in the delightful experience of making this no-bake Butterfinger Pie! This creamy dessert marries the rich flavors of peanut butter and chocolate, delivering a sweet treat that’s perfect for any occasion—from busy weeknights to festive gatherings. With just a quick 15 minutes of preparation time, you can whip up this crowd-pleaser and let it chill in the fridge while you focus on other tasks. Whether you’re serving it at a party or enjoying it at home, this Butterfinger Pie is sure to bring smiles and requests for seconds!
- Prep Time: 15 minutes
- Cook Time: None
- Total Time: 0 hours
- Yield: Serves approximately 8 slices 1x
- Category: Dessert
- Method: None
- Cuisine: American
Ingredients
- 8 ounces cream cheese (room temperature)
- 1/2 cup creamy peanut butter
- 2 teaspoons vanilla extract
- 1 1/2 cups powdered sugar
- 12.5 ounces fun-sized Butterfinger bars (crushed; reserve 2 for topping)
- 8 ounces Cool Whip (thawed)
- Store-bought chocolate graham cracker crust
Instructions
- In a large mixing bowl, beat together room temperature cream cheese and peanut butter until smooth. Add vanilla extract and mix well.
- Gradually add powdered sugar, mixing until fully combined.
- Fold in crushed Butterfinger bars gently to incorporate their crunch.
- Carefully fold in Cool Whip until the mixture is light and fluffy.
- Spread the filling evenly into the prepared crust and sprinkle reserved Butterfinger pieces on top.
- Refrigerate for at least 4 hours before serving to allow flavors to meld.
Nutrition
- Serving Size: 1 slice (80g)
- Calories: 320
- Sugar: 24g
- Sodium: 240mg
- Fat: 18g
- Saturated Fat: 7g
- Unsaturated Fat: 10g
- Trans Fat: 0g
- Carbohydrates: 35g
- Fiber: 1g
- Protein: 5g
- Cholesterol: 30mg