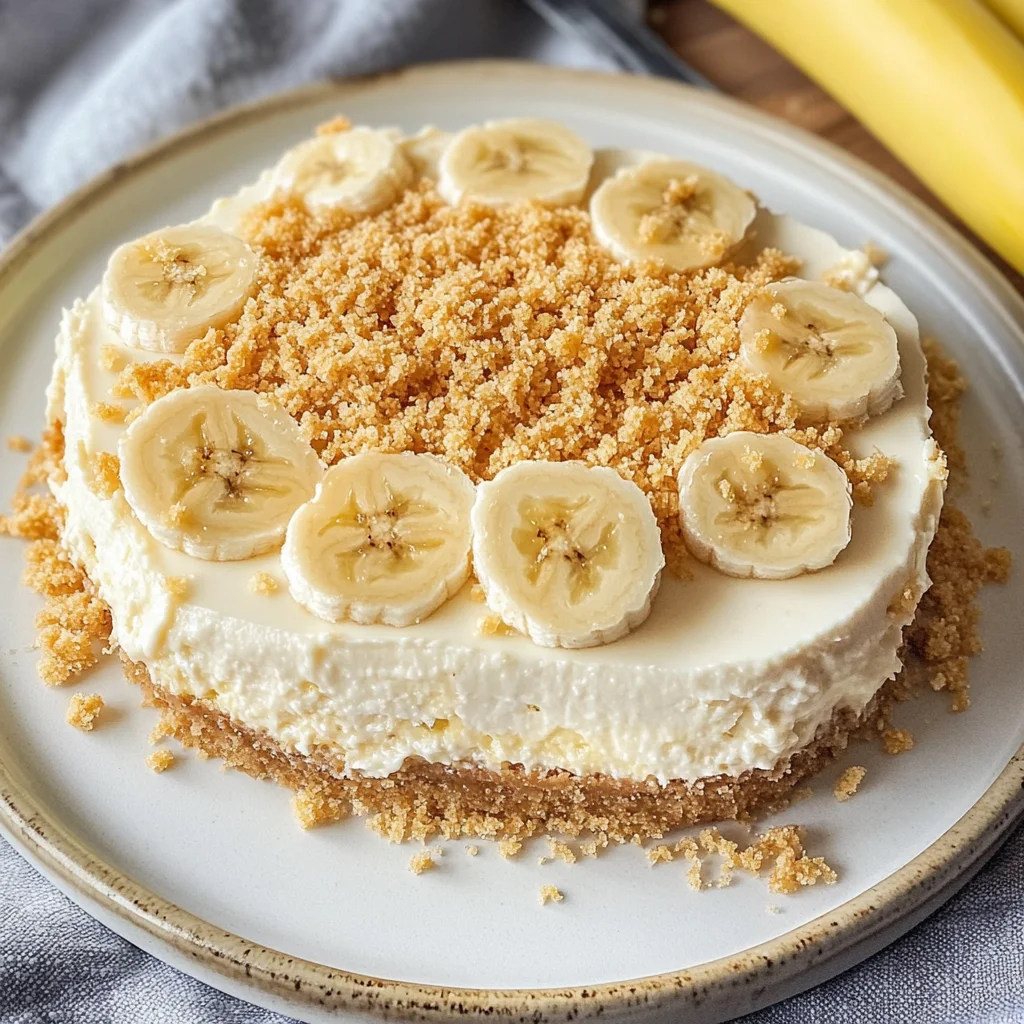
No Bake Banana Pudding Cheesecake
If you’re looking for a dessert that brings a smile to everyone’s face, look no further than this No Bake Banana Pudding Cheesecake! This delightful treat combines the comforting flavors of banana pudding with the rich creaminess of cheesecake, all without turning on the oven. It’s a recipe that holds a special place in my heart, perfect for warm summer days or cozy family gatherings.
What makes this dessert even better is how easy it is to whip up! Whether you’re planning a casual weeknight dinner or need a show-stopping dessert for a potluck, this No Bake Banana Pudding Cheesecake is sure to impress. With its layers of creamy filling and fresh bananas, it’s both simple and indulgent—just what we all crave sometimes!
Why You’ll Love This Recipe
- No Baking Required: This cheesecake comes together quickly and easily without any baking, making it the perfect recipe for beginners.
- Family-Friendly: Kids and adults alike love the classic combination of banana and vanilla wafers, making it a hit at any gathering.
- Make-Ahead Convenience: You can prepare this dessert in advance, allowing it to chill overnight for maximum flavor.
- Light & Airy Texture: The whipped cream gives this cheesecake a lightness that makes each bite melt in your mouth.
- Endless Customization: Feel free to add your own twist with toppings or variations—this recipe is wonderfully flexible!

Ingredients You’ll Need
Let’s gather our ingredients! This No Bake Banana Pudding Cheesecake uses simple and wholesome ingredients that you likely already have in your kitchen. Here’s what you’ll need:
For the Crust:
- Vanilla Wafers: 2 cups, finely crushed. These provide the classic, sweet and crunchy base for our no-bake cheesecake, reminiscent of traditional banana pudding.
- Melted Unsalted Butter: 6 tablespoons. This binds the crushed vanilla wafers together, creating a cohesive and slightly rich crust.
- Granulated Sugar: 2 tablespoons. Adds a touch of extra sweetness to the crust, complementing the overall dessert flavor profile.
For the Cheesecake Filling:
- Cream Cheese: 3 (8-ounce) packages, softened. The foundation of our creamy cheesecake; it’s crucial to use full-fat cream cheese and ensure it’s properly softened for a smooth filling.
- Sweetened Condensed Milk: 1 (14-ounce) can. Adds sweetness and a luscious texture without the need for baking.
- Heavy Whipping Cream: 1 cup, cold. Whipped to stiff peaks, this adds lightness and airiness to the cheesecake.
- Instant Banana Pudding Mix: 1 (3.4-ounce) package. Infuses the cheesecake with that quintessential banana pudding flavor.
- Vanilla Extract: 1 teaspoon. Enhances sweetness and flavor complexity.
- Fresh Lemon Juice: 1 tablespoon. Balances sweetness with a subtle tang.
For the Banana Pudding Layer & Topping:
- Ripe Bananas: 3-4 medium, sliced. Choose ripe but firm bananas for best flavor without mushiness.
- Vanilla Wafers: Additional, for layering and garnish. Adds visual appeal throughout the dessert.
- Whipped Cream or Cool Whip: For topping (optional). Adds an extra layer of creamy richness.
- Sprinkling of Vanilla Wafer Crumbs: For garnish (optional). Enhances presentation with added texture.
Variations
This No Bake Banana Pudding Cheesecake is wonderfully flexible! Here are some fun ways to switch things up:
- Add Chocolate: Drizzle chocolate sauce over each layer or mix in chocolate chips for a delicious twist!
- Use Different Fruits: Swap in strawberries or blueberries if you want to change up the fruit flavor while keeping things fresh.
- Try Alternative Creams: Use coconut cream instead of heavy whipping cream for a tropical flair!
- Mix Up Your Toppings: Experiment with different toppings like crushed nuts or caramel sauce for extra crunch and taste.
How to Make No Bake Banana Pudding Cheesecake
Step 1: Prepare the Crust
In a food processor, pulse the vanilla wafers until finely crushed into crumbs. If you don’t have a food processor handy, just toss those wafers into a zip-top bag and crush them using a rolling pin—it works like magic! In a medium bowl, combine these crumbs with melted butter and sugar until everything resembles wet sand. This step is important because it ensures your crust holds together beautifully!
Step 2: Press the Crust
Now it’s time to press that crumb mixture into your springform pan! Use either the bottom of a measuring cup or glass to pack it firmly into an even layer across the bottom of your pan. Chilling it in the refrigerator while you make your filling helps set that crust so it’s nice and sturdy when you’re ready to slice into your cheesecake.
Step 3: Make the Cream Cheese Mixture
In another large bowl (the electric mixer will be your friend here!), beat your softened cream cheese until it’s super smooth—no lumps allowed! Gradually add in sweetened condensed milk while mixing on low speed until well combined. Scrape down those bowl sides as needed—you want every bit mixed together perfectly.
Step 4: Whip the Cream
Using another chilled bowl (this helps!), whip your heavy whipping cream until stiff peaks form—be careful not to overwhip here! Stiff peaks mean that when you lift out your whisk, those peaks stand tall without falling over—this lightness is what gives our cheesecake its beautiful texture.
Step 5: Fold Everything Together
Gently fold that whipped cream into your cream cheese mixture in two parts—think tenderly here! After folding in half of it, add in instant banana pudding mix alongside vanilla extract and lemon juice before folding everything together until just combined. We want lightness here so take care not to overmix!
Step 6: Layer It Up
Remove your chilled crust from its cozy spot in the fridge and start layering! Begin with sliced bananas followed by more vanilla wafers before pouring half of that luscious cheesecake filling over them evenly. Repeat this process one more time so you end up with layers upon layers of deliciousness!
Step 7: Chill Time
Cover that springform pan tightly with plastic wrap before placing it back in the refrigerator for at least six hours—or ideally overnight if you can wait! This chilling stage is key because it allows all those flavors to meld beautifully while setting up properly.
Step 8: Serve & Enjoy!
When you’re ready to serve up slices of heaven, carefully release your springform pan by running a thin knife around its edges first—it helps ensure clean removal! Top off each slice right before serving with whipped cream, extra banana slices or maybe even some vanilla wafer crumbs—you deserve every bit of deliciousness this no-bake treat has to offer!
Pro Tips for Making No Bake Banana Pudding Cheesecake
Creating the perfect no-bake banana pudding cheesecake is a delightful adventure, and these tips will ensure your dessert turns out wonderfully every time!
- Use Room Temperature Cream Cheese: Make sure your cream cheese is softened at room temperature before mixing. This prevents lumps and ensures a silky-smooth filling that mixes well with the other ingredients.
- Chill Your Mixing Bowl: For an even fluffier whipped cream, chill your mixing bowl in the freezer for 10-15 minutes before whipping the cream. This helps the cream whip up faster and hold its shape better.
- Layer Strategically: When layering bananas and vanilla wafers, try to alternate layers evenly. This creates a beautiful presentation and ensures that every slice contains a delightful mix of flavors and textures.
- Let It Set Overnight: While you can enjoy this cheesecake after just six hours, letting it chill overnight allows all the flavors to meld beautifully, making each bite even more delicious.
- Avoid Browning Bananas: To keep your bananas looking fresh and vibrant, layer them just before serving or lightly brush them with lemon juice. This will help maintain their color and texture.
How to Serve No Bake Banana Pudding Cheesecake
This no-bake banana pudding cheesecake not only tastes incredible but also looks stunning on any dessert table. Here’s how to present it beautifully!
Garnishes
- Whipped Cream: A generous dollop of whipped cream on top adds a classic touch and enhances the creamy texture of the cheesecake.
- Chocolate Shavings: For a decadent twist, sprinkle some chocolate shavings over the top. The rich flavor pairs wonderfully with the banana.
- Fresh Mint Leaves: A few fresh mint leaves can add a pop of color and freshness, making your dessert look even more inviting.
Side Dishes
- Fresh Fruit Salad: A light fruit salad made with seasonal fruits can complement the richness of the cheesecake while providing a refreshing balance.
- Vanilla Ice Cream: Serve slices of cheesecake alongside vanilla ice cream for an indulgent treat that enhances the creamy flavors.
- Coffee or Tea: Offering a warm beverage like coffee or herbal tea can balance out the sweetness of the cheesecake and make for a comforting pairing.
- Chocolate-Covered Strawberries: These sweet treats are perfect alongside your cheesecake, adding an elegant touch to your dessert spread while providing a delightful contrast in flavor.
With these serving suggestions and pro tips, you’ll be all set to impress family and friends with your no-bake banana pudding cheesecake! Enjoy every creamy, dreamy bite!
Make Ahead and Storage
This No Bake Banana Pudding Cheesecake is perfect for meal prep! You can easily make it ahead of time, allowing the flavors to meld beautifully while saving you time on special occasions or busy weeknights.
Storing Leftovers
- Store any leftover cheesecake in an airtight container in the refrigerator.
- It will keep well for up to 3-4 days.
- If possible, store the toppings separately to keep everything fresh and intact.
Freezing
- Cover the cheesecake tightly with plastic wrap and then with aluminum foil before freezing.
- It can be frozen for up to 2-3 months.
- To thaw, place it in the refrigerator overnight before serving.
Reheating
- There’s no need to reheat this no-bake cheesecake; it’s best enjoyed chilled.
- If you prefer a softer texture, you can let it sit at room temperature for about 15-20 minutes before slicing.
FAQs
Here are some common questions about making this delightful dessert!
Can I use another type of pudding mix in the No Bake Banana Pudding Cheesecake?
Yes! While banana pudding mix is traditional, feel free to experiment with other flavors like vanilla or butterscotch for a unique twist.
How long does the No Bake Banana Pudding Cheesecake need to set?
For optimal results, chill the cheesecake for at least 6 hours or overnight. This allows it to firm up properly for easy slicing.
Can I make this No Bake Banana Pudding Cheesecake dairy-free?
Absolutely! Substitute the cream cheese with a dairy-free cream cheese alternative and use coconut cream or a dairy-free whipped topping for the filling.
What’s the best way to slice my No Bake Banana Pudding Cheesecake?
Use a sharp knife dipped in warm water; this helps create clean slices. Wipe the knife after each cut for even better results.
Can I add other fruits to my No Bake Banana Pudding Cheesecake?
Definitely! Consider adding strawberries or blueberries between layers for extra flavor and color. Just ensure they are not overly juicy, so they don’t affect the texture of your cheesecake.
Final Thoughts
This No Bake Banana Pudding Cheesecake is truly a delightful dessert that brings back nostalgic memories while offering a creamy and satisfying treat. I hope you find joy in making it as much as I do. Enjoy every bite and don’t hesitate to share your creations; I’d love to hear how it turns out! Happy baking!
No Bake Banana Pudding Cheesecake
Indulge in the delightful No Bake Banana Pudding Cheesecake, a creamy dessert that’s perfect for any occasion. This luscious cheesecake combines the beloved flavors of banana pudding with a rich, velvety filling—all without the need for baking! Layered with fresh bananas and a sweet vanilla wafer crust, this treat is as visually appealing as it is delicious. Whether it’s a summer gathering or a cozy family dinner, this easy-to-make cheesecake is sure to impress everyone at the table. Simply whip up the ingredients, let it chill, and enjoy every creamy bite!
- Prep Time: 30 minutes
- Cook Time: None
- Total Time: 0 hours
- Yield: Serves approximately 10 slices 1x
- Category: Dessert
- Method: No bake
- Cuisine: American
Ingredients
- 2 cups finely crushed vanilla wafers
- 6 tablespoons melted unsalted butter
- 3 (8-ounce) packages softened cream cheese
- 1 (14-ounce) can sweetened condensed milk
- 1 cup cold heavy whipping cream
- 1 (3.4-ounce) package instant banana pudding mix
- 3–4 medium ripe bananas, sliced
- Optional toppings: whipped cream, vanilla wafer crumbs
Instructions
- Prepare the crust by mixing crushed vanilla wafers, melted butter, and sugar until combined. Press into a springform pan and chill.
- Beat softened cream cheese until smooth. Gradually add sweetened condensed milk and mix well.
- Whip heavy cream in a separate bowl until stiff peaks form. Gently fold into the cream cheese mixture.
- Add banana pudding mix and lemon juice; fold until just combined.
- Layer sliced bananas and vanilla wafers in the chilled crust followed by half of the cheesecake filling. Repeat layers.
- Cover and refrigerate for at least 6 hours or overnight to set before serving.
Nutrition
- Serving Size: 1 slice (120g)
- Calories: 350
- Sugar: 27g
- Sodium: 250mg
- Fat: 23g
- Saturated Fat: 13g
- Unsaturated Fat: 9g
- Trans Fat: 0g
- Carbohydrates: 34g
- Fiber: 1g
- Protein: 4g
- Cholesterol: 70mg