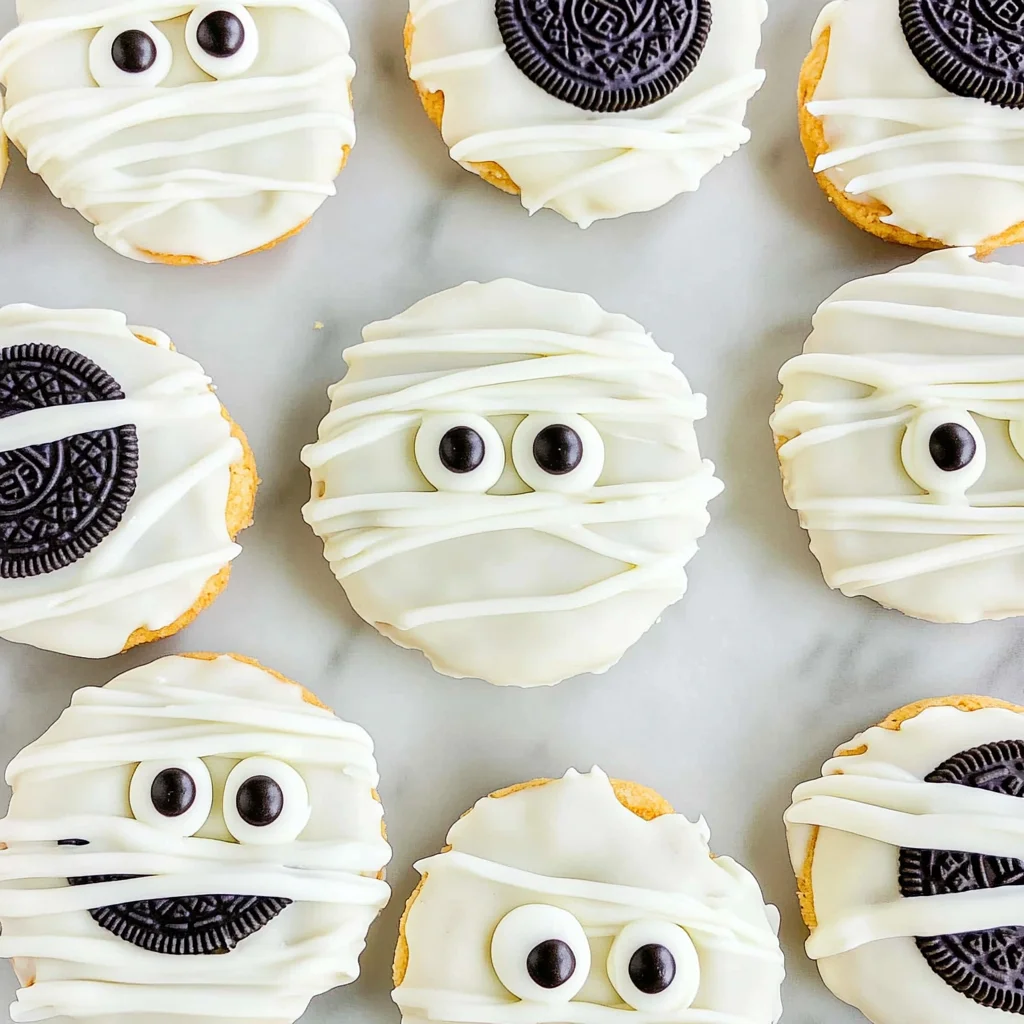
Halloween Mummy Oreo Cookies
If you’re looking for a fun and festive treat to celebrate Halloween, let me introduce you to my favorite Halloween Mummy Oreo Cookies! These delightful cookies are not only adorable but also super simple to make. Dipping Oreo cookies in white chocolate and dressing them up as spooky mummies is an exciting activity that the whole family can enjoy. Whether you’re preparing for a costume party, a school function, or just want something sweet for a cozy night in, these cookies are perfect!
What makes these Halloween Mummy Oreo Cookies so special is how quickly they come together. With just a few ingredients and minimal time in the kitchen, you’ll have a batch of these deliciously decorated cookies ready to impress your friends and family. Plus, they’re always a hit with kids—who can resist those cute little mummy eyes?
Why You’ll Love This Recipe
- Easy to Make: No need for advanced baking skills here! These cookies come together in just 30 minutes.
- Family-Friendly Fun: This recipe is perfect for involving the kids in the kitchen. Let them dip and decorate!
- Versatile Treat: Great for Halloween parties, fall gatherings, or even just a fun dessert at home.
- Deliciously Sweet: The combination of creamy white chocolate and crunchy Oreo cookies creates an irresistible flavor.
Ingredients You’ll Need
Here’s the list of simple, wholesome ingredients you’ll need to whip up these cute Halloween Mummy Oreo Cookies. You probably already have most of them at home!
- Oreo Sandwich Cookies (your fav flavor)
- 2 cups white chocolate melting wafers
- 2 tablespoons paramount crystals¹
- royal icing eyes
Variations
This recipe is wonderfully flexible! Feel free to get creative with flavors and decorations to make these mummies your own.
- Change the Oreos: Use different flavors of Oreo cookies like mint or peanut butter for a unique twist.
- Add Sprinkles: Before the chocolate hardens, sprinkle some colorful edible decorations on top for extra festivity.
- Use Dark Chocolate: Swap out white chocolate for dark chocolate melting wafers if you prefer that rich flavor.
- Try Different Eyes: Instead of royal icing eyes, use candy eyeballs or even mini chocolate chips for fun variations.
How to Make Halloween Mummy Oreo Cookies
Step 1: Prepare Your Workspace
Start by lining your baking sheet with parchment paper or a Silpat mat. This will help prevent sticking and make cleanup a breeze after your cookies are ready!
Step 2: Melt the White Chocolate
In a microwave-safe bowl, combine white chocolate melting wafers and paramount crystals¹. Microwave on medium heat for 30 seconds, then stir slowly. Repeat in 15-second increments until fully melted. This step is crucial because properly melted chocolate ensures an even coating on your Oreos.
Step 3: Dip the Oreos
Grab your Oreo Sandwich Cookies. Using a fork or dipping tool, dip each cookie into the melted white chocolate. Tap lightly on the side of the bowl to remove excess chocolate before placing them on your lined baking sheet. Don’t forget to add your royal icing eyes right away; this will help them stick while the chocolate cools!
Step 4: Decorate Like a Mummy
Pour any remaining melted chocolate into a decorating bag or sandwich bag and snip off the corner gently. Pipe lines across each cookie to create that classic mummy look—just be careful not to cover those adorable eyes! Once you’ve finished decorating, let your Halloween Mummy Oreo Cookies sit until the chocolate hardens completely.
Now all that’s left is to enjoy these spooky treats with family and friends!
Pro Tips for Making Halloween Mummy Oreo Cookies
Making Halloween Mummy Oreo Cookies is a fun and simple process, but a few tips can help you achieve the perfect spooky treat!
- Choose your chocolate wisely: Use high-quality white chocolate melting wafers for a smoother coating. This will not only enhance the flavor but also make the cookies look more appealing with a shiny finish.
- Work quickly: Once you dip the Oreos in chocolate, add the royal icing eyes immediately before the chocolate hardens. This ensures they stick well and don’t fall off later.
- Experiment with flavors: Feel free to use different Oreo flavors like pumpkin spice or mint to add a unique twist to your mummy cookies. Flavor variations can surprise your guests and make your treats even more delightful.
- Pipe with precision: When piping the melted chocolate over the cookies, use a steady hand to create a mummy-like appearance. This adds character and makes them look extra cute.
- Let them set completely: Allow enough time for the chocolate to fully harden before serving or storing. This helps maintain their shape and keeps them looking fresh longer.
How to Serve Halloween Mummy Oreo Cookies
Presenting your Halloween Mummy Oreo Cookies in a creative way can add to the festive spirit of your gathering! Here are some ideas for serving them up.
Garnishes
- Sprinkles: Add festive sprinkles (like orange or black) around each cookie for an extra pop of color that captures the Halloween vibe.
- Chocolate drizzle: A drizzle of dark chocolate on top creates contrast and adds an extra layer of flavor.
Side Dishes
- Pumpkin Spice Dip: A creamy dip made with pumpkin puree, cream cheese, and spices pairs perfectly with these cookies, adding warmth and seasonal flavor.
- Apple Slices: Crisp apple slices provide a refreshing contrast to the sweetness of the cookies. Consider serving them with a caramel dip for that classic fall treat!
- Caramel Corn: Sweet and crunchy caramel corn brings texture and fun to your dessert table, making it an enticing addition alongside your mummies.
- Ghostly Fruit Skewers: Thread pieces of bananas, grapes, or strawberries onto skewers to create ghosts that are both healthy and festive!
With these tips and serving suggestions, you’ll be ready to impress your friends and family at any Halloween gathering! Enjoy creating these deliciously adorable treats!

Make Ahead and Storage
These Halloween Mummy Oreo Cookies are not just a fun treat for the spooky season; they’re perfect for meal prep too! You can whip up a batch ahead of time and store them, making it easy to have a delightful dessert on hand for Halloween parties or family gatherings.
Storing Leftovers
- Place any leftover cookies in an airtight container at room temperature.
- They can be stored for up to one week, but they’re best enjoyed fresh!
Freezing
- To freeze, arrange the cookies in a single layer on a baking sheet and place them in the freezer until solid.
- Once frozen, transfer the cookies into a freezer-safe bag or container. They can be stored for up to three months.
- When ready to enjoy, let them thaw at room temperature for an hour.
Reheating
- You don’t need to reheat these cookies; they are best served at room temperature straight from storage!
- If you prefer them warm, pop them in the microwave for just 5-10 seconds. Enjoy!
FAQs
You might have some questions about making these delightful treats. Let’s address a few common ones!
Can I use other flavors of Oreo cookies for Halloween Mummy Oreo Cookies?
Absolutely! Feel free to experiment with different Oreo flavors like mint, peanut butter, or even seasonal varieties. Each will add its unique twist to your Halloween Mummy Oreo Cookies.
How long do Halloween Mummy Oreo Cookies stay fresh?
When stored properly in an airtight container at room temperature, your Halloween Mummy Oreo Cookies will remain fresh for about one week. You might want to make more than you think you’ll need—they’re that good!
What if I don’t have royal icing eyes?
If you can’t find royal icing eyes, you can easily substitute with mini chocolate chips or candy eyeballs available at most stores. Your Halloween Mummy Oreo Cookies will still look adorably spooky!
Final Thoughts
I hope you enjoy making these Halloween Mummy Oreo Cookies as much as I do! They’re not just tasty but also bring a festive spirit to any gathering. Whether you’re sharing them with friends or keeping them all to yourself (no judgment here!), I know they’ll be a hit. Dive into this delightful recipe and let the spooky fun begin—happy baking!
Halloween Mummy Oreo Cookies

Halloween Mummy Oreo Cookies are the perfect festive treat to delight both kids and adults this spooky season! These adorable cookies feature classic Oreo sandwiches dipped in creamy white chocolate, transformed into cute little mummies with royal icing eyes. Not only are they easy to make in under 30 minutes, but they also offer a fun family activity that encourages creativity in the kitchen. Whether you’re preparing for a Halloween party or simply want a sweet snack for movie night, these cookies will surely impress your guests and add a cheerful touch to your celebrations.
- Prep Time: 15 minutes
- Cook Time: 15 minutes
- Total Time: 30 minutes
- Yield: Approximately 12 servings 1x
- Category: Dessert
- Method: Baking
- Cuisine: American
Ingredients
- Oreo Sandwich Cookies (your favorite flavor)
- 2 cups white chocolate melting wafers
- 2 tablespoons paramount crystals
- Royal icing eyes
Instructions
- Line a baking sheet with parchment paper.
- In a microwave-safe bowl, combine white chocolate melting wafers and paramount crystals. Microwave on medium heat for 30 seconds, then stir. Continue heating in 15-second increments until fully melted.
- Dip each Oreo cookie into the melted chocolate, tapping off excess before placing it on the lined baking sheet. Immediately add royal icing eyes.
- Pour remaining melted chocolate into a decorating bag and pipe lines across each cookie to create mummy wraps without covering the eyes.
- Allow cookies to set until the chocolate hardens completely before serving.
Nutrition
- Serving Size: 1 cookie (25g)
- Calories: 120
- Sugar: 10g
- Sodium: 20mg
- Fat: 7g
- Saturated Fat: 4g
- Unsaturated Fat: 3g
- Trans Fat: 0g
- Carbohydrates: 14g
- Fiber: 0g
- Protein: 1g
- Cholesterol: 0mg